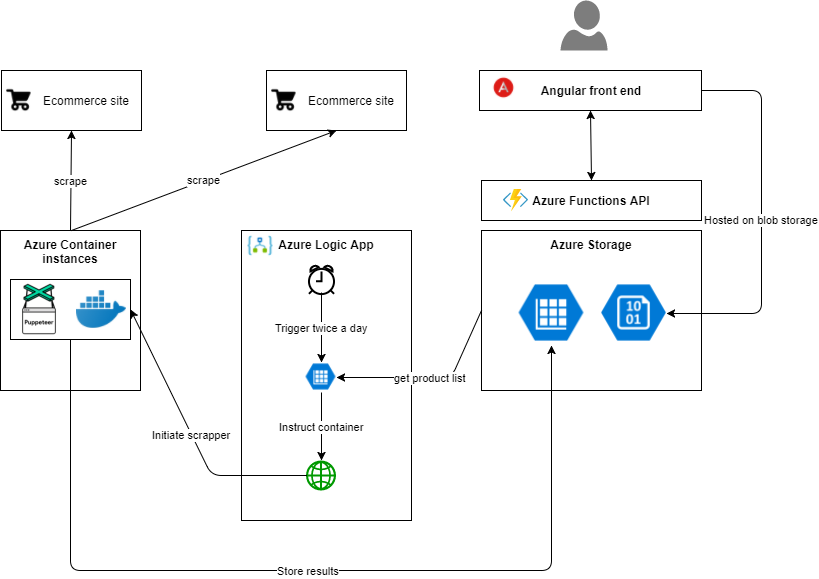
Building a web scraper is pretty hard. Doing it in Azure is harder. Utilizing Serverless and PaaS services is challenging. I don’t want to pay for a VM and just deploy the scraper on it because I need the solution to be scalable. Secondly I only want to pay for actual usage and not for a VM thats idle.
The case
I want to scrape certain websites twice a day. At 10:00 UTC and at 18:00 UTC. This frequency might change in the future so I don’t want to have it build in hard coded. I’m scraping ecommerce sites and the pages that need to be scraped depend on a list of id’s comming from a database. So the input for the scraper is dynamic. Lastly the output of the scraper has to be stored in a database. Later on I will have to develop some UI which discloses the information for ecommerce traders.
The solution
 Web scraping comes in different shapes and sizes. Some packages just perform Http calls and evaluate the response. Others spin up and entire (headless) browser and perform actual DOM operations. Since I want to scrape different ecommerce sites spinning up an actual browser looked like the way to go. Also because lots of ecommerce sites rely on alot on JavaScript. Some are build as an SPA and that requires per definition a browser based approach. After some research I stumbled upon `puppeteer`. A headless Chrome API build by Google itself, very promising.
My initial idea was to run puppeteer inside an Azure Function, however after some research I came to the conclusion that running a headless browser on Azure PaaS or Serverless is not going to happen. So what are the alternatives? Well containers seems like a reasonable solution. I can spin up and tear down the container with some orchestration and thereby limit my costs. A good start point for running puppeteer containers in Azure is this blog post.
For orchestrating the scraper I was thinking about using Azure Functions again. But then on a bright day I figured I would use Azure Logic Apps instead. Logic Apps are great for defining and running workflows and look like a perfect fit. They are pay per usage and are easy to develop!
Puppeteer, TypeScript and NodeJs
I wanted to brush up my TypeScript and NodeJS skills since it has been a while that I seriously developed in TypeScript. The last time I did something significant I was still using Visual Studio instead of VS Code for TypeScript development. So here’s the story to get a puppeteer scraper working in NodeJs and TypeScript.
Depedencies
First of all get TypeScript tsconfig.json file there using the following command.
1 | tsc --init |
A sample of how your TypeScript configuration file might look like is this.
Once important thing is to enable source maps. This allows you to debug your TypeScript code instead of debugging the transpiled JavaScript (which is a mess).
1 | { |
Once you’ve setup the TypeScript configuration its time to setup a NPM project.
1 | npm init |
You are now ready to start developing your TypeScript application.
You probably need some packages to interface with Puppeteer, Azure storage or whatever. Install them using npm.
1 | npm install puppeteer --save |
A lot of packages got separate TypeScript definition packages. These are required to have type checking. We also require them for puppeteer. You should install them as a dev-dependency instead of a regular dependency.
1 | npm install @types/puppeteer --save-dev |
Puppeteer
Once you’ve installed your dependencies you can start developing your scraper. It’s all up to you to interact with the page and retrieve the right information. A very basic example is this:
1 | import * as puppeteer from 'puppeteer'; |
One thing you probably want to do is to debug your code. In VSCode you’ll have to add a debug configuration. This can be achieved by adding the following configuration in launch.json. Notice the “Launch program” configuration inside the debug panel of VS Code.
1 | { |
Docker and Azure
Well you’ve got your scraper working on Node using TypeScript. The next thing is to host it in the Cloud. We want to containerize the application inside a docker container. Building a docker container requires a dockerfile. Here’s one that works for the Puppeteer scraper. The Google Chrome teams has made a nice Docker file with some tricks applied, I basically copied that. Secondly is this a nice blogpost about running Docker containers on Azure Container Instances. Its worth a read.
1 | FROM node:8-slim |
Service bus
Now that we’ve got a very basis scraper running inside a Docker container on Azure Container Instances, its time to feed to scraper with commands.
I therefore created a queue of scrape commands. I prefer using Service Bus technology over Http REST interfaces because it has better fault handling. Secondly it might take a while for a scrape commands to finish and I dont want to run in any Http timeouts or whatsoever.
So we have to listen to a Service Bus inside your Node application. Microsoft has created a package that can be used to setup a connection, namely: azure-sb.
Here’s the code to listen to Service Bus messages on a queue.
1 | import * as azure from "azure-sb"; |
Azure Logic Apps
 Now that we can initiate a scrape session with a Service Bus queue message. We should queue some scrape commands.
I chose to use Logic Apps for that because its on pay per use base and secondly its just a basic workflow which probably doesn't change a lot.
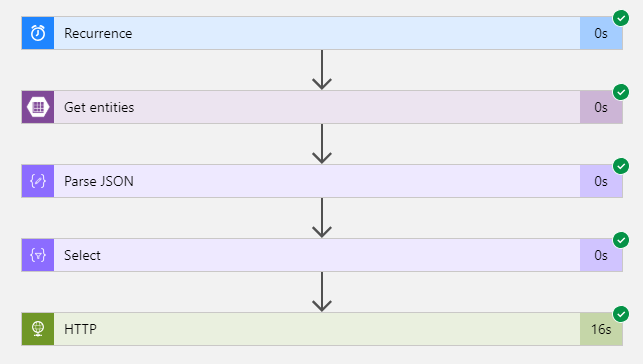
Another benefit of Azure Logic Apps is the ability to analyse your 'runs' and exactly see the data flow through your Logic App.
The steps are pretty basic and straight forward.