It can be quite a struggle to really understand the ins and outs of Azure Search, how search results are scored, and how scoring profiles with weights and functions add up. In this blog post I intend to explain the inner workings of Azure Search, describing the scoring algorithm and how to tweak it to your advantage. I will also provide some practical tips to improve your search performance, but in order to apply those tips correctly you’ll first need to have a deeper understanding of Azure Search itself.
Azure Search

Once the content has been indexed, one can query the index with a text query and additionally add facets, filters and sorting. This query will be evaluated against the index and the system will return the highest scored documents. This blog post is about unraveling the scoring system, and to help you improve your search performance. Performance matters because the user experience of the search is primarily determined by the relevance of the returned documents. In projects with Azure Cognitive Search I have come across way too many questions like: How did this document score this high? And why does it also find these documents? This blog post will help you answer such questions.
The search engine
The search engine of Azure Cognitive Search is quite complex and, to be honest, the documentation isn’t really forthcoming as to how documents are being indexed and how the entered query eventually gets processed and scored against the indexed documents. This blog post intends to shine some light into that black box. First, I will explain the general flow of indexing. Secondly, I will explain how a search query is evaluated against the index. Lastly, I will share some practical tips to improve your Azure Search Performance.
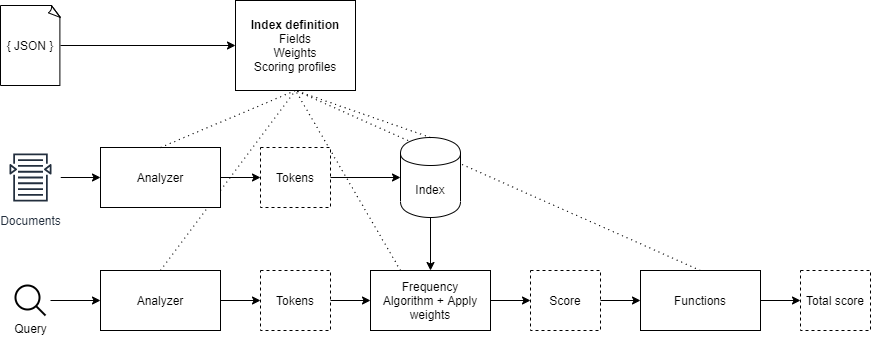
Indexing documents
Indexing documents basically comes down to the creation of a database which stores a set of tokens per field that are generated for each document that has been indexed. The search engine will then use this so called index to evaluate a given query to it. What’s important to notice is is that the same process for indexing a document aswell as for tokenizing a query is performed. The data either a document or a search query will go through a so called analyzer, more on those later.
Index
An Azure Cognitive Search index consists of fields, analyzers, charFilters, tokenizers and tokenFilters. In most cases one wouldn’t need to create a custom analyzer and prefer the use of one of the pre-built analyzers, such as the language specific analyzers (nl.microsoft, en.microsoft), or the default analyzer. However, it is possible to create a custom analyzer and configure it for the appropriate fields. Note that every field can have its own analyzer configured. It is even possible to configure separate analyzers for indexing a document and searching (querying) a document. This can be a useful option in the scenario where one is trying to reduce noise in search results. Particularly the pre-built language analyzers generate a lot of linguistic tokens that are not necessarily helpful at all times. Below is a JSON representation of an index:
1 | { |
Analyzers
Let’s take a closer look at an analyzer. As stated before, a (custom) analyzer includes a charFilter, tokenizer and tokenFilter. The index requires an analyzer for every searchable property, this can either be the same analyzer for indexing aswell as for searching. The analyzers can be configured using the indexAnalyzer and the searchAnalyzer properties. If one requires the same analyzer for both indexing aswell as searching then the analyzer property can be set.
Depending on whether or not one needs custom charFilters, tokenizers and tokenFilters, one can configure them in the index. The Azure Cogntive Search documentation contains a reference of all pre-built components. One can pick and choose to create the most optimal analyzer for their needs.
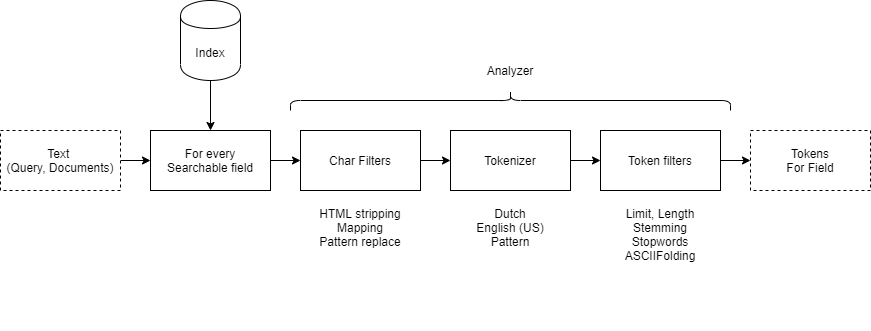
It’s important to know how an analyzer works. The tokens that are generated for every seachable field form the basis for every search outcome. One can easily test what tokens are generated by performing a simple REST call to the Azure Cognitive Search service. Below is an example of the differences between a standard (default) analyzer and the English en.microsoft analyzer. When submitting the text cycling helmet, the en.microsoft analyzer adds the stem of the word cycling, cycle. When the en.microsoft analyzer is configured as search analyzer, all properties that have the word cycle present in the index will be returned as a match for the given search query. This can be the cause of lots of noise or poorly matching search results. Properties containing the exact match cycling will return a higher score, but more on scoring in the Scoring chapter.
Example of a language specific and default analyzer
Below, one can compare an example of tokens being generated by a language specific analyzer with those of the default analyzer. Note that language specific analyzers add conjugations of certain words. In many cases, conjugations of verbs, nouns and also adjectives are added. Note that in the example the stem of the verb is added as well as the singular conjugation of the noun helmets. The standard analyzer, however, just splits the search query based on spaces and doesn’t add any conjugations.
Example language specific analyzer
1 | POST https://[az search].search.windows.net/indexes/[index name]/analyze?api-version=[api-version] |
Response
1 | { |
Example Standard Analyzer
1 | POST https://[az search].search.windows.net/indexes/[index name]/analyze?api-version=[api-version] |
Response
1 | { |
For more information on how to test analyzers, charFilters, tokenizers and tokenFilters please visit: https://docs.microsoft.com/en-us/rest/api/searchservice/test-analyzer.
Searching through documents.
Now that you know how tokens are generated for both documents and search terms, let’s dive into the Azure Cognitive Search scoring mechanism. Based on the API version being used, Azure Cognitive Search uses either the BM25 or TFIDF algorithm. In principle, both algorithms come down to the same thing. Basically, what the algorithms do is compare the list of tokens stored in the index with the tokens generated for the specified search query and calculate a term frequency. The score that is calculated has a range of , where no results will be produced with a score of 0, but everything above is considered a result. So you can imagine that the conjugations the analyzer adds to the tokens can cause more documents to return a score of , which could cause your search results to be noisy. Obviously, the documents with the most matched terms will score the highest, and as a result will be considered the best search results.
Scoring profiles
In addition to the standard term frequency scoring mechanism, a scoring profile can be configured. A scoring profile consists of two parts: weights and functions. Weights can be used to weigh certain fields in the index more strongly than other fields. Each searchable field basically counts proportionally in determining the 0 - 1 term frequency score. What is important to know is that fields with a relatively long text will yield a lower score than fields with a short text. In other words, the term frequency of a short text field is logically higher than the term frequency of a long text field. For example, if you search for cyling helmet and the title of the document contains those exact terms, the score of that field will be higher than a description field of ~200 words that also contains the search terms. Suppose the title is ‘Red Specialized Cycling Helmet’, then the term frequency is relatively high. The description may also include content such as aerodynamics or other details of the product in which the words cylcing helmet are relatively less frequent. Based on this reasoning, it is therefore not always wise to weigh the title more heavily as the description field, because the length of the content of the fields is already a factor included in the term frequency algorithm.
That said, weights can be a good addition to tweak search results. A good example is to apply weights to keyword fields. An e-commerce platform often has keywords that should give a strong boost in relevance when the user enters the exact keyword as a search term. In the case of keywords, it is important to determine whether conjugations generated by the analyzer have a negative or positive effect on the accuracy of the search results. For keywords you may want to ensure that only exact matches cause an increase in relevance and not conjugations. To illustrate, the en.microsoft analyzer will generate the tokens cylcing, cycle and helmet given the search query cylcing helmet. When the user enters the search query motorcycle helmet, documents containing the keyword cycling helmet will also be scored. If, for example, a comparison is made with a motorcycle helmet in the description of that document, it is possible that a cycling helmet document scores higher than a motorcycle helmet. So keep in mind what keywords you store and how much you let them weigh in.
Scoring algorithm
Azure Cognitive Search uses a scoring algorithm which is not published as part of the documentation. It can therefore be quite hard to figure out how a score is composed and how the different factors come in play. While I’m by no means a mathematician, I’ve tried to define it as a mathematical equation, shown below. I determined this algorithm by reverse engineering the Azure Cognitive Search. The process was quite simple: add a few searchable fields to an index, add some documents, evaluate the total unweighted score, then add weights to see how they affect the search score. I discovered that the weights multiply the raw search score which yielded by the BM25 or TFIDF algorithm. I then added functions to see how they would come into play and realised they also multiply the total weighted score of all searchable fields. Putting it all together results in the following equation:
Further specification of the function
will be the total score for each document.Weights
The first factor of the equation is a series of searchable fields () which will be evaluated. Each field will be evaluated by the scoring function () which is either a BM25 or TFIDF algorithm. The output of the function yields a score of which will be multiplied by the weight () of to field being evaluated (). The total of all evaluated search fields will be summed up and yield a total weighted score.
Functions
The right hand of the function is a series of functions () which will be evaluated. Each function can be any one of the following types: a freshness, magnitude, distance or tag function. The aggregration of the series of functions can be a summation, average, minimum, maximum or first matching function ().
The score yielded by a function can be quite hard to understand. In all cases, one needs to pick an interpolation and a boost factor. The interpolation affects the score prior to boosting it. When the interpolation is not constant, the function score will be determined on the range set in the scoring function. The freshness, magnitude, distance logically need a range of values to work with. These scoring functions boost documents that are within a time period, a numerical range or a geographical range, respectively. In any case, the scoring functions return a score of . The boost function will then multiply the score with an offset of 1. This is also the reason why the boosting function has to be . The equation predicting the total score of a function is: , where is the score, is the boost factor and is the function score.
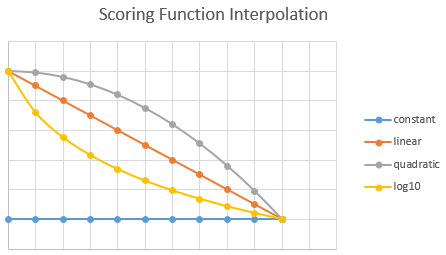
To elaborate, I will share an example. Let’s say you have a new website or e-commerce platform that needs to boost documents that were written in the last year. In order for you to do so, you’d need to configure a magnitude function with, for instance, a linear interpolation. If you want relevance to decrease faster or slower, then you should choose a quadratic or logarithmic interpolation instead. Finally, if a document needs to be boosted constantly over the entire year, you should choose constant.
Lets say we have a document that has a written date of 50 days ago. The range of the freshness function is set from today to 365 days ago, giving us a range of 0…365. In our example, 50 days from now scores a 0.8630137, since 1 is today and 0 is 365 days (or more) ago. To calculate the value on a custom scale, use this function: , in our case: . If a boost of 2 is configured, the total score of the function will be .
Total
This brings us to the grand total score of a document, including weights, functions and boosting. The final score is a simple multiplication of the total weighted field scores times the total score of the function aggregation.
Measuring performance
Measuring search performance is very difficult. Apart from the fact that it is complex to understand the logic that drives the search results, understanding the performance of your Azure Search is complicated. This is because a search query often returns multiple results in a specific order. The order of the results largely determines the performance of your Azure Search device. Tweaking the analyzers, scoring profiles and the like can have a significant impact on the performance of your Azure Search. However, it is strongly recommended to compile a gold set of the most commonly used queries before tweaking. Depending on the size of your Azure Search, I recommend a gold set of about 100-200 commonly used search terms. The gold set helps you keep edge cases out of the discussion; too often I have seen that the Azure Search was adjusted to accommodate a certain edge case, without testing regression properly. As a result, that small adjustment might actually result in a worse general performance. To prevent this, you should always test with a gold set that is representative of your target audience. If an edge case is deemed vital, you should add it to the gold set in order to always benchmark performance using a fixed basis and determine whether the adjustments you make bring about a general improvement.
An important tip I would like to share is that it is wise to store the gold set in a database, such as a SQL database table or an Azure Table storage table. This will allow you to automate the regression test in the long run. Automating the regression test is essential to be able to continuously make small improvements to your Azure Search in an Agile way.
Regression testing
Suppose you have a gold set, how do you perform a regression test on Azure Search? First of all, you need to create a script that retrieves the gold set from the database and runs it on the Azure Search index. You must then store the results in a database. This can be a simple table with the search term as primary key, a date time column and as other columns the IDs of the top 10 search results. Using this data, you can analyze the impact of an adjustment by comparing two test runs. The first metric of interest is the significance of the adjustment. To determine the significance of the adjustment you can simply use the percentage of:
- queries where the first search result has changed.
- queries where the first 3 search results were changed.
- queries where the first 5 search results were changed.
- queries where the first 10 search results were changed.
This gives you an idea of whether the change you have made has a major impact or not. If it has a high significance of adjustment, you should be aware that it can also have a big impact on the user experience.
Analyzing a regression test
When you have performed a regression test, it is wise to classify each major change as an improvement or a deterioration. Of course, you cannot classify changes based on the average change rate alone, you will have to look at certain search terms more closely. What I find a clear and good method is to compare two test runs with each other and generate the following table:
| Search term | Rank 1 | Rank 2 | Rank 3 | Rank 4 | Rank 5 | Rank 6 | Rank 7 | Rank 8 | Rank 9 | Rank 10 |
|---|---|---|---|---|---|---|---|---|---|---|
| Racing bike | 2 | 3 | 4 | 5 | 1 | 6 | 7 | 8 | 9 | 10 |
| Gravel bike | 1 | 2 | 3 | 5 | 4 | 6 | 7 | 8 | 9 | 10 |
| Cyclocross bike | 1 | 2 | 3 | 4 | 5 | 6 | 7 | 8 | 10 | 9 |
| Mountainbike | 8 | 9 | 10 | 4 | 5 | 6 | 7 | 2 | 1 | 3 |
| Cycling helmet | 1 | new | 2 | 3 | 6 | 5 | 7 | 8 | 9 | 10 |
| Cycling gloves | 1 | 2 | 3 | 4 | 5 | 6 | 7 | 8 | 9 | 10 |
| Bicycle lights | 7 | 4 | 3 | 2 | 5 | 6 | 1 | 8 | 9 | 10 |
| Cycling bibs | 1 | 4 | 6 | 2 | 5 | 3 | 7 | 8 | 9 | 10 |
| Cycling tights | 1 | 2 | 3 | 4 | 5 | 6 | 7 | 10 | 9 | 8 |
| Cycling glasses | 1 | 2 | 3 | 4 | 5 | 8 | 7 | 6 | 9 | 10 |
? If the document has moved more than 5 ranks up.
? If the document has moved more than 5 ranks down.
? If the document stayed within a margin of 4 ranks.
? If the document has the same rank.
In the above example, I used a gold set of 10 search terms which could be used by our hypothetical bicycle e-commerce store. In this overview, the significance of the change can be seen quickly and easily. When you see major changes, you can always analyze the results more closely and see if the change you made in case of a single search term is an improvement or a deterioration. If too many deteriorations have occurred, consider whether you want to bring the adjustment live.
Using this method you can perform regression tests on adjustments made to Azure Search. You keep the old index intact while also building a new one. By running the gold set on both Azure Search indexes you can analyze the impact of your change and classify the results of individual search terms as improvement or deterioration.
10 Azure Search performance tips
- Create a gold set of search terms and improve your Azure Search based on this set.
- Make sure to test regression so you can estimate the impact and classify it as improvement or deterioration.
- Automate the regression test.
- Make sure you have representative and clean data. Divide the data into fields. Avoid adding additional fields with bulks of text.
- Apply weights for fields that are important. Make sure weights are balanced.
- Apply functions to determine scenarios such as time relevance or commercial considerations.
- Make sure you use the same indexing analyzer as search.
- Provide good facet and filter options so that the data being searched with text search is already limited.
- Use the correct analyzers for fields or create custom analyzers as needed.
- A/B test the changes you make to the Azure Search.