At the SeverlessDays Amsterdam online meetup on February the 3rd I gave a talk on Integration patterns using NServiceBus & Azure Functions.
Improving your Azure Cognitive Search performance
It can be quite a struggle to really understand the ins and outs of Azure Search, how search results are scored, and how scoring profiles with weights and functions add up. In this blog post I intend to explain the inner workings of Azure Search, describing the scoring algorithm and how to tweak it to your advantage. I will also provide some practical tips to improve your search performance, but in order to apply those tips correctly you’ll first need to have a deeper understanding of Azure Search itself.
Azure Search

Once the content has been indexed, one can query the index with a text query and additionally add facets, filters and sorting. This query will be evaluated against the index and the system will return the highest scored documents. This blog post is about unraveling the scoring system, and to help you improve your search performance. Performance matters because the user experience of the search is primarily determined by the relevance of the returned documents. In projects with Azure Cognitive Search I have come across way too many questions like: How did this document score this high? And why does it also find these documents? This blog post will help you answer such questions.
The search engine
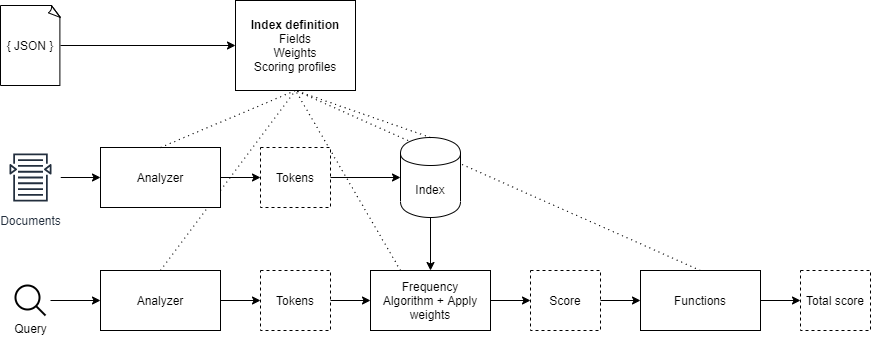
The search engine of Azure Cognitive Search is quite complex and, to be honest, the documentation isn’t really forthcoming as to how documents are being indexed and how the entered query eventually gets processed and scored against the indexed documents. This blog post intends to shine some light into that black box. First, I will explain the general flow of indexing. Secondly, I will explain how a search query is evaluated against the index. Lastly, I will share some practical tips to improve your Azure Search Performance.
Indexing documents
Indexing documents basically comes down to the creation of a database which stores a set of tokens per field that are generated for each document that has been indexed. The search engine will then use this so called index to evaluate a given query to it. What’s important to notice is is that the same process for indexing a document aswell as for tokenizing a query is performed. The data either a document or a search query will go through a so called analyzer, more on those later.
Index
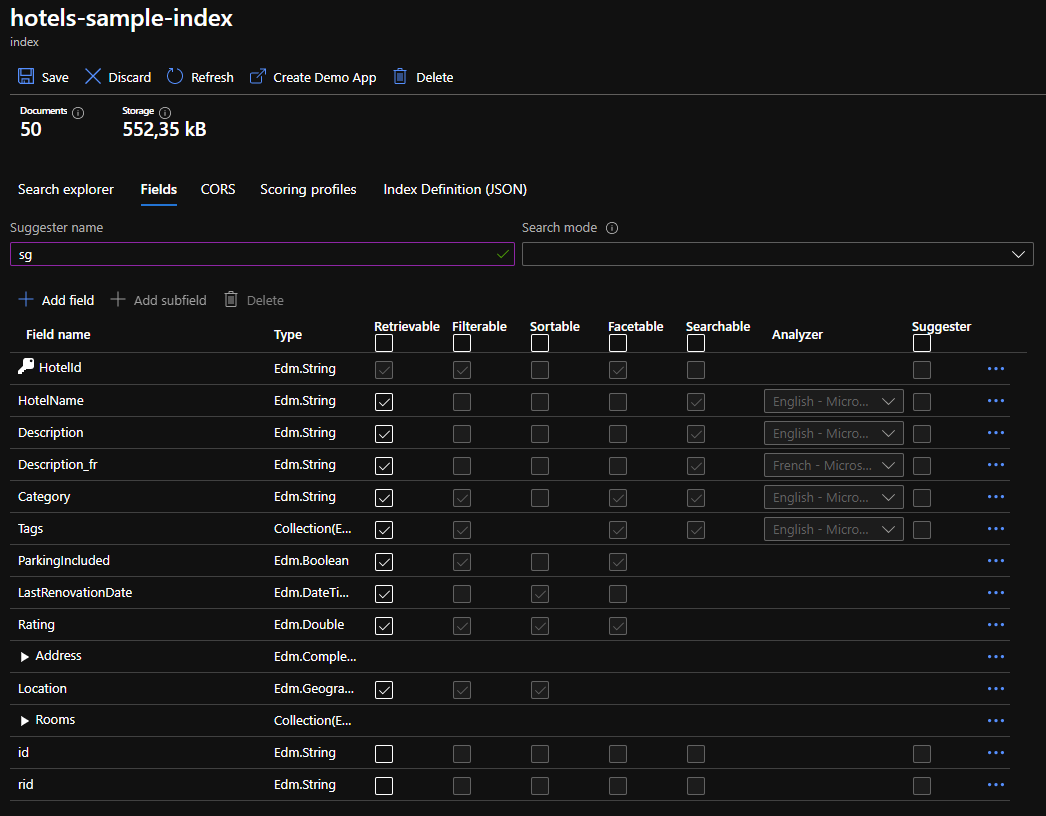
An Azure Cognitive Search index consists of fields, analyzers, charFilters, tokenizers and tokenFilters. In most cases one wouldn’t need to create a custom analyzer and prefer the use of one of the pre-built analyzers, such as the language specific analyzers (nl.microsoft, en.microsoft), or the default analyzer. However, it is possible to create a custom analyzer and configure it for the appropriate fields. Note that every field can have its own analyzer configured. It is even possible to configure separate analyzers for indexing a document and searching (querying) a document. This can be a useful option in the scenario where one is trying to reduce noise in search results. Particularly the pre-built language analyzers generate a lot of linguistic tokens that are not necessarily helpful at all times. Below is a JSON representation of an index:
1 | { |
Analyzers
Let’s take a closer look at an analyzer. As stated before, a (custom) analyzer includes a charFilter, tokenizer and tokenFilter. The index requires an analyzer for every searchable property, this can either be the same analyzer for indexing aswell as for searching. The analyzers can be configured using the indexAnalyzer and the searchAnalyzer properties. If one requires the same analyzer for both indexing aswell as searching then the analyzer property can be set.
Depending on whether or not one needs custom charFilters, tokenizers and tokenFilters, one can configure them in the index. The Azure Cogntive Search documentation contains a reference of all pre-built components. One can pick and choose to create the most optimal analyzer for their needs.
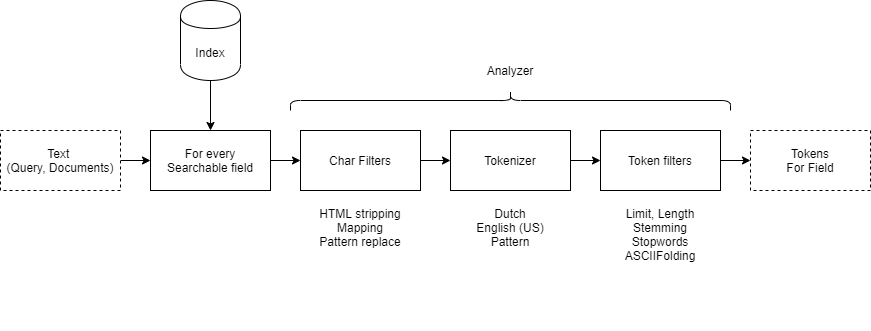
It’s important to know how an analyzer works. The tokens that are generated for every seachable field form the basis for every search outcome. One can easily test what tokens are generated by performing a simple REST call to the Azure Cognitive Search service. Below is an example of the differences between a standard (default) analyzer and the English en.microsoft analyzer. When submitting the text cycling helmet, the en.microsoft analyzer adds the stem of the word cycling, cycle. When the en.microsoft analyzer is configured as search analyzer, all properties that have the word cycle present in the index will be returned as a match for the given search query. This can be the cause of lots of noise or poorly matching search results. Properties containing the exact match cycling will return a higher score, but more on scoring in the Scoring chapter.
Example of a language specific and default analyzer
Below, one can compare an example of tokens being generated by a language specific analyzer with those of the default analyzer. Note that language specific analyzers add conjugations of certain words. In many cases, conjugations of verbs, nouns and also adjectives are added. Note that in the example the stem of the verb is added as well as the singular conjugation of the noun helmets. The standard analyzer, however, just splits the search query based on spaces and doesn’t add any conjugations.
Example language specific analyzer
1 | POST https://[az search].search.windows.net/indexes/[index name]/analyze?api-version=[api-version] |
Response
1 | { |
Example Standard Analyzer
1 | POST https://[az search].search.windows.net/indexes/[index name]/analyze?api-version=[api-version] |
Response
1 | { |
For more information on how to test analyzers, charFilters, tokenizers and tokenFilters please visit: https://docs.microsoft.com/en-us/rest/api/searchservice/test-analyzer.
Searching through documents.
Now that you know how tokens are generated for both documents and search terms, let’s dive into the Azure Cognitive Search scoring mechanism. Based on the API version being used, Azure Cognitive Search uses either the BM25 or TFIDF algorithm. In principle, both algorithms come down to the same thing. Basically, what the algorithms do is compare the list of tokens stored in the index with the tokens generated for the specified search query and calculate a term frequency. The score that is calculated has a range of , where no results will be produced with a score of 0, but everything above is considered a result. So you can imagine that the conjugations the analyzer adds to the tokens can cause more documents to return a score of , which could cause your search results to be noisy. Obviously, the documents with the most matched terms will score the highest, and as a result will be considered the best search results.
Scoring profiles
In addition to the standard term frequency scoring mechanism, a scoring profile can be configured. A scoring profile consists of two parts: weights and functions. Weights can be used to weigh certain fields in the index more strongly than other fields. Each searchable field basically counts proportionally in determining the 0 - 1 term frequency score. What is important to know is that fields with a relatively long text will yield a lower score than fields with a short text. In other words, the term frequency of a short text field is logically higher than the term frequency of a long text field. For example, if you search for cyling helmet and the title of the document contains those exact terms, the score of that field will be higher than a description field of ~200 words that also contains the search terms. Suppose the title is ‘Red Specialized Cycling Helmet’, then the term frequency is relatively high. The description may also include content such as aerodynamics or other details of the product in which the words cylcing helmet are relatively less frequent. Based on this reasoning, it is therefore not always wise to weigh the title more heavily as the description field, because the length of the content of the fields is already a factor included in the term frequency algorithm.
That said, weights can be a good addition to tweak search results. A good example is to apply weights to keyword fields. An e-commerce platform often has keywords that should give a strong boost in relevance when the user enters the exact keyword as a search term. In the case of keywords, it is important to determine whether conjugations generated by the analyzer have a negative or positive effect on the accuracy of the search results. For keywords you may want to ensure that only exact matches cause an increase in relevance and not conjugations. To illustrate, the en.microsoft analyzer will generate the tokens cylcing, cycle and helmet given the search query cylcing helmet. When the user enters the search query motorcycle helmet, documents containing the keyword cycling helmet will also be scored. If, for example, a comparison is made with a motorcycle helmet in the description of that document, it is possible that a cycling helmet document scores higher than a motorcycle helmet. So keep in mind what keywords you store and how much you let them weigh in.
Scoring algorithm
Azure Cognitive Search uses a scoring algorithm which is not published as part of the documentation. It can therefore be quite hard to figure out how a score is composed and how the different factors come in play. While I’m by no means a mathematician, I’ve tried to define it as a mathematical equation, shown below. I determined this algorithm by reverse engineering the Azure Cognitive Search. The process was quite simple: add a few searchable fields to an index, add some documents, evaluate the total unweighted score, then add weights to see how they affect the search score. I discovered that the weights multiply the raw search score which yielded by the BM25 or TFIDF algorithm. I then added functions to see how they would come into play and realised they also multiply the total weighted score of all searchable fields. Putting it all together results in the following equation:
Further specification of the function
will be the total score for each document.Weights
The first factor of the equation is a series of searchable fields () which will be evaluated. Each field will be evaluated by the scoring function () which is either a BM25 or TFIDF algorithm. The output of the function yields a score of which will be multiplied by the weight () of to field being evaluated (). The total of all evaluated search fields will be summed up and yield a total weighted score.
Functions
The right hand of the function is a series of functions () which will be evaluated. Each function can be any one of the following types: a freshness, magnitude, distance or tag function. The aggregration of the series of functions can be a summation, average, minimum, maximum or first matching function ().
The score yielded by a function can be quite hard to understand. In all cases, one needs to pick an interpolation and a boost factor. The interpolation affects the score prior to boosting it. When the interpolation is not constant, the function score will be determined on the range set in the scoring function. The freshness, magnitude, distance logically need a range of values to work with. These scoring functions boost documents that are within a time period, a numerical range or a geographical range, respectively. In any case, the scoring functions return a score of . The boost function will then multiply the score with an offset of 1. This is also the reason why the boosting function has to be . The equation predicting the total score of a function is: , where is the score, is the boost factor and is the function score.
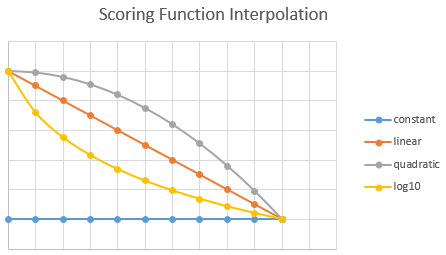
To elaborate, I will share an example. Let’s say you have a new website or e-commerce platform that needs to boost documents that were written in the last year. In order for you to do so, you’d need to configure a magnitude function with, for instance, a linear interpolation. If you want relevance to decrease faster or slower, then you should choose a quadratic or logarithmic interpolation instead. Finally, if a document needs to be boosted constantly over the entire year, you should choose constant.
Lets say we have a document that has a written date of 50 days ago. The range of the freshness function is set from today to 365 days ago, giving us a range of 0…365. In our example, 50 days from now scores a 0.8630137, since 1 is today and 0 is 365 days (or more) ago. To calculate the value on a custom scale, use this function: , in our case: . If a boost of 2 is configured, the total score of the function will be .
Total
This brings us to the grand total score of a document, including weights, functions and boosting. The final score is a simple multiplication of the total weighted field scores times the total score of the function aggregation.
Measuring performance
Measuring search performance is very difficult. Apart from the fact that it is complex to understand the logic that drives the search results, understanding the performance of your Azure Search is complicated. This is because a search query often returns multiple results in a specific order. The order of the results largely determines the performance of your Azure Search device. Tweaking the analyzers, scoring profiles and the like can have a significant impact on the performance of your Azure Search. However, it is strongly recommended to compile a gold set of the most commonly used queries before tweaking. Depending on the size of your Azure Search, I recommend a gold set of about 100-200 commonly used search terms. The gold set helps you keep edge cases out of the discussion; too often I have seen that the Azure Search was adjusted to accommodate a certain edge case, without testing regression properly. As a result, that small adjustment might actually result in a worse general performance. To prevent this, you should always test with a gold set that is representative of your target audience. If an edge case is deemed vital, you should add it to the gold set in order to always benchmark performance using a fixed basis and determine whether the adjustments you make bring about a general improvement.
An important tip I would like to share is that it is wise to store the gold set in a database, such as a SQL database table or an Azure Table storage table. This will allow you to automate the regression test in the long run. Automating the regression test is essential to be able to continuously make small improvements to your Azure Search in an Agile way.
Regression testing
Suppose you have a gold set, how do you perform a regression test on Azure Search? First of all, you need to create a script that retrieves the gold set from the database and runs it on the Azure Search index. You must then store the results in a database. This can be a simple table with the search term as primary key, a date time column and as other columns the IDs of the top 10 search results. Using this data, you can analyze the impact of an adjustment by comparing two test runs. The first metric of interest is the significance of the adjustment. To determine the significance of the adjustment you can simply use the percentage of:
- queries where the first search result has changed.
- queries where the first 3 search results were changed.
- queries where the first 5 search results were changed.
- queries where the first 10 search results were changed.
This gives you an idea of whether the change you have made has a major impact or not. If it has a high significance of adjustment, you should be aware that it can also have a big impact on the user experience.
Analyzing a regression test
When you have performed a regression test, it is wise to classify each major change as an improvement or a deterioration. Of course, you cannot classify changes based on the average change rate alone, you will have to look at certain search terms more closely. What I find a clear and good method is to compare two test runs with each other and generate the following table:
| Search term | Rank 1 | Rank 2 | Rank 3 | Rank 4 | Rank 5 | Rank 6 | Rank 7 | Rank 8 | Rank 9 | Rank 10 |
|---|---|---|---|---|---|---|---|---|---|---|
| Racing bike | 2 | 3 | 4 | 5 | 1 | 6 | 7 | 8 | 9 | 10 |
| Gravel bike | 1 | 2 | 3 | 5 | 4 | 6 | 7 | 8 | 9 | 10 |
| Cyclocross bike | 1 | 2 | 3 | 4 | 5 | 6 | 7 | 8 | 10 | 9 |
| Mountainbike | 8 | 9 | 10 | 4 | 5 | 6 | 7 | 2 | 1 | 3 |
| Cycling helmet | 1 | new | 2 | 3 | 6 | 5 | 7 | 8 | 9 | 10 |
| Cycling gloves | 1 | 2 | 3 | 4 | 5 | 6 | 7 | 8 | 9 | 10 |
| Bicycle lights | 7 | 4 | 3 | 2 | 5 | 6 | 1 | 8 | 9 | 10 |
| Cycling bibs | 1 | 4 | 6 | 2 | 5 | 3 | 7 | 8 | 9 | 10 |
| Cycling tights | 1 | 2 | 3 | 4 | 5 | 6 | 7 | 10 | 9 | 8 |
| Cycling glasses | 1 | 2 | 3 | 4 | 5 | 8 | 7 | 6 | 9 | 10 |
? If the document has moved more than 5 ranks up.
? If the document has moved more than 5 ranks down.
? If the document stayed within a margin of 4 ranks.
? If the document has the same rank.
In the above example, I used a gold set of 10 search terms which could be used by our hypothetical bicycle e-commerce store. In this overview, the significance of the change can be seen quickly and easily. When you see major changes, you can always analyze the results more closely and see if the change you made in case of a single search term is an improvement or a deterioration. If too many deteriorations have occurred, consider whether you want to bring the adjustment live.
Using this method you can perform regression tests on adjustments made to Azure Search. You keep the old index intact while also building a new one. By running the gold set on both Azure Search indexes you can analyze the impact of your change and classify the results of individual search terms as improvement or deterioration.
10 Azure Search performance tips
- Create a gold set of search terms and improve your Azure Search based on this set.
- Make sure to test regression so you can estimate the impact and classify it as improvement or deterioration.
- Automate the regression test.
- Make sure you have representative and clean data. Divide the data into fields. Avoid adding additional fields with bulks of text.
- Apply weights for fields that are important. Make sure weights are balanced.
- Apply functions to determine scenarios such as time relevance or commercial considerations.
- Make sure you use the same indexing analyzer as search.
- Provide good facet and filter options so that the data being searched with text search is already limited.
- Use the correct analyzers for fields or create custom analyzers as needed.
- A/B test the changes you make to the Azure Search.
Applying an Azure Governance Framework in 10 steps

Every year RightScale, now Flexera, holds a survey to measure the current cloud challenges. This year just like in previous years Managing cloud spend and applying governance were the top challenges companies face. This blogpost is to manage the governance challenge. It provides a simple but yet effective framework to apply cloud governance into your business.
1. Get a grip on your subscriptions
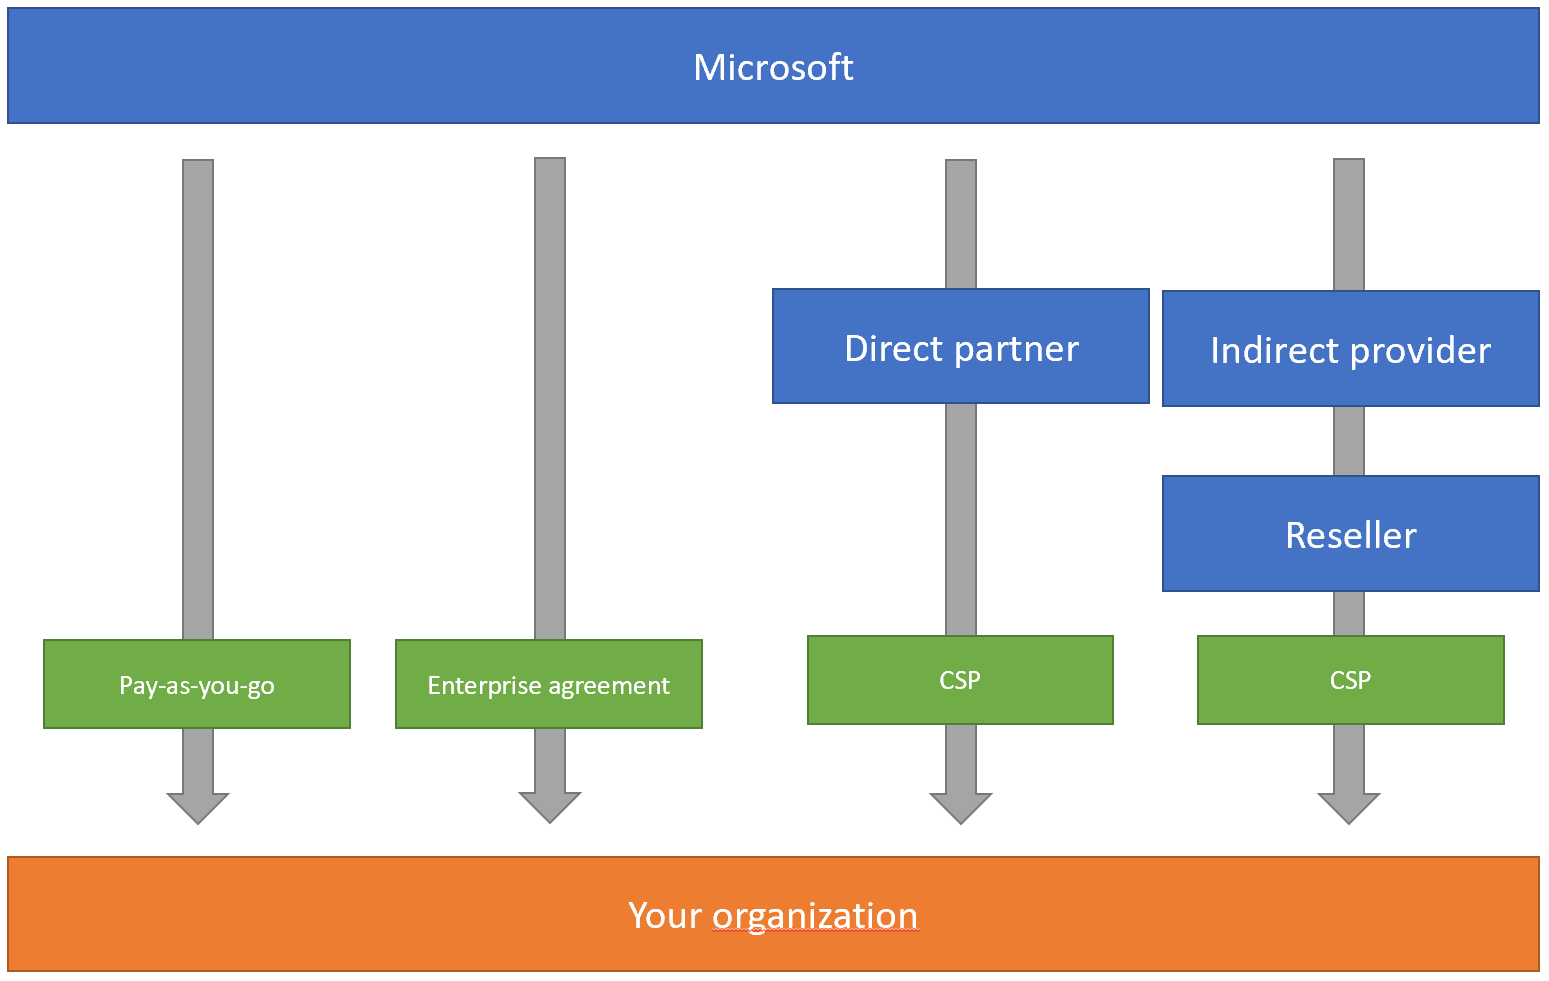
It all starts with your Azure subscriptions. When creating an Azure tetant there are 4 ways of creating it.
If you choose to create one via Microsoft then you have 2 options, either the Pay-As-You-Go account type or an Enterprise Agreement.
If your organization it not a small or medium business then you will probably need an Enterprise Agreement. It offers you a way to easily create multiple subscriptions and create them accordingly to for instance your business value domains.
The alternative is to choose either a direct on indirect Microsoft partner. These are so called Cloud Solution Providers. The CSP’s will get a kick back fee for your Azure consumption making it a interesting option for them to help you with your Azure needs. In return Microsoft expects that CSP’s will give a first line of support to their customers.
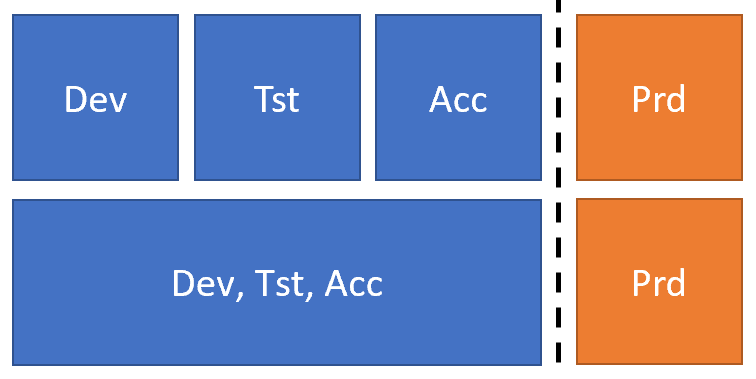
It’s also wise to always create a separate production subscription or dependent on the size of your value domains also separate dev, test and acceptance subscriptions. For security and governance reasons later described in the Role based Access Control section, it is wise to separate production from dta.
To conclude
Basically, the rules of thumb are:
- Only if you’re a really small company or start-up use a Pay-As-You-Go subscription.
- Use CSP subscriptions if you need a 3rd party to help you with 1st line of support questions.
- Use an Enterprise Agreement if your reasonable in size and want to negotiate with Microsoft regarding Azure prices.
Secondly,
- Create multiple subscriptions for different value domains within your company.
- Create separate subscriptions for dev, test, acceptance and production workloads.
For a detailed overview of Enterprise Agreement, CSP and Pay-As-You-Go subscriptions please visit this blog.
2. Apply structure with Naming conventions
It sounds evident but it’s certainly not. Applying transparent and clear naming conventions is often forgotten or poorly implemented. Especially when there is no central organ within an organization that sees to it that the conventions are correctly applied. The importance of naming conventions can’t be overestimated. Without them Azure subscriptions quickly become a mess of unrelated, unregulatable resources.
It’s very important that the naming conventions are consistent throughout the various subscriptions.
Often Infrastructure as Code (IAC) code, such as ARM templates or Azure CLI commands, is parameterized based on these conventions.
Its helps to reuse code and make fewer mistakes.
A naming convention is often a composition of properties that describe the Azure resource.
One composition that I often use is the following:
1 | env-company-businessunit-application-resourcetype-region-suffix |
Its made up out of several critical properties, some that are also used within some naming conventions proposed by the Microsoft documentation.
| Property | Example | Abbreviation |
|---|---|---|
| Environment | Production | p |
| Company | Cloud Republic B.V. | clr |
| Business unit | Development | dev |
| Application | Customer Portal | csp |
| Resource type | Resource Group | rg |
| Region | West Europe | weu |
| Suffix | 001 | 001 |
Resulting in this name:
1 | p-clr-dev-csp-rg-weu-001 |
Applying the same naming conventions throughout the whole organization can be very useful. Organizations often end up building tooling to automate development processes and workflows. Without a consistent and clear naming convention this can be very hard. Secondly having a consistent and clear naming convention can help to reduce security issues. For Ops-people it has to be clip and clear if the resource is a production one and if its vital to the organization. With the right naming its easier to categorize resources.
Some generic tips for composing a naming convention
- Start with the environment property because its often the only parameterized property. This reduces the need for string concatenation within IaC code.
- Use 3 or 4 letter abbreviations consistently throughout all properties.
- Use the resource abbreviations proposed by Microsoft.
- Add a suffix because it may occur that a resource name is locked for a significant amount of time when its deleted.
- This happened to me once when I tried to recreate an Azure Service Bus. The name was locked for 2 days.
- Use all lower cases characters, there are some restrictions.
- Don’t use special characters, only alphanumeric characters. Hyphen (-) excluded.
- Try to be unique
- Some resource names, such as PaaS services with public endpoints or virtual machine DNS labels, have global scopes, which means that they must be unique across the entire Azure platform.
3. Take precautions with Blueprints / Policies
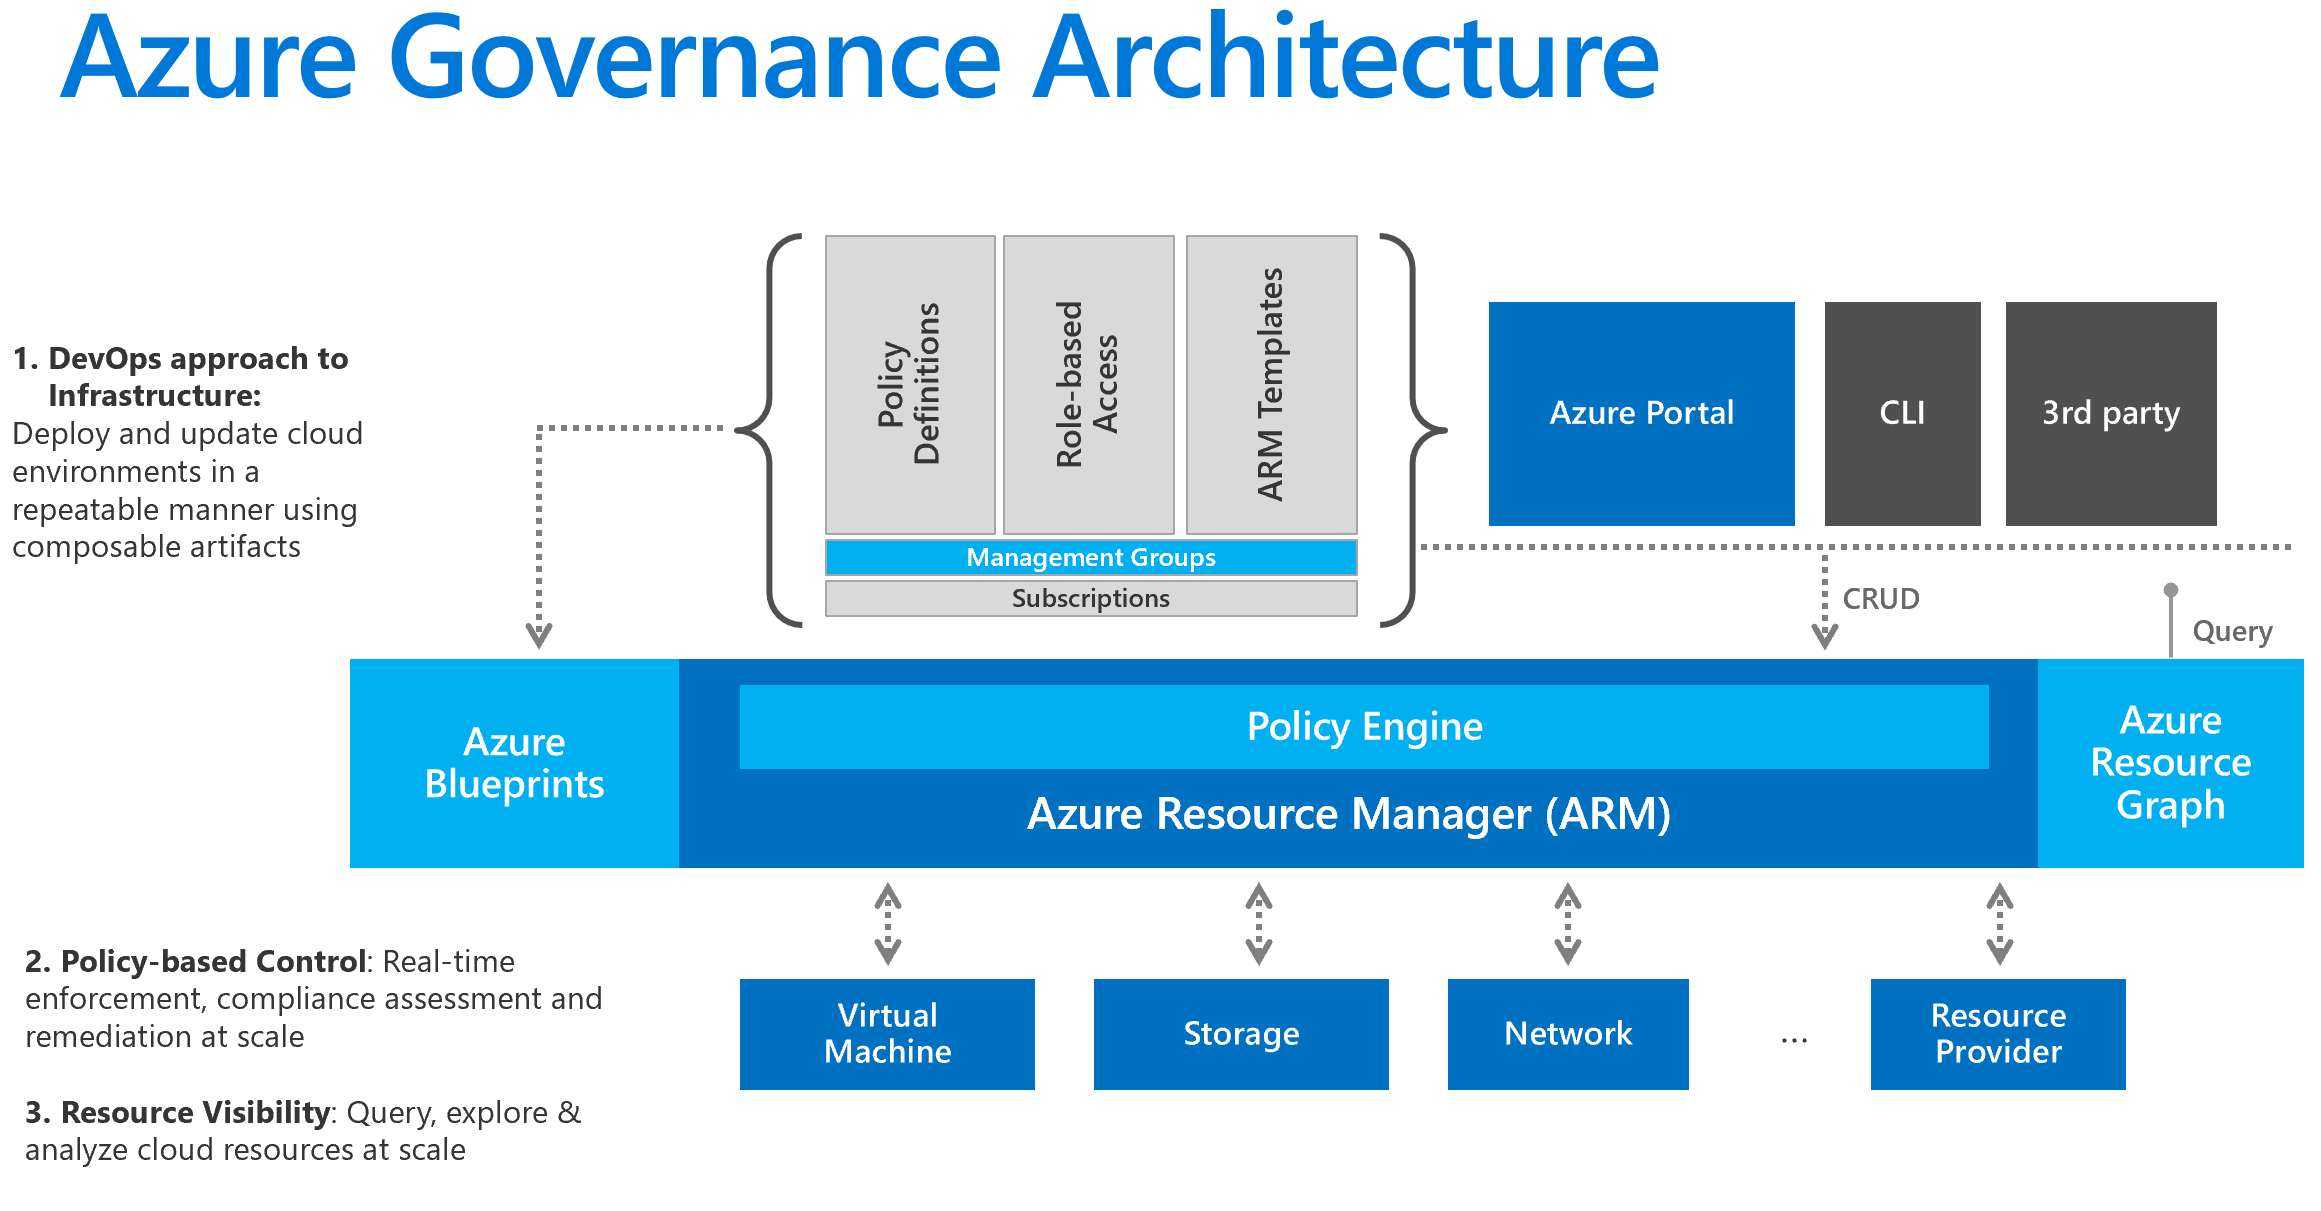
There are several ways to create Azure resources, namely via the Azure portal, ARM templates, Azure CLI or via Powershell. In all cases its very important that Azure resources are created in a controlled manner. We often see organizations struggling with compliance and governance, especially when an organization wants to get back in control after a period of experimenting and starting.
Its very important to adopt the major DevOps practices to truely get back in control. Some practices that really relate to governance are the following.
- Version control
- Continuous integration
- Continuous delivery
- Infrastructure as Code
- Monitoring and logging
These practices all point to a set of underlying principles, namely: traceability and accountability and the least access principle.
Traceability and accountability
Version control and CI/CD enables organizations to get in control of the artifacts that are being deployed in their cloud environment. With an DevOps platform like Azure Devops its very easy to setup source code repositories (with for instance Git) to take care of an organizations source code. Version control helps organizations to collaboratively work on code in a controlled way.
With continuous integration organizations can continuously check the status of their code. Does the latest change negatively or positively impacted the quality of the code? With static code analysis and automated testing with for instance unit testing the quality of the code can be made deterministic. Did the unit test code coverage increase or decrease with the latest change? And did we have more or less compiler warnings?
With continuous delivery organizations can continuously deploy their artifacts to a testing environment. Getting the feedback loop as quick as possible boosts the quality of an Agile development cycle. It enables testers to test a developers work earlier and also it enables product owners and stakeholders to provide feedback earlier. Lastly setting up a delivery pipeline to for instance Azure reduces the amount of deployment mistakes. Once the delivery pipeline is setup it should also work for production.
With infrastructure as code (IaC) organizations can make sure that the created resources in Azure are consistent and reliable. IaC enables developers to specify the infrastructure needed for their applications in code. This can either be template like for instance an JSON ARM template, but it can also be a script with Azure CLI or Azure Powershell. It’s also possible to use cloud independent tools like Terraform, Ansible or Pulumi. In all cases automation accounts are used to create or update resources in Azure. Secondly within your DevOps platform, like Azure DevOps you can make sure that this IaC code is reviewed by at least 2 people and use Continuous delivery pipelines to execute the IaC code against your Azure subscriptions.
With monitoring and logging organizations can get continuous feedback on the health, performance and reliability of their applications. With a good governance framework in place organizations will use the monitoring dashboards as a primary source of information for their production applications. When RBAC is taking care of developers are typically not authorized to sneak and peek into production. More on that in the least access principle.
Least access principle
One very important principle which is truely going to impact your business, both in a developers mindset way but also in a procedural way, is the least access principle. Basically it comes down to the fact that no developer has access to read or modify production related resources. DevOps-engineers should use monitoring and logging to get a sense of how table their production applications are running. With this measure we tackle two very important, namely: GPDR law and unintended production disorders.
When DevOps-engineers can’t touch production and are obligated to work via the CI/CD pipelines and use monitoring then they are going to think different. Initially they might slow down but eventually they will test better and add better monitoring and logging to get insights into their applications. You don’t want your engineers to run blind and therefore implementing this measure requires true care. You can start with taking away their contributor rights and let them fix issues via the CI/CD pipeline.
Temporary access via Privileged Identity Management
Of course we understand that sometimes when a production issue occurs DevOps-engineers have to look into the Azure resources manually. Ideally this is not what you want since how do you know they don’t break other things? How do you know that they do not get access data privacy related data and so on. However sometimes its necessary, especially when the logging isn’t suffice.
Azure Active Directory has a great feature for this scenario, its called Privileged Identity Management, short PIM. With PIM administrators can give just-in-time role assignments to DevOps-engineers. The role assignments can be time-bound so that the role assignments will be resigned after a given period of time. Secondly a very important feature for GPDR and the Dutch AVG privacy laws is the audit history. An admin can download an audit history for the temporary elevated privileges, this can be needed for audits regarding privacy and security.
So what are Azure Policy and Azure Blueprints?
So once you’ve setup the DevOps practices you can apply Azure policies and blueprints to further secure your Azure environment and ensure compliance. Policies are basically a set of rules to which an Azure resource has to comply. Think about tagging your Azure resources with costs center tags or maybe you want to enable SSL/TLS for all web traffic and disable plain Http encrypted traffic. You can enforce this with Azure Policy.
Blueprints on the other hand are more a template sort of functionality. It enables organizations to define a way of setting up Azure resources, a default way of setting up for instance a SQL Server with a Web App. Complying to the set of rules defined by your organization, like for instance default SSL/TLS, always encrypted databases, integrated Active Directory authentication and so on. This helps to prevent that Azure resources are being created that do not comply to your policies.
https://docs.microsoft.com/en-us/azure/devops/learn/what-is-devops
https://www.microsoft.com/en-us/us-partner-blog/2019/07/24/azure-governance
4. Bring logic in the universe with Azure Resource Groups
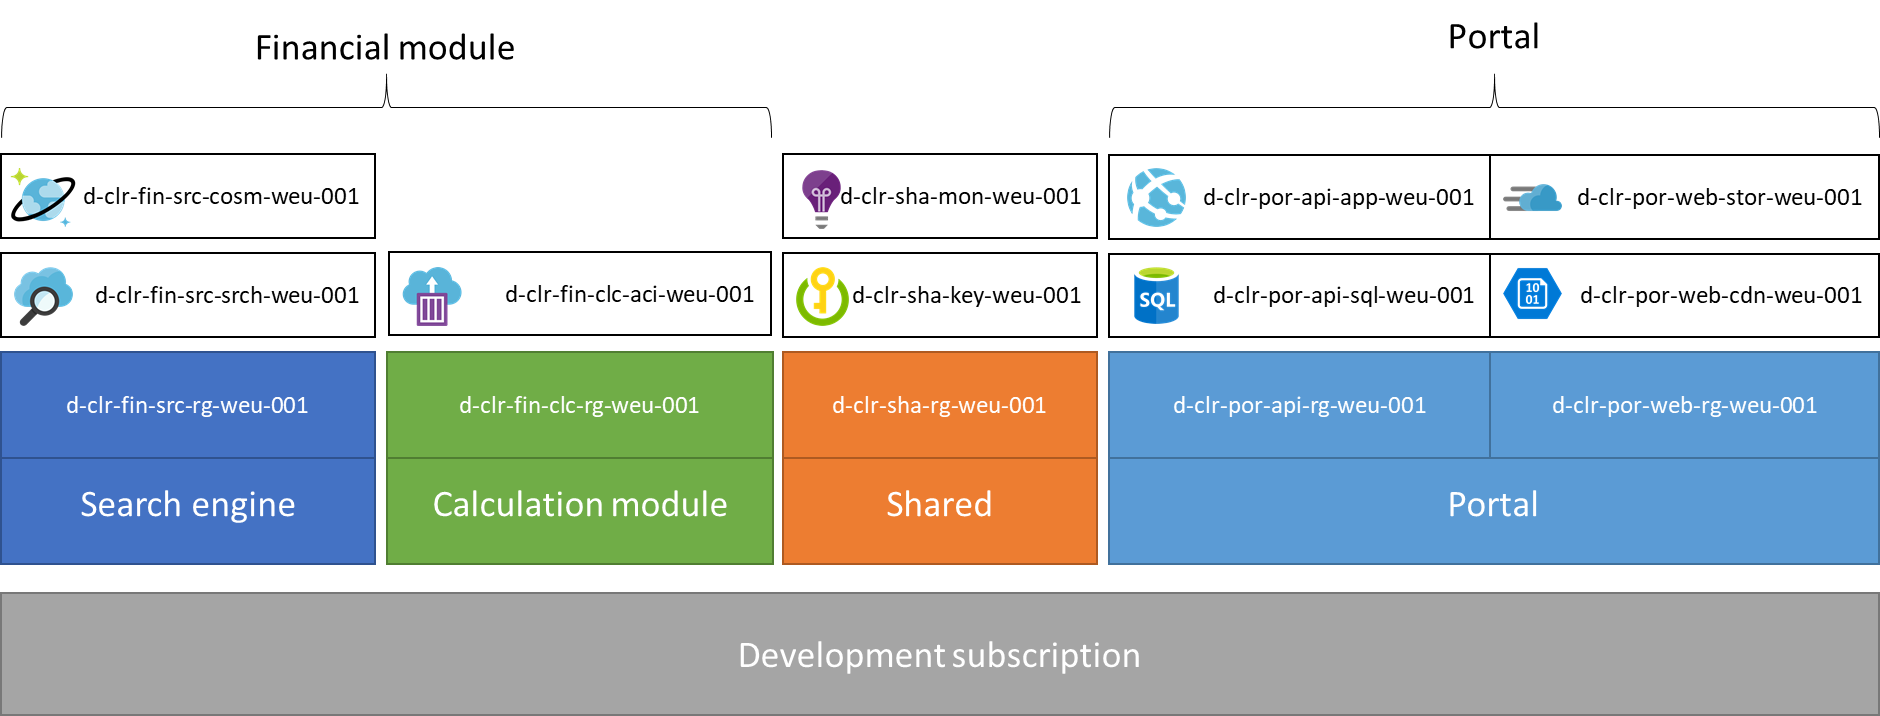
Setting up resource groups in Azure sounds like a next-next-finish exercise, however in practice it can be very difficult to come up with a clear and understandable setup of your resource groups. A rule of thumb that you can use is that a resource group should always be a single unit of deployment. In the example above I have tried to come up with a clear example.
Let’s say you are building a portal. Its build with React and an ASP.net core backend. Ideally you want to be able to deploy the backend API separately from your front-end single page application. Its then fundamental to split those resources up into 2 separate resource groups. In the naming scheme we have used the following pattern: environment-company-production-resource-region-suffix, where the company, Cloud Republic is abbreviated to: clr and the product portal to: por and the financial module to: fin.
With this resource groups are a logical set up Azure resources that are deployed as a single unit. Secondly resource groups are linked with their names to collectively form a product. This helps for instance Ops-engineers to determine to importance of the Azure resources and take the necessary steps.
5. Add security with Role based Access Control (RBAC)
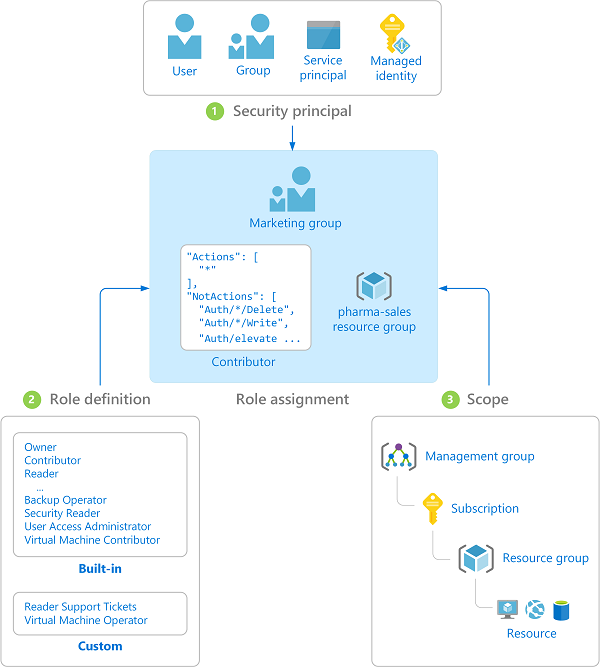
One of the key pillars of any governance framework is an authorization / authentication framework. In Azure its tightly linked with Azure Active Directory and how that integrates with Azure resources. In essence there are 4 types of security principals namely: users, groups, service principals and managed identities. Those service principals are then assigned a role, typically: owner, contributor or reader to a specific scope. Let’s say a resource group or subscription.
Users and groups
Having a clear separation between production and dev/test workloads helps to arrange the right RBAC implementation. For dev and test subscription you might want to assign everyone the contributor role to the whole subscription. In acceptance workloads you might want to narrow down the role assignments to teams of DevOps-engineers being having reader role assignments to their resource groups. And in production you only want maybe first line of support engineers to have reader role assignments.
When DevOps-engineers are assigned roles to certain Azure scopes its very important to create logical groups of users, and then assign the roles to those groups instead of to users directly. If an admin assigns roles directly to users it will quickly become a clumsy mess of role assignments, and people eventually will get access to the Azure resources which they should not get access to.
Managed identities
Managed identities are basically security principals that behave on behalf of applications. These managed identities and their role assignments should always be created through Infrastructure as Code. Redeploying applications should never break these identities.
Service principals
Service principals on the other hand are Azure security principals that are used to connected other services to the Azure environment. Its often used to connect Azure Devops pipeliens to an Azure account. Its very important that these service principals do not become God accounts. Its a common mistake to allow the service principals on the whole subscription. One should always narrow the scope of such a service principals to the resource groups a team should have access to. Secondly the service principals will have access to production application. If a developer has access to the service principals via for instance Azure DevOps pipelines then the engineer basically has delegated production rights. Administrators therefore have to take care of the Azure DevOps roles and rights as well. The rule of thumb that we use alot is that every change has to be seen by 2 sets of eyes. So a DevOps-engineer should never be able to release anything into production without having an extra peer review. This especially counts for edits on the release pipelines, that’s why Yaml release pipelines are such a great feature.
6. Tag your resources to get insights
Tagging resources can help to identify important properties of Azure resources. Its often used as a type of documentation for Azure resources. Most of the time a tag is correlated to either: accountability, costs or reliability, but other categories can be useful as well. With accountability tags we often try to answer questions like: Who created this resource? Who should we contact if anything happens? Which business unit is accountable? And additionally some tracability. For costs related tags we often try to answer questions like: Who is paying for the resource? Which budget does it relate to? And lastly with reliability tags we answers questions like: What is the expected uptime? Is this resource business critical? What needs to happen when a disaster happens?
You can use the template below as a starting point (copied from Microsoft).
| Accountability | Costs | Reliablity |
|---|---|---|
| Start date of the project | Budget required/approved | Disaster recovery |
| End date of the project | Cost center | Service class |
| Application name | Environment deployment | |
| Approver name | ||
| Requester name | ||
| Owner name | ||
| Business unit |
7. Monitor with Azure security center
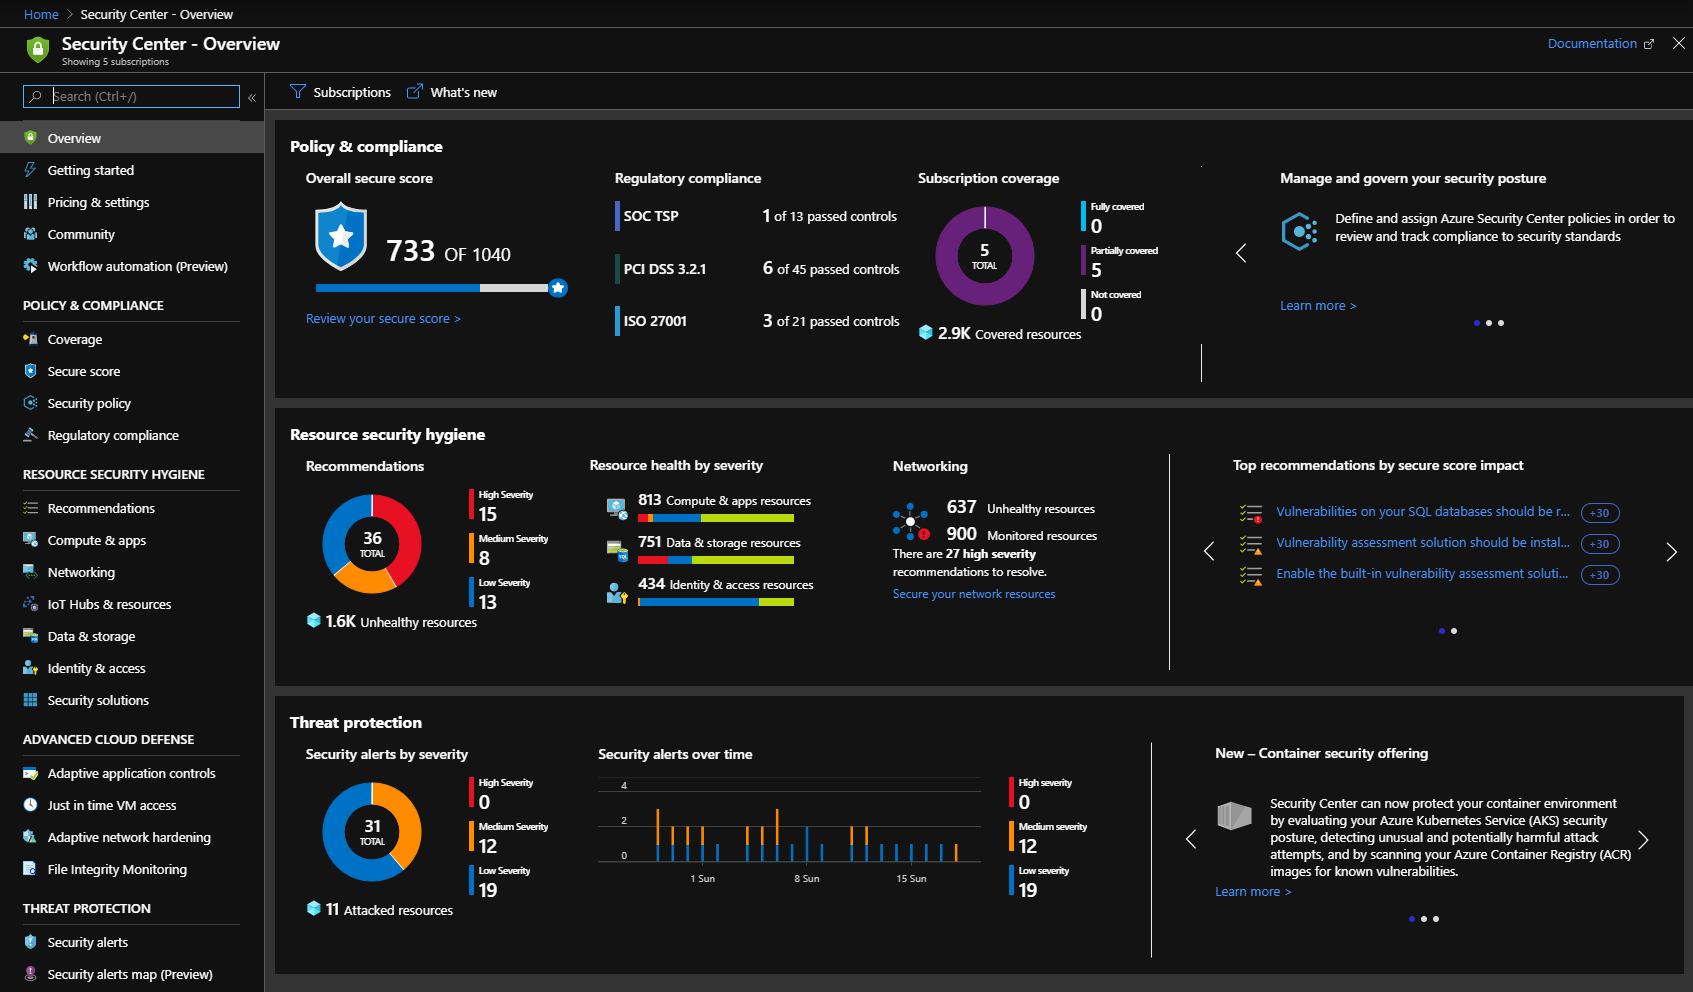
One way of monitoring the security of your Azure resources is with Azure security center. It continuously checks all your Azure resources and will come up with a secure score, recommendations, alerts and possible measures. It’s a costly feature but if security is a top priority for your organization then it can be very helpful.
Alerts
bla
8. Automate your work with Azure Automation
One helpful tool to apply governance measures at scale can be Azure Automation. It can help in several scenario’s ranging from adding tags to all Azure resources to fixing security center findings like outdated VM’s for instance.
9. Lock your viable resources
A quick win for organizations who start to implement the governance framework is to enable locking. With locking you can prevent developers or ops-engineers to accidently remove or edit Azure resources. This can be very helpful in securing critical production workloads. Within Azure there are 2 types of locks, namely: CanNotDelete and ReadOnly.
CanNotDelete
CanNotDelete means that an authorized user is still able to read and modify the resource. However the user is not able to delete the resource without explicitly removing the lock first.
ReadOnly
ReadOnly means that an authorized user is able to read the resource but is not able to change or delete the resource. Effectively it restricts all users even admins to the Reader role.
To conclude
In my opinion resource locking is not something organizations have to implement in an ideal situation. When production workloads are separated in production subscriptions, and when RBAC is implement correctly then the need for Locking resources is minimal. However when organizations are in the beginning of applying this or any governance framework it can be a helpful instrument to prevent mistakes or to ensure business continuity.
Further reading
| Topic | Resource |
|---|---|
| Azure Accounts / Enterprise agreement | https://docs.microsoft.com/azure/azure-resource-manager/resourcemanager-subscription-governance |
| Naming conventions | https://docs.microsoft.com/azure/guidance/guidance-naming-conventions |
| Azure Blueprints | https://docs.microsoft.com/en-us/azure/governance/blueprints/overview |
| Azure policies | https://docs.microsoft.com/en-us/azure/governance/policy/overview |
| Resource tags | https://docs.microsoft.com/azure/azure-resource-manager/resourcegroup-using-tags |
| Resource groups | https://docs.microsoft.com/azure/azure-resource-manager/resourcegroup-overview |
| RBAC | https://docs.microsoft.com/azure/active-directory/role-based-accesscontrol-what-is |
| Azure locks | https://docs.microsoft.com/en-us/azure/azure-resource-manager/resource-group-lock-resources |
| Azure Automation | https://docs.microsoft.com/azure/automation/automation-intro |
| Security Center | https://docs.microsoft.com/azure/security-center/security-center-intro |
References
A big inspiration for this blog comes from this article.
https://novacontext.com/azure-strategy-and-implementation
Running an OpenAI Gym on Windows with WSL
Recently, I have been playing with Artifical Intelligence a little bit. I want to take on this subject a little bit more serious and I was looking for a playground to combine gaming with AI, to make it fun. I came accross the OpenAI Gym which has a built in Atari simulator! How cool is it to write an AI model to play Pacman.
I’m a Windows power user, always have been. I have tried Ubuntu and MacOS but those don’t cut it for me. However the Atari simulator is only supported for Linux, so I have to use Linux. Recently I have heard about WSL (Windows Subsystem for Linux) which is a lite weight way of running Ubuntu on Windows. I thought I’d use that, but sadly it doesn’t bring an UI, and I need one to see Pacman crushing those ghosts. But I managed to fix that.
In this blogpost I’ll show you how to run an OpenAI Gym Atari Emulator on WSL with an UI. Secondly I’ll show you how to run Python code against it. This blogpost doesn’t include the AI part because I still have to learn it :)
Install Ubuntu on WSL for Windows
First of all we have to enable WSL in Windows, you can simply do that by executing the following Powershell code in Admin mode.
1 | Enable-WindowsOptionalFeature -Online -FeatureName Microsoft-Windows-Subsystem-Linux |
After that you can install a Linux distro. I took the Ubuntu 18.04 LTS version. You can easily install it via the Microsoft Store. Don’t forget to execute the following Powershell in Admin mode to enable WSL in Windows.
Once Ubuntu is installed it will prompt you for an admin username and password. After that make sure to update and upgrade Ubuntu, using the following bash command.
1 | sudo apt-get update && sudo apt-get upgrade -y && sudo apt-get upgrade -y && sudo apt-get dist-upgrade -y && sudo apt-get autoremove -y |
For a complete guide on installing WSL on Windows please visit this website.
Screen mirroring
Now that we’ve got WSL running on Windows its time to get the UI working. WSL doesn’t come with a graphical user interface. OpenAI Gym however does require a user interface. We can fix that with mirroring the screen to a X11 display server. With X11 you can add a remote display on WSL and a X11 Server to your Windows machine. With this UI can be mirrored to your Windows host.
First of all we need a X11 Server for Windows. I used the Xming X Server for Windows. Download it and install it on your host machine.
After that we have to link the WSL instance to the remote display server, running on Windows. Execute the following code inside your WSL terminal.
1 | echo "export DISPLAY=localhost:0.0" >> ~/.bashrc |
After that restart the bash terminal or execute this command.
1 | . ~/.bashrc |
It’s as simple as that. You can test if the mirroring works by installing for instance the X11 Apps. It comes with a funny demo application.
1 | sudo apt-get install x11-apps |
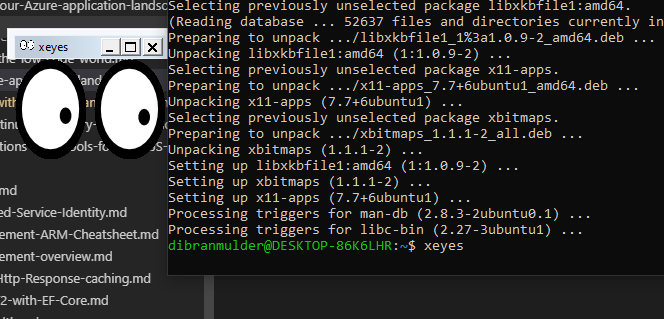
The last thing you have to install is OpenGL for Python. OpenAI Gym uses OpenGL for Python but its not installed in WSL by default.
1 | sudo apt-get install python-opengl |
Anaconda and Gym creation
Now that we’ve got the screen mirroring working its time to run an OpenAI Gym. I use Anaconda to create a virtual environment to make sure that my Python versions and packages are correct.
First of all install Anaconda’s dependencies.
1 | sudo apt-get install cmake zlib1g-dev xorg-dev libgtk2.0-0 python-matplotlib swig python-opengl xvfb |
After that download the shell script for Anaconda and install it.
1 | # Download Anaconda |
Refresh the bash or start the terminal.
1 | . ~/.bashrc |
Now that we’ve got Anaconda installed we can create a virtual environment. Use Python 3.5 because the OpenAI Gym supports that version.
1 | # Create the environment |
Now that we are inside the environment its time to install the OpenAI Gym package. You can do that by simply executing this code.
1 | # Install the gym package |
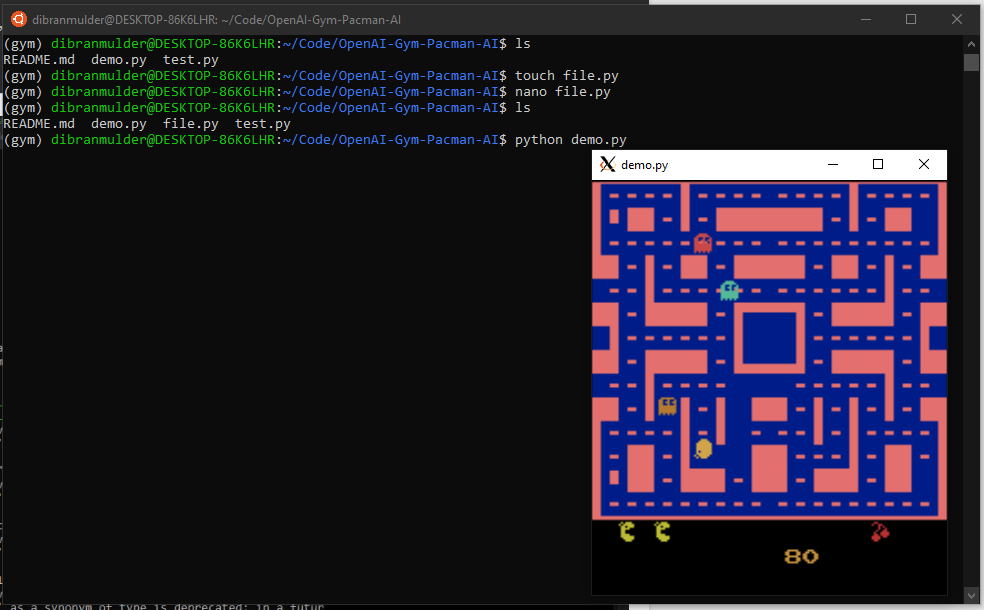
You should be ready! You can now create a Python file with a simple loop that creates a random input for the pacman.
1 | (gym) user@machine: touch test.py |
With the following code.
1 | import time |
VS Code
Working with Nano is a pain in the ass. I prefer VS Code as a development environment. Luckily VS Code comes with a great extension for WSL development called Remote - WSL. You can simply install it and connect with a WSL environment.
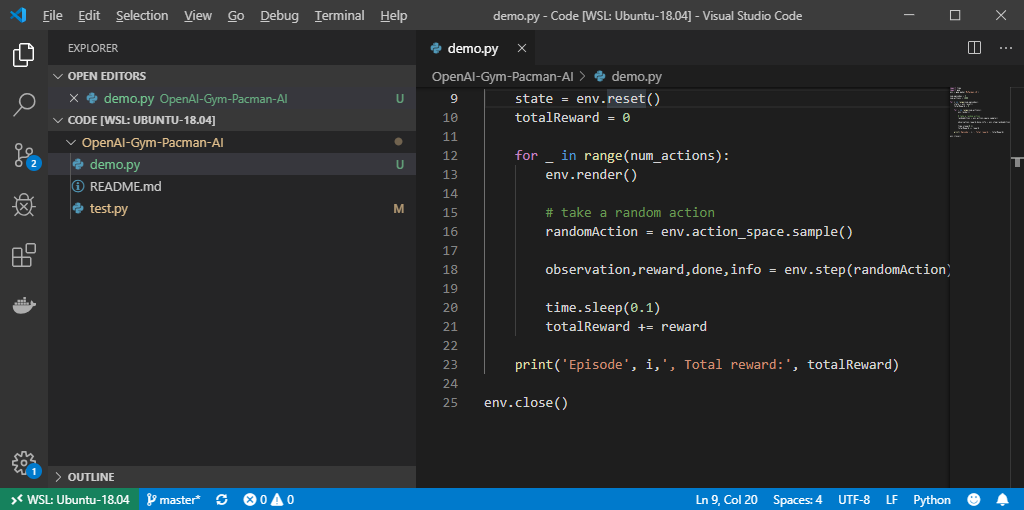
Thats about it! Happy coding.
Sending e-mails with SendGrid and Azure Functions
In this blogpost I’ll show how to send e-mails with SendGrid and Azure Functions.
The goal is to send an email like this, stating in Dutch that some products that people are selling are hijacked.
SendGrid in Azure
First or all we need a SendGrid instance, you can simply create one using the Azure Portal. But who uses the portal to create Azure services? If you’re still doing that you probably have a completely unmanged Azure subscription and you have no control over it. So start using Azure ARM templates or Azure CLI! SendGrid has a nice free tier.

ARM
1 | { |
Azure Function
1 | [] |
Handelbar syntax
1 | <br> |
Autonoom rijden
Dibran over Artificial Intelligence.
Dit is de eerste blog in de serie: “Dibran over Artificial Intelligence”, een serie blogs waarin ik dieper in ga op de hedendaagse mogelijkheden en toepassingen van artificial intelligence (kunstmatige intelligentie). Omdat het taalgebruik in het software- en artificial intelligencevakgebied doorgaans Engels is zal ik in mijn blogs ook de Engelse benamingen gebruiken.
Wat is autonoom rijden?
We horen in de media veel over autonoom rijden, bijna alle autofabrikanten zijn er mee bezig maar hoe ver zijn ze eigenlijk? En wanneer kunnen we echt slapend op de achterbank naar ons werk rijden? Hoe werkt het eigenlijk? In deze blogpost geef ik antwoord op deze vragen.
Autonoom rijden is opgedeeld in 5 levels(niveaus). Van geheel handmatig rijden tot volledig automatisch. Er is nog geen enkele auto in de wereld, ook geen test auto’s, die al level 5 hebben gehaald. Dit komt omdat een level 5 auto overal ter wereld zelfstandig moet kunnen rijden, dus van hartje Amsterdam tot de wegen in Afrika. Daarnaast moet het ook om kunnen gaan met allerlei omstandigheden, zoals: sneeuw, extreme regenval, wegwerkzaamheden, etc.

Autonoom rijden in de praktijk
De meeste toepassingen van autonoom rijden die we vandaag de dag zien zijn op level 2 of 3 niveau. Vaak wordt de combinatie van een ‘x’ aantal functies omgedoopt tot een nieuwe term als “autopilot” of iets vergelijkbaars. In de praktijk is het eigenlijk een combinatie van ingeschakelde functies waardoor de auto in bepaalde omstandigheden zelfstandig kan rijden. Omdat Tesla de meeste informatie deelt en ook het meest ver is met haar implementatie neem ik Tesla als voorbeeld. De autopilot van Tesla is momenteel een combinatie van de volgende functies: Traffic-Aware Cruise Control, Autosteer, Auto Lane Change, Side Collision Warning, Automatic Emergency Braking. Daarnaast omvat het ook nog overige functies zoals AutoPark en Summon.
De autopilot staat niet standaard aan wanneer de auto wordt gestart. De bestuurder kan op een snelweg de autopilot aanzetten, ook wel ‘engagen’ genoemd. De auto zal dan op basis van het niveau van zelfrijden automatisch afstand houden met de voorganger en automatisch sturen. Sommige auto’s zoals de Mercedes E-Klasse en de Tesla’s kunnen ook automatisch van rijbaan wisselen wanneer de bestuurder de richtsaanwijzer een paar seconden vasthoudt. De auto gebruikt dan zijn sensoren om te bepalen of de weg naast de auto beschikbaar is en sturen dan zelf naar de gewenste rijbaan. Dit is typisch een voorbeeld van level 2 autonomie. Onlangs heeft Tesla Auto Lane Change uitgebracht. Hierdoor hoeft de bestuurder niet meer zijn richtsaanwijzer te gebruiken om van rijbaan te wisselen, de auto bepaalt dan namelijk zelf wanneer het moet wisselen van rijbaan. Het idee is dat hiermee een Tesla zelfstandig op en afritten kan nemen op de snelweg, ook is het in staat op langzaam verkeer zoals vrachtwagens in te halen. Dit is een typisch voorbeeld van een level 3 feature.
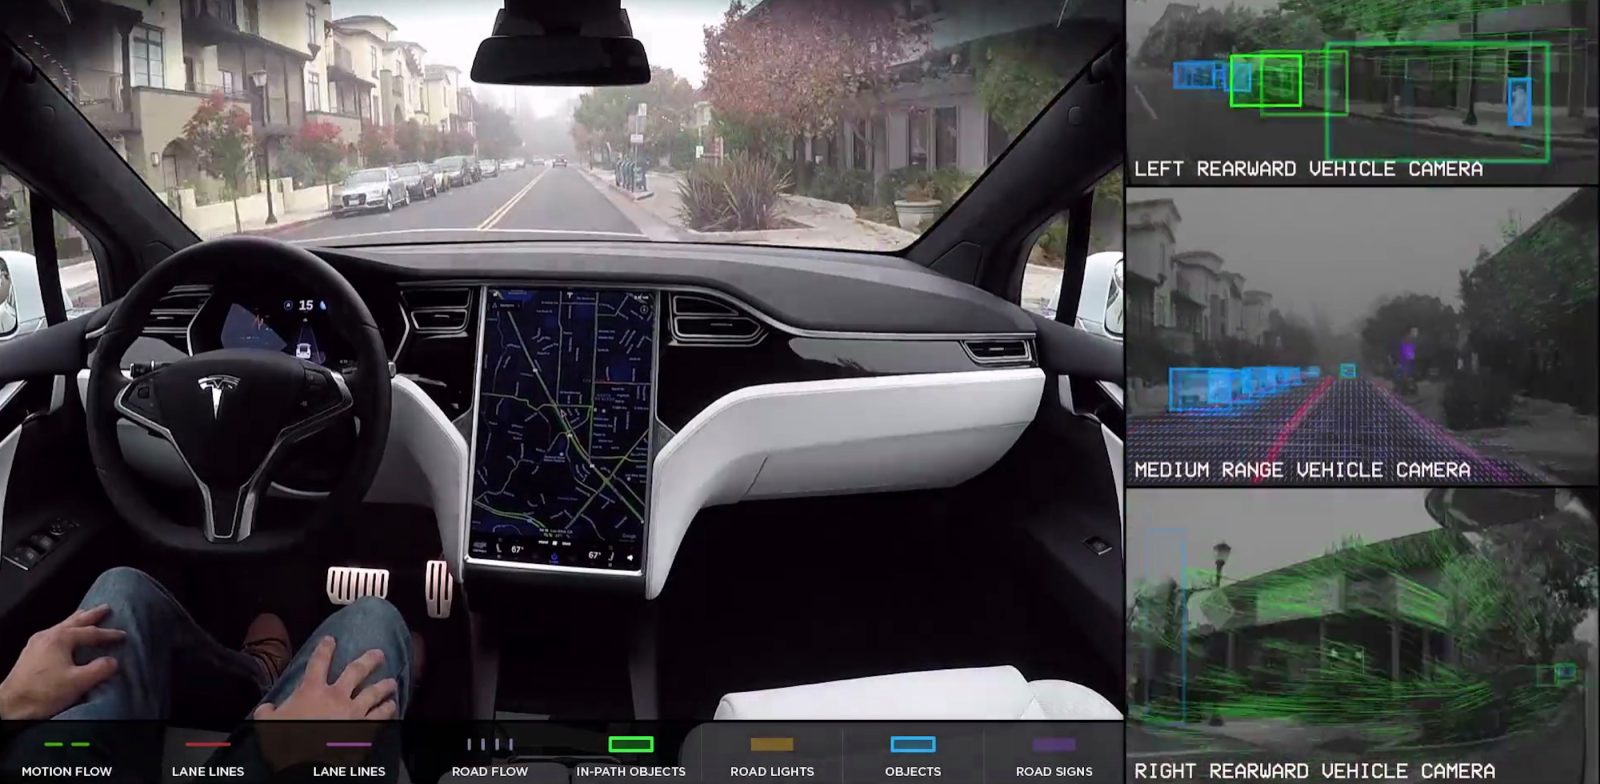
Wanneer de auto de situatie niet meer kan inschatten zal het de besturing aan de gebruiker teruggeven. Dit gebeurt ook wanneer de gebruiker zelf gaat sturen of wanneer het op de rem trapt. Dit moment noemen we ‘disengagen’. Disengage momenten zijn belangrijk om van te leren vooral wanneer de bestuurder de controle overneemt over het voertuig. Veel autofabrikanten zullen de data van de sensoren bewaren om disengage momenten later te evalueren.
Momenteel is het zo dat de bestuurder moet opletten wanneer autopilot is ingeschakeld. De bestuurder moet zelfs het stuur af en toe vasthouden om aan te geven dat het nog oplet. Wanneer de bestuurder dit signaal negeert zal de auto hem waarschuwen, door flitsende meldingen en geluidsindicaties. Als de gebruiker weigert om het stuur vast te houden dan wordt disengage geforceerd en is autopilot voor de rest van de rit uitgeschakeld.
Vooralsnog zijn er weinig autofabrikanten die een auto met autopilot of vergelijkbare functionaliteit bieden. Het hogere segment van de auto’s van Volvo, Audi en Volkswagen hebben vaak wel een uitgebreide suite aan functies die op level 2 niveau zitten. Bijvoorbeeld adaptive cruise control en soms zelfs lane keeping. Echter er zijn weinig auto’s op de markt die dit combineren in een zelfrijdende modus.
Hoe werkt autonoom rijden?
Een mens gebruikt zijn cognitieve zintuigen om een auto te besturen. Vanzelfsprekend is het gezichtsvermogen het belangrijkste zintuig voor het besturen van een auto. Met ons zicht zijn wij in staat om te bepalen hoe de weg loopt, diepte in te schatten en gevaren te herkennen. Met ons zicht, gehoor en tast verzamelen wij doorgaans genoeg informatie om een veilige autoreis te maken.

Toch is de mens niet perfect, los van domme beslissen is ons gezichtsveld namelijk vrij beperkt. Met spiegels hebben we dit gedeeltelijk opgelost, echter het is voor ons onmogelijk om telkens alle informatie te verzamelen. We kunnen maar 1 van de 4 gezichtsvelden tot ons nemen. Door periodiek alle informatiekanalen af te scannen krijgen we toch een vrij compleet beeld van onze omgeving.
Bij een autonome auto gaat het in essentie hetzelfde. Een auto wordt verrijkt met tal van sensoren waarmee genoeg informatie verzameld wordt om de omgeving van de auto in kaart te brengen. Deze ruwe data wordt ter plekke, in de auto, verwerkt door machine learning software. Dit levert een soort van kunstmatige menselijke intelligentie ervaring op die we doorgaans artificial intelligence noemen.
Sensoren
Je hebt meerdere sensoren nodig om een auto autonoom te laten rijden. Niet alle fabrikanten gebruiken dezelfde sensoren, wat dit onderwerp an sich al tot een interessant onderwerp van discussie maakt. Het doel van de sensoren is om onder alle omstandigheden een juiste representatie te kunnen maken van de omgeving van de auto. Dit betekent dat de sensoren moeten kunnen werken, in het donker, in sneeuw, hevige regenval, felle zonneschijn, etc.
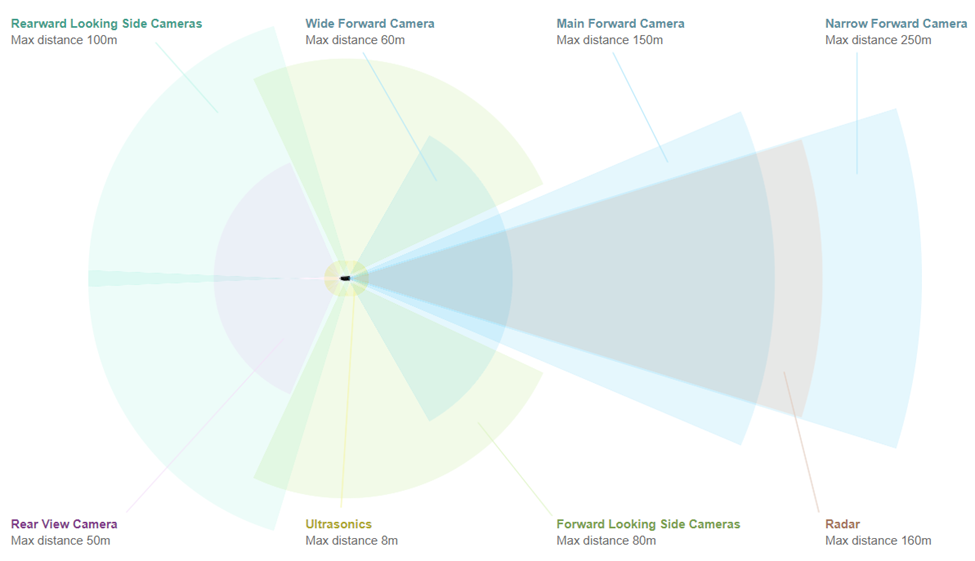
Alle huidige toepassingen van autonoom rijdende auto’s maken gebruik van camera’s. In het geval van Tesla zitten er 8 camera’s in een auto. Deze camera’s hebben gezamenlijk een 360° beeld rondom de auto. Afhankelijk van de kijkrichting is het een camera van hogere kwaliteit waardoor het verder weg ook scherp kan zien.
Naast camera’s zien we nog meer sensoren die gebruikt worden. In het geval van Tesla worden ook nog radar en ultrasonics gebruikt. Met een radar kunnen objecten in de ruimte voor de auto gedetecteerd worden. Het mooie aan een radar sensor is dat het door fysieke objecten heen kan meten. Als het bijvoorbeeld heel hard regent, of er is mist dan kan de radar toch detecteren of er objecten in de buurt zijn. Vaak zit de radar alleen aan de voorkant van de auto. We zien bij veel auto’s dat de voorkant van de auto de meeste sensoren heeft, logisch aangezien daar de meest belangrijke informatie vandaan komt.
Ultrasonics kennen we van de parkeersensoren in onze huidige auto’s. Het is voor camera’s vrij moeilijk te detecteren of er een object naast de auto staat als hij heel dicht naast de auto staat. In het geval van Tesla zitten er 12 ultrasonics in de auto waarmee objecten in de nabije omgeving van de auto ook gedetecteerd kunnen worden.
“Lidar vs Vision”
Een verhitte discussie onder onderzoekers en ontwikkelaars van zelfrijdende auto’s is het gebruik van Lidar. Lidar is in wezen een soort van radar sensor die werkt op basis van laserstralen. Vaak zien we dit soort sensors boven op een dak van een auto, de sensor draait razendsnel rond en schiet allemaal laserstraaltjes af. De weerkaatsing van de laserstraaltjes wordt opgevangen door de sensor en de software kan hiermee een gedetailleerde representatie maken van de omgeving. Een belangrijk voordeel van de sensor is dat er een 360° 3D kaart van de omgeving mee gemaakt kan worden. In tegenstelling tot Radar die slechts een 3D kaart van de voorkant van de auto maakt. Belangrijke nadelen die worden genoemd zijn:
- Het is een dure sensor is om te maken.
- Er gaat informatie verloren die je met beeldherkenning wel zou kunnen interpreteren.
Lidar zou bijvoorbeeld een verkeersbord kunnen detecteren. Maar de betekenis van het bord zou het niet kunnen bepalen. Daarnaast kan lidar moeilijker gebruikt worden voor object herkenning. Stel er vliegt een plastic tas voorbij op de snelweg. Is dat een plastic tas of een kapotte autoband? Met lidar heb je niet genoeg informatie op dit te achterhalen.
- Objecten achter objecten worden niet herkent.
Lidar gebruikt laser signalen in het visuele spectrum. Hierdoor is het supersnel en super accuraat. Echter heeft dit ook als gevolg dat het niet objecten achter objecten kan herkennen. Een radarsensor kan dit wel, doordat het een veel lagere frequentie gebruikt waardoor de sensor de auto voor de auto waar je achter rijdt ook kan detecteren.
Onlangs is er in de “Lidar vs Vision” discussie nog wat kolen op het vuur gegooid door Elon Musk, CEO van Tesla. Hij claimde het volgende: “Lidar is a crutch” en “Anyone relying on Lidar is doomed”. Een gedurfde uitlating, echter een uitlating die later grondig is onderbouwt door Tesla in de Autonomy days Videos.
Er is volgens Tesla namelijk geen reden waarom je met “vision technology” (de camera sensors) geen diepte zou kunnen bepalen en daarmee een 3D kaart van de omgeving kan maken. De mens doet in feite precies hetzelfde met zijn ogen. Wanneer 2 camera’s hetzelfde beeld vangen kan er op basis van stereo vision techniek diepte worden gemeten. Bij ons vindt de diepte bepaling plaats in het brein maar bij camera’s en computers kunnen we algoritmes implementeren die exact hetzelfde doen.

Lidar lijkt dus een overbodige sensor te zijn, echter momenteel is het wel de meest accurate sensor om een 3D representatie van de omgeving te krijgen. De verwachtingen zijn echter dat vision in combinatie met radar het op lange termijn gaat winnen.
“People don’t drive with lasers in their forehead.”
Software
Alle output van de sensoren in een auto genereren een enorme stroom aan data. Uit deze stroom van data moet alle informatie gehaald worden om de auto veilig over de weg te laten rijden. Hiervoor heb je software nodig. Logica die van camera beelden, ultrasonic en radarsignalen een representatie kan maken van de wereld en op basis van die representatie de juiste beslissingen kan maken. Maar hoe schrijf je ooit een programma dat alle scenario’s omvat? Als je dit leest en niet kan programmeren vergelijk het dan met het maken van een flowchart. Hoe kan je een alomvattend flowchart maken die in 99.999% van de gevallen de juiste beslissing neemt? Dat is praktisch onmogelijk.
Van data naar een representatie van de wereld
Hoe kom je van ruwe camera beelden, ultrasonic en radar gegevens tot een goede representatie van de wereld? Belangrijk is om alle informatie uit de verschillende kanalen te combineren tot één werkelijkheid. Camera’s hebben vaak een overlappend beeld waardoor herkenning van objecten elkaar kunnen bevestigen of juist een error van 1 sensor kunnen voorkomen. Hetzelfde geldt voor radar en ultrasonic gegevens. Objecten die door de camera worden herkend dienen ook door de radar gezien te worden, zo kan het systeem met meer zekerheid zeggen of een object echt aanwezig is.
Het systeem combineert alle informatie van de sensoren en rekent het om naar een universeel lokaal coördinatensysteem. De software kan dan met alle gegevens de juiste beslissing gaan nemen. Hoe dat plaats vindt leg ik later uit.
Een ander belangrijk gegeven is dat de verwerking van alle data lokaal in de auto plaatsvindt. Het is namelijk praktisch onmogelijk om alle data te versturen naar de cloud om daar de verwerking van de gegevens te laten plaatsvinden. Dit komt omdat het simpelweg te veel data is die in te korte tijd verwerkt moet zijn. 8 camera’s, 12 ultrasonic en een radarsensor genereren gezamenlijk makkelijk 100Mbps. Dat is te veel data om realtime over-the-air te sturen naar een datacenter en te wachten op het antwoord. Daarbij opgeteld is de latency naar een datacenter vaak al 20ms. Hoe sneller een auto een beslissing kan nemen hoe veiliger de situatie wordt. Stel dat er ineens een kind de weg oversteekt, dan wil je dat de auto supersnel reageert.

Objectherkenning uit camera beelden
We weten dus dat de beelden van de camera’s in de auto verwerkt moeten worden. Maar hoe kan dat zonder dat de auto een supercomputer is. Hier komt een belangrijke techniek in de artificial intelligence wereld om de hoek kijken, namelijk: neural networks. Een neural network (neuraal netwerk) is een techniek die het menselijk brein simuleert. Het menselijk brein bestaat namelijk uit netwerk van miljoenen neuronen. Deze neuronen krijgen constant prikkels van andere neuronen en conditioneel geven ze het signaal door aan de neuronen die vastzitten aan het betreffende neuron. Over tijd heeft het neuron geleerd of een bepaalt input signaal doorgegeven moet worden aan een volgend neuron. Zo herkennen wij situaties, beelden en geluid.
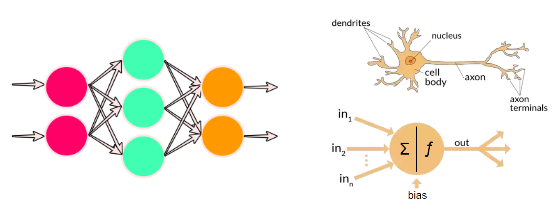
Bij artificial neural networks werkt het in feite hetzelfde. Het leren, wat bij een mens automatisch gaat, is echter een complex proces waar veel data voor nodig is. Dit leer proces bij neural networks heet backpropagation. Wat er gebeurt is dat het neural network een afbeelding wordt getoond met daarbij de oplossing. Backpropagation is een algoritme waarbij de connecties tussen de neuronen zodanig worden aangepast dat bij de volgende keer dat dezelfde afbeelding als input wordt gegeven aan het neural network, de kans hoger is dat het gegeven antwoord als output eruit komt. Bij dit proces is het belangrijk dat niet telkens dezelfde afbeelding als trainingsdata aan het neural network wordt gevoed. Een gevarieerde dataset levert altijd veel betere resultaten op. In het geval van zelfrijdende auto’s is het dus superbelangrijk om afbeeldingen van objecten (auto’s, fietsers, wandelaars, etc) te hebben in de sneeuw, regen, nacht en felle zon. Zodoende zal het neural network beter de juiste waarde tussen de connecties kunnen leggen om tot de juiste output te komen.
Je kunt je misschien voorstellen dat het herkennen van objecten nog lang niet genoeg is om een auto zelf te laten rijden. Stel je kunt auto’s, fietsers, voetgangers, brommers, vrachtwagens, etc detecteren dan nog is hun gedrag vrij moeilijk te voorspellen. Toch wordt hier dezelfde techniek voor gebruikt alleen dan in een ander neural network. Onze hersenen doen eigenlijk hetzelfde. De visuele cortex is het gedeelte van het brein dat de input van het netvlies omzet naar beelden, wat wij met die beelden doen is aan een ander gedeelte in het brein overgelaten. Zet het ons aan tot beweging, emotie of iets anders? Bij zelfrijdende auto’s werkt dat ook zo. De output van het ene neural network is de input voor het volgende. Als we een auto hebben herkend dan is dat de input voor het “gevaren” neural network. Die gaat het gedrag van de auto voorspellen om zodoende te bepalen of de auto nog op een veilige tour is. Dit neural network leert precies op dezelfde manier als het object herkennings neural network. Het systeem wordt gevoed met allerlei veilige en onveilige gedragingen van auto’s. Zo herkent het op de duur het veilige en onveilige gedrag van automobilisten en signaleert de juiste output voor het volgende neural network.
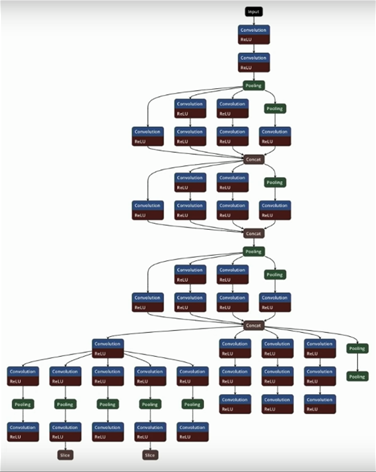
Om uiteindelijk van al die input bronnen tot een zelfrijdende auto te komen zijn er dus meerdere neurale netwerken nodig die in verbinding met elkaar staan. Tesla heeft op de Autonomy Day informatie gedeeld over hun neurale netwerken. Het is indrukwekkend om te zien wat voor landschap van neural networks en software er nodig is om een level 2-3 zelfrijdende auto te maken. Mijn verwachting is dat deze software nog factoren complexer gaat worden naarmate de auto richting level 4 en 5 self driving gaat.
Zelflerende software
Van artificial intelligence software wordt vaak geclaimd dat het zelflerend is. Dat het over tijd vanzelf beter wordt en dat dat soms een gevaar kan vormen voor de samenleving. Dat deze software niet vanzelf beter wordt werd wel duidelijk tijdens de presentaties op de Tesla Autonomy Day. Om de software telkens beter te maken en meer situaties te laten ondersteunen voert Tesla constant updates uit. Deze updates vinden over-the-air plaats. Dat wil zeggen dat Tesla op afstand updates kan doorvoeren om de zelfrijdende auto’s beter te maken. Andersom gebruiken ze de auto’s ook om data te verzamelen die nodig is om de neural networks te trainen met de juiste situaties. Dit proces noemt Tesla de data engine.
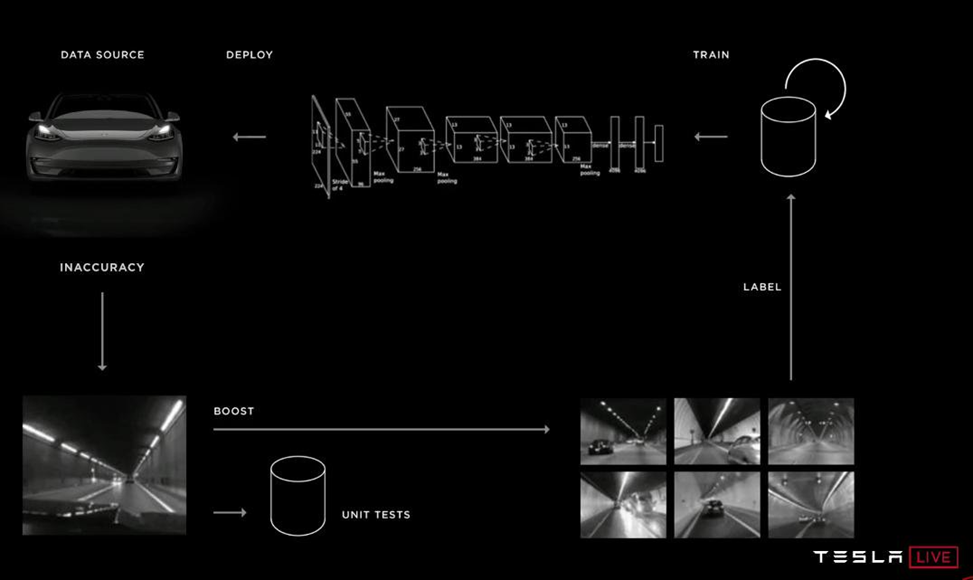
Het komt er kort op neer dat Tesla situaties identificeert die nog niet goed worden opgepakt door de software, inaccuracies genoemd. Denk bijvoorbeeld aan vuil op de weg, plastic zakken, banden, etc, of wat ik persoonlijk een mooi voorbeeld vind is een fiets achterop een fietsendrager van een auto. Je kunt je voorstellen dat de fiets geïdentificeerd wordt als verkeersdeelnemer. Het systeem kan op basis van deze foutieve herkenning hele rare beslissingen nemen. Het systeem heeft namelijk geleerd dat het voorzichtig om moet gaan met fietsers. Wat Tesla dan doet in zo’n geval is dat ze de fleet van auto’s vragen om vergelijkbare situaties op te sturen naar hun datacenters.
Alle auto’s van Tesla, met de full self driving setup, hebben een lokale opslag van data. Hierin worden momenten opgeslagen waarin de software geen goede beslissing kon nemen of wanneer de bestuurder ingreep. De gehele output van alle sensoren wordt opgeslagen samen met de output van de software, dit worden ook wel clips genoemd. Wanneer de ontwikkelaars bij Tesla een inaccuracy willen oplossen query-en ze de fleet naar vergelijkbare situaties, ook hier worden neural networks toegepast om vergelijkbare situaties ten opzichte van de inaccuracy situatie te vinden. Alle resultaten worden over-the-air naar de datacenters van Tesla gestuurd. Wat er dan gebeurt is dat mensen handmatig of semi geautomatiseerd de situaties gaan labelen. Ze gaan dus bij de camera streams aangegeven waar de fiets zich bevindt achterop de auto. Met deze gelabelde data gaan ze de juiste neural networks trainen met het eerdergenoemde backpropagation algoritme. Wat er dus gebeurt is dat de connecties tussen de neuronen zodanig worden aangepast dat een fietser niet als object herkend wordt wanneer de fiets achterop een auto is vastgemaakt.
Een belangrijk concept wat Tesla hanteert is shadow mode. Het verbeterde neural network wordt eerst in shadow mode gedraaid in de auto’s. Pas wanneer uit de analyses blijkt dat het nieuwe neural network beter presteert dan de voorgaande, dan pas gaan ze over op de nieuwe versie. Het kan dus zijn dat jouw Tesla terwijl je aan het rijden bent een test versie van een neural network naast je actieve neural network draait. Je merkt hier helemaal niets van.

Voor Tesla zijn er 3 factoren die het verschil maken om als eerste een zelfrijdende auto te leveren. Het is superbelangrijk dat er een grote gevarieerde data set opgebouwd wordt. In het geval van Tesla wordt deze dataset opgebouwd door data te verzamelen van alle auto’s die de volledige hardware setup hebben voor full self driving. Daarnaast is het belangrijk dat Tesla de fleet van auto’s kan vragen om data van vergelijkbare situaties op te leveren. Het is praktisch onmogelijk om alle data van de auto’s op te sturen naar de servers van Tesla. In plaats daarvan hebben ze een vindingrijke oplossing gevonden waarin ze de auto’s gebruiken als data buffer die ze ondemand kunnen bevragen. Als laatst is shadow mode een hele belangrijke feature. Dit is Tesla’s manier om te testen of de nieuwe software beter presteert dan de oude. Omdat de software een combinatie is van meerdere neurale netwerken is het moeilijk te testen met klassieke test routines. Uiteraard doen ze dat wel maar de praktijk moet leren of de nieuwe versie beter is dan de vorige.
Hardware
Het verwerken van alle data in de neural networks vereist nogal wat van de hardware specificaties van de computer in de auto. Het evalueren van data in een neural network levert enorm veel mathematische berekeningen op. Het is namelijk zo dat op basis van het input signaal er calculaties moeten plaatsvinden om te evalueren welk opvolgend neuron een signaal moet krijgen. Op basis van de waardes die aan de connecties tussen de neuronen hangen wordt het volgende neuron namelijk gesignaleerd. Je kunt je voorstellen dat er miljoenen operaties per seconde uitgevoerd moeten worden om van een input signaal naar een output te komen.
Uit het Bitcoin tijdperk hebben we geleerd dat grafische videokaarten erg goed zijn in het uitvoeren van mathematische berekeningen. Vergelijkbare operaties dienen namelijk ook te gebeuren in games. Hierin bewegen objecten zich ook in de ruimte en interacteren met elkaar. Het is dan ook geen verassing dat in de Tesla Hardware 2.0 en 2.5 NVidia GPU’s worden gebruikt om deze berekeningen uit te voeren. Wat we echter in het Bitcoin tijdperk ook hebben geleerd is dat chips met een dedicated ontwerp nog sneller kunnen zijn in het verwerken van deze data. Dit soort chips heten ASIC chips (application specific integrated circuit).

We kunnen stellen dat hoe flexibeler de chip is, hoe minder efficiënt hij is. Een grafische kaart van NVidia kan gebruikt worden in veel situaties. Ze zijn wel beperkt tot het verwerken van grafische/mathematische berekeningen maar je zou ze net zo goed kunnen inzetten voor games. Wat Tesla heeft gedaan is dat ze een eigen chip hebben ontworpen die puur en alleen bedoeld is voor de zelfrijdende auto. De neural networks kunnen hierdoor super efficiënt worden geëvalueerd door de hardware waardoor het wel tot 2100 frames van video signaal per seconde kan verwerken, dat is zo’n 250fps per camera.
Toekomst
De toekomst van zelfrijdende auto’s komt razendsnel op ons af. Tesla heeft een dominante positie en lijkt die de komende tijd nog niet te verliezen. Ze hebben by-far de grootste fleet met auto’s die actief gebruikt worden om het systeem beter te maken.
Zelfrijdende auto’s beloven niet alleen veiliger te zijn maar brengen ook nieuwe mogelijkheden met zich mee. Zo heeft Tesla al een nieuw concept aangekondigd namelijk RoboTaxi. Met RoboTaxi kunnen auto eigenaren hun auto toevoegen aan een soort van Uber fleet van auto’s. Eigenlijk is je auto dan een zelfrijdende taxi wanneer je hem niet gebruikt. Dit klinkt natuurlijk erg mooi maar de praktijk moet uitwijzen of dit haalbaar is.
Daarnaast hebben bedrijven als Tesla ook nog een grote uitdaging aangaande wetgeving en verzekeringen. Het zal nog een hele tijd duren voordat de juridische puzzel opgelost wordt wanneer er geen bestuurder aanwezig is in de auto.
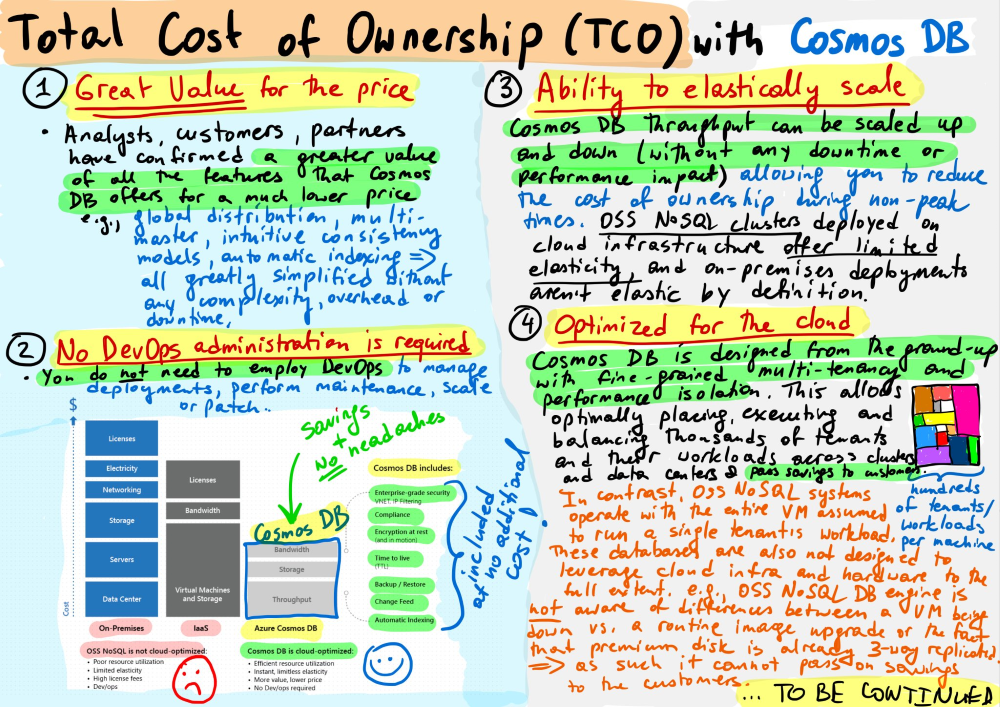
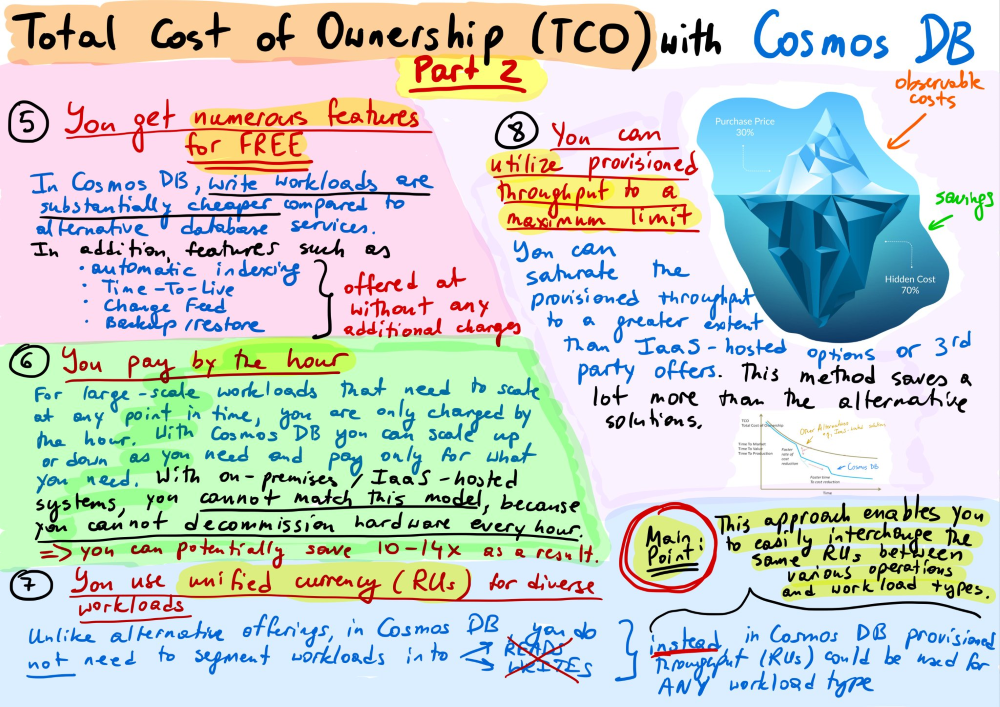
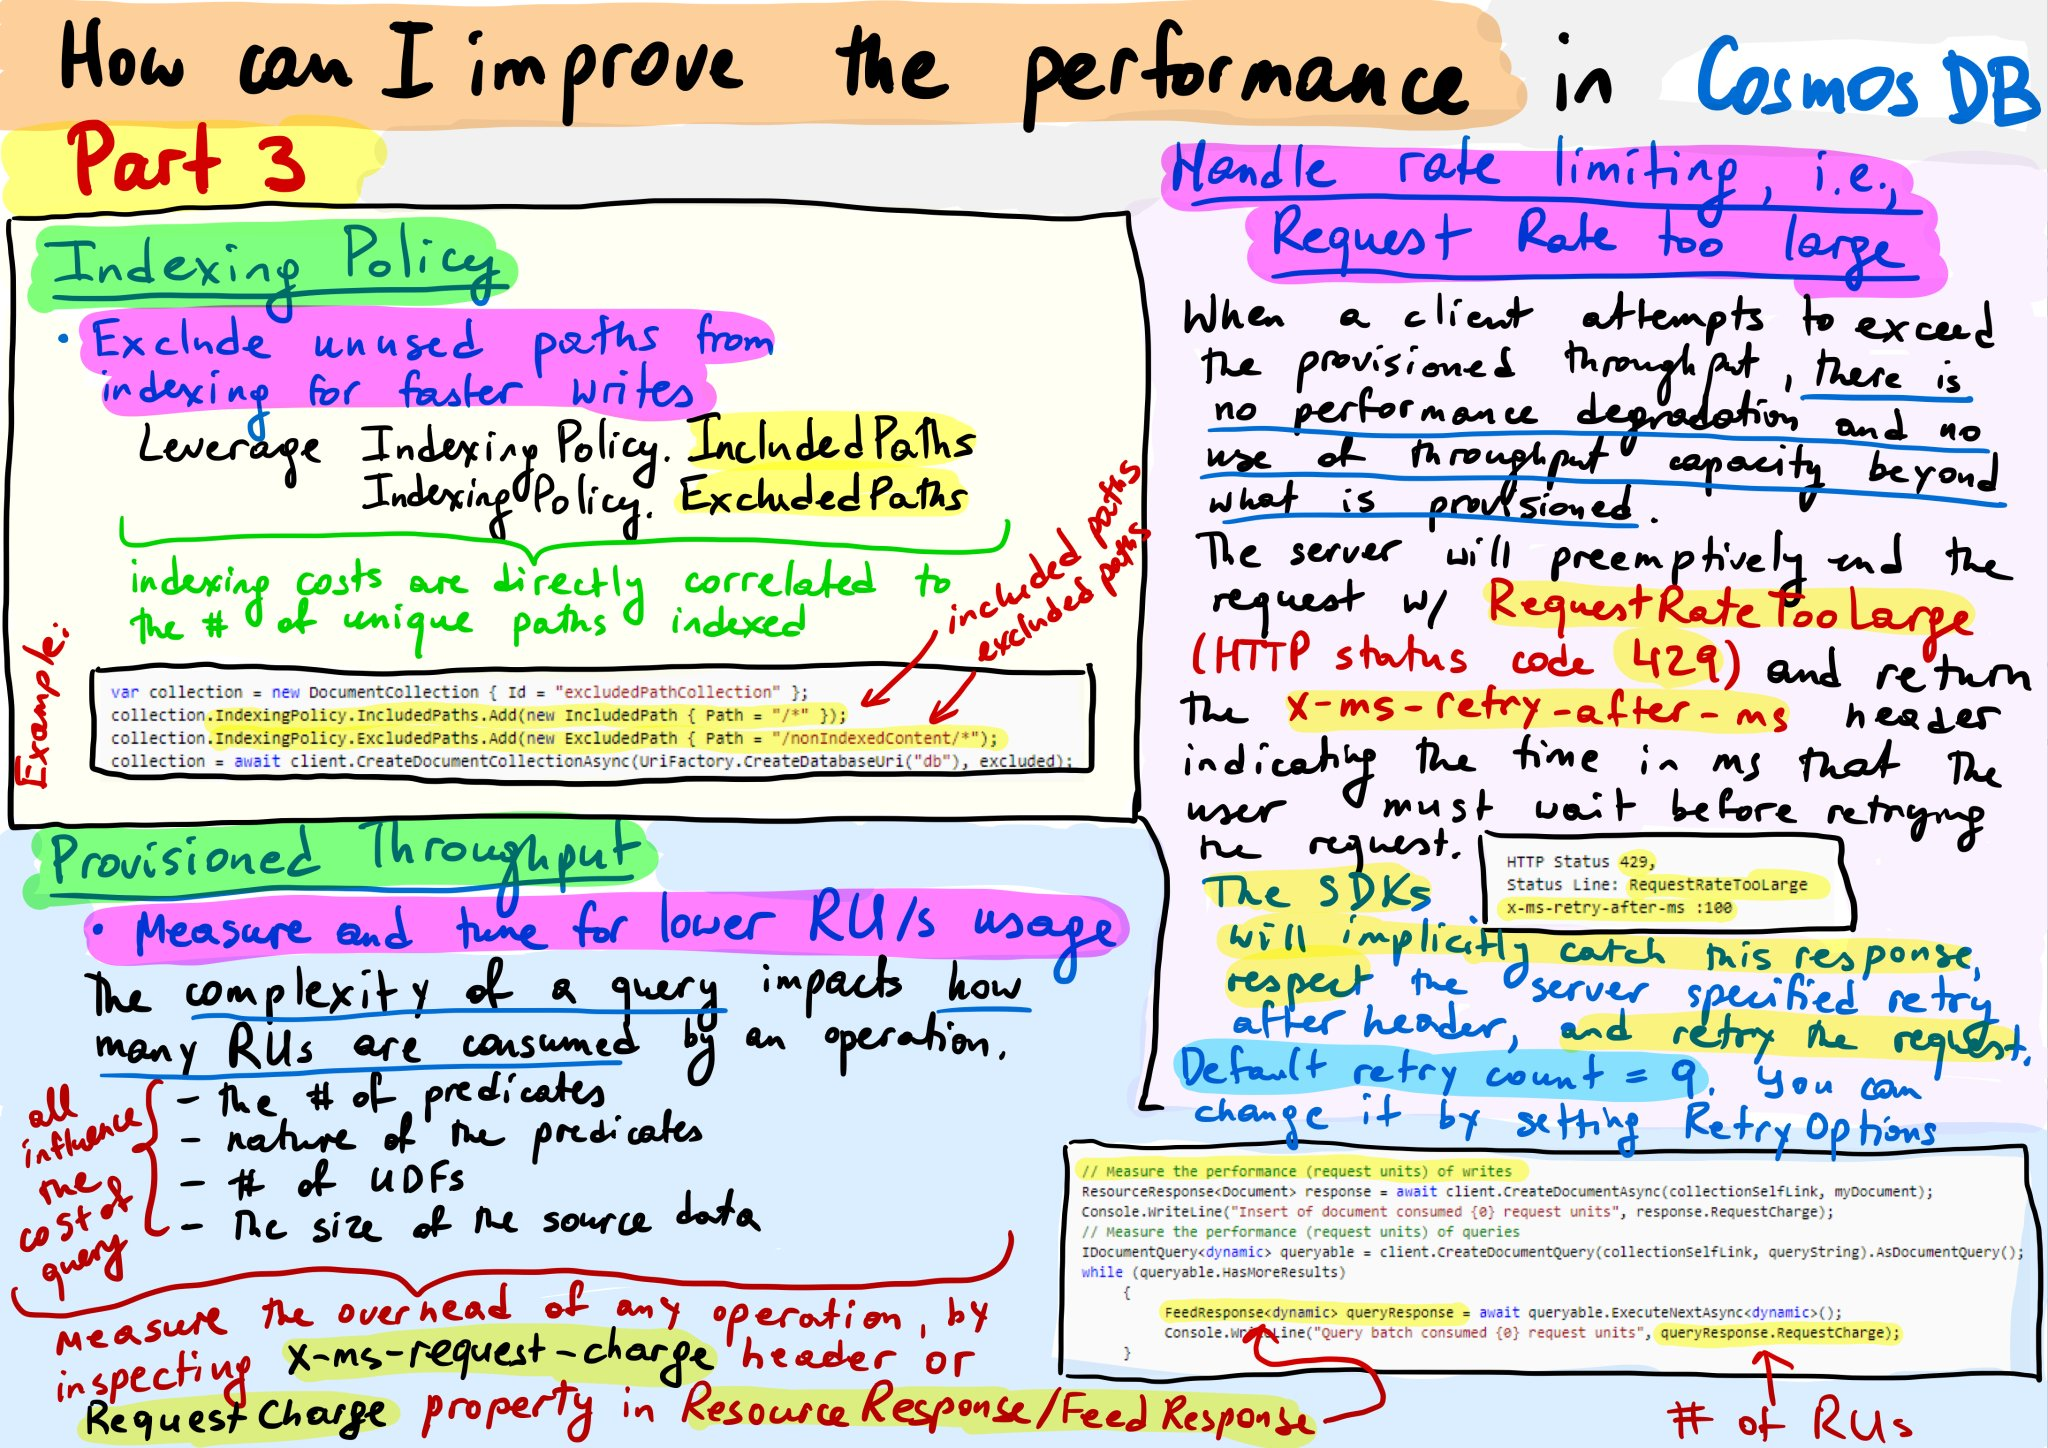
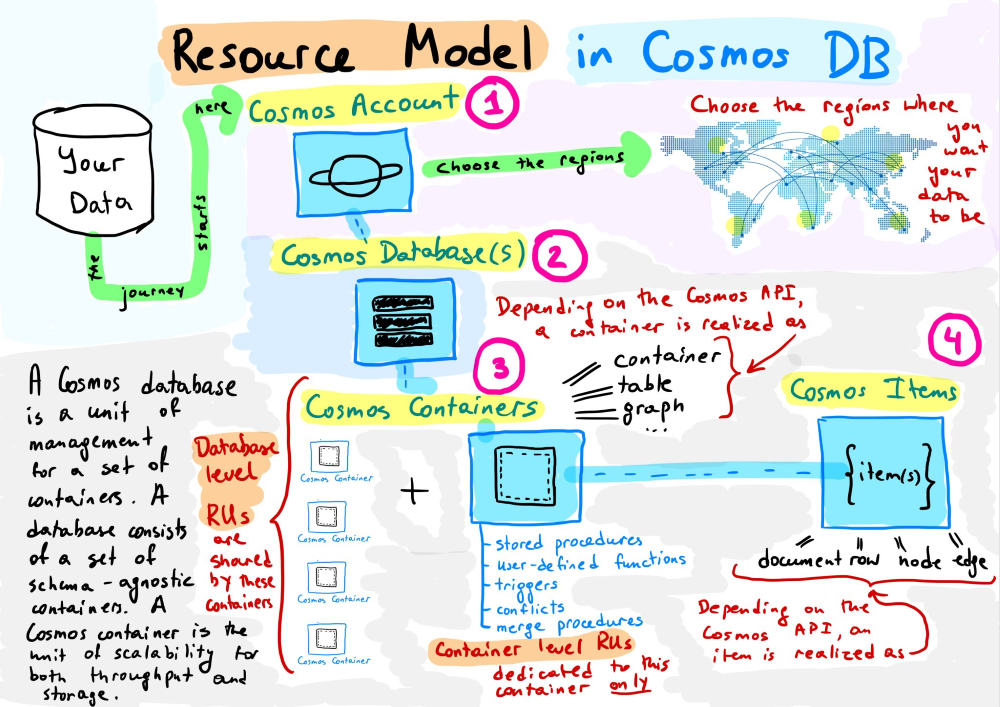
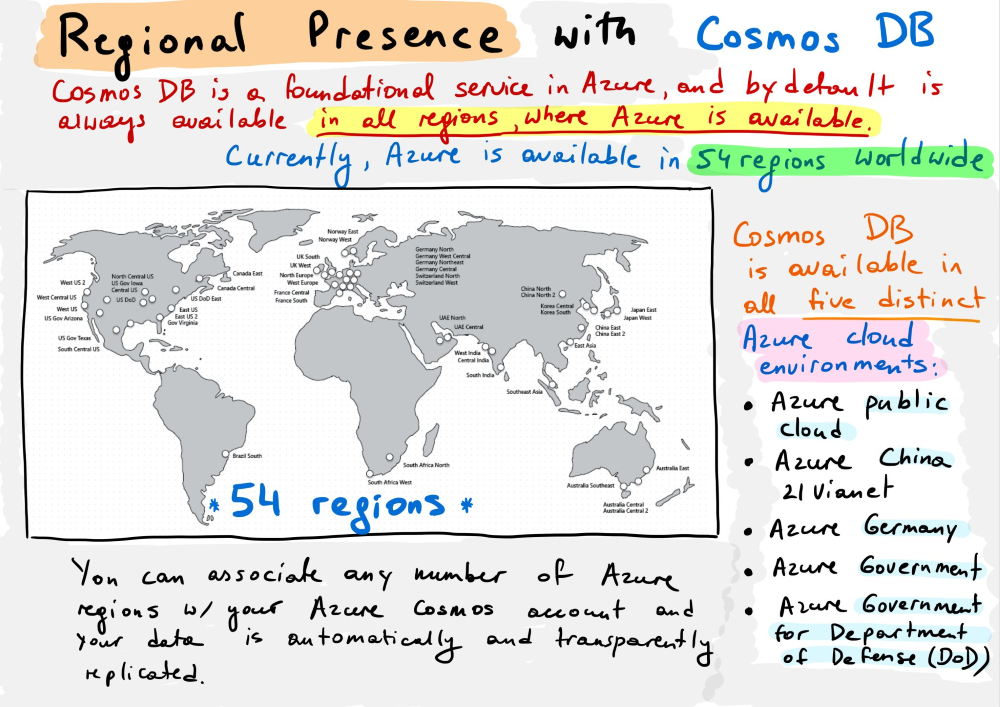
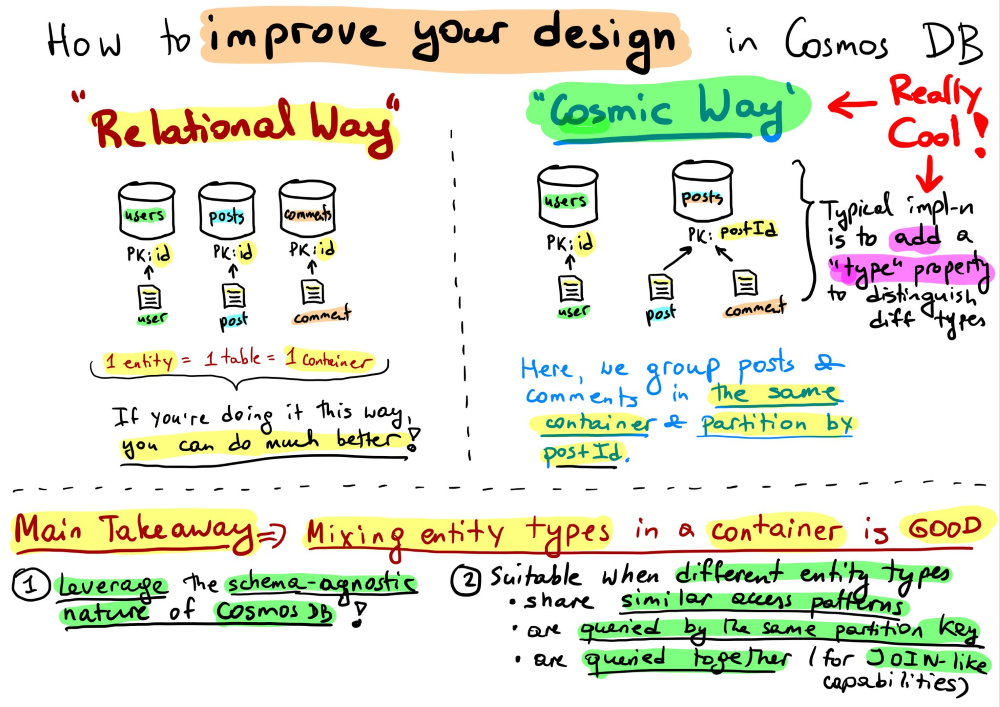
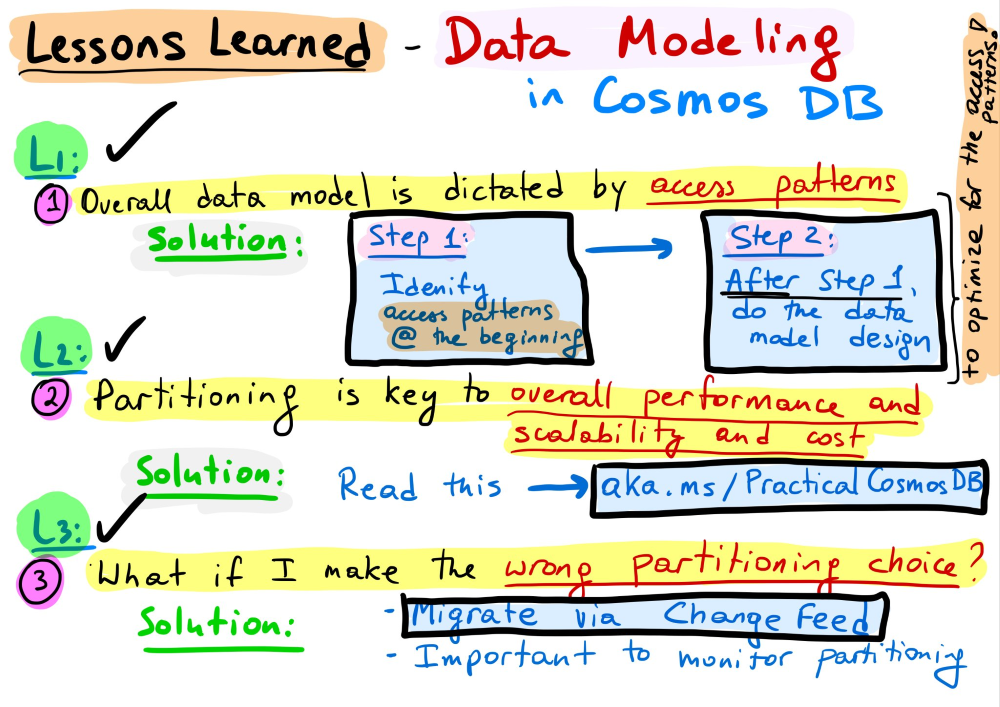
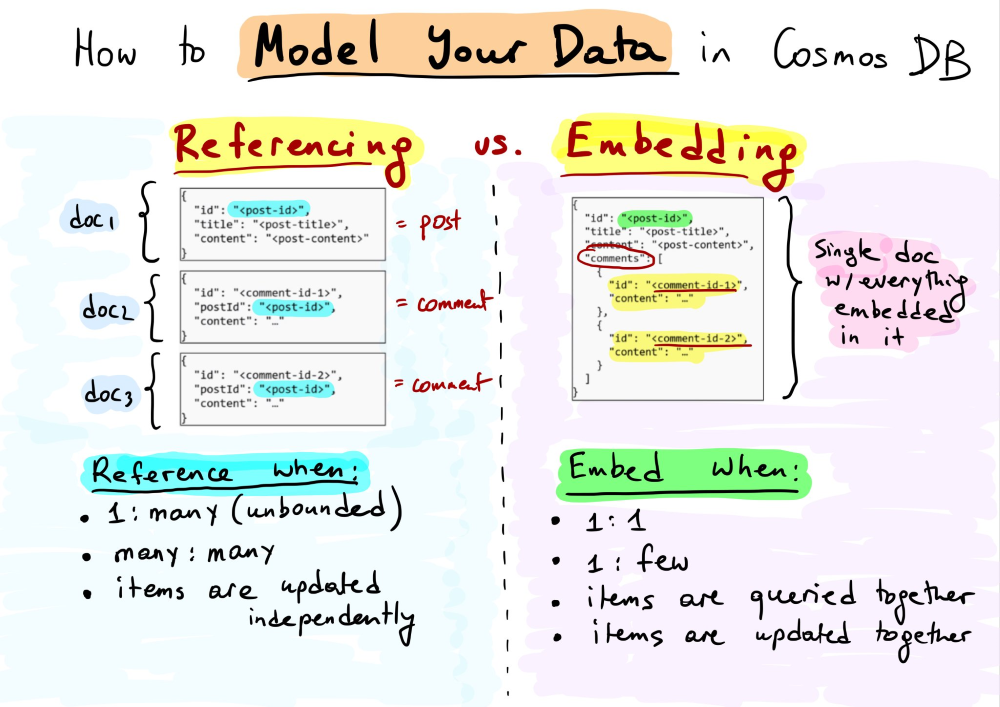
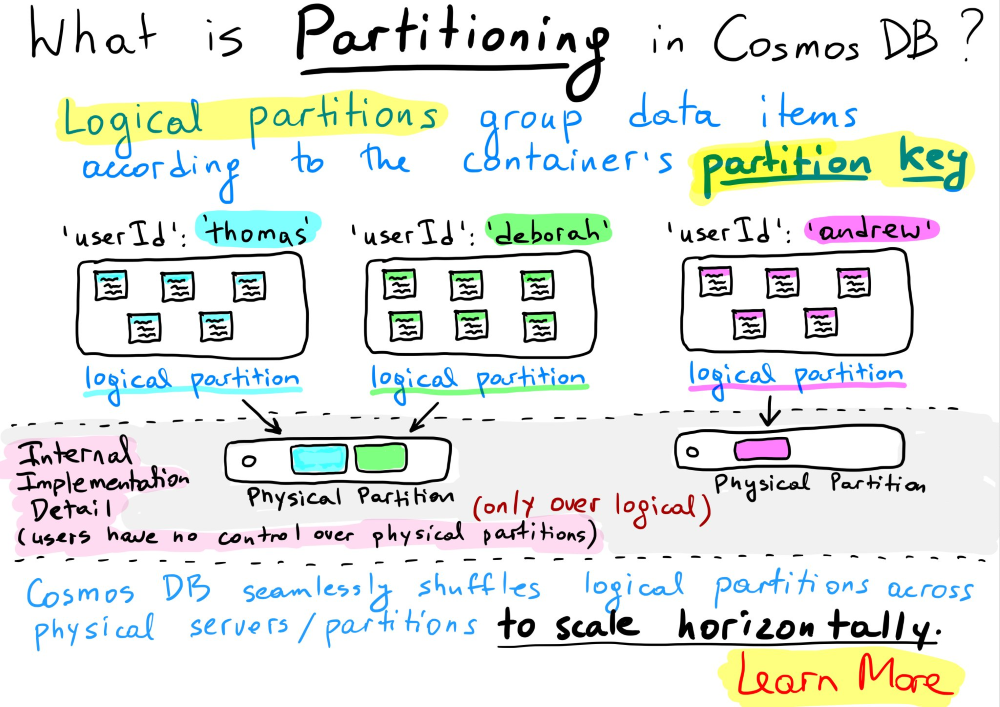
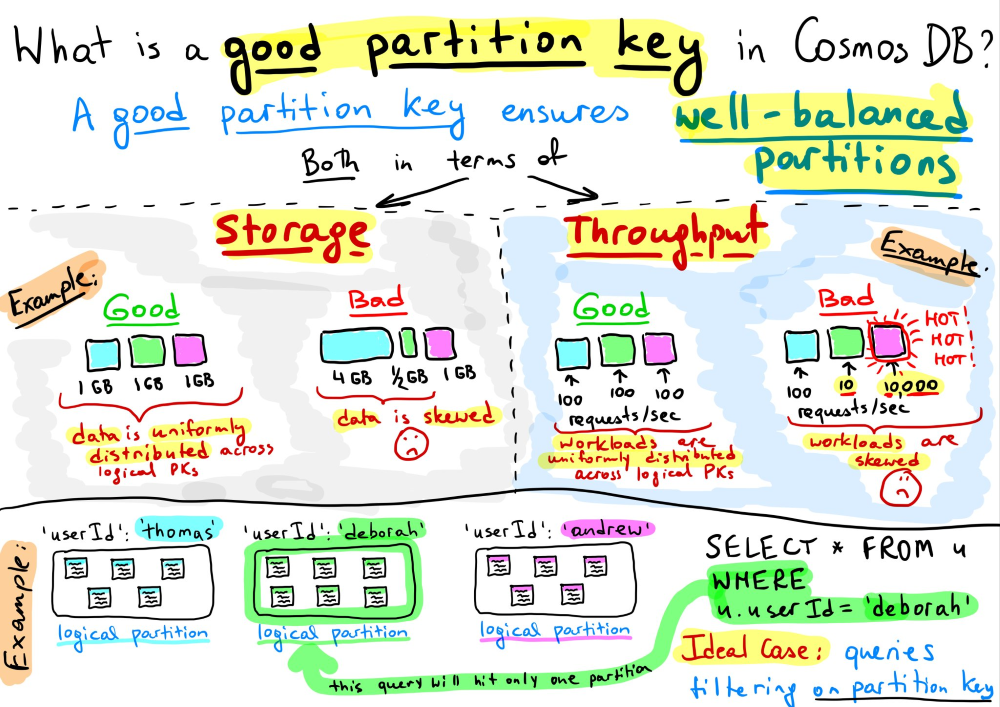
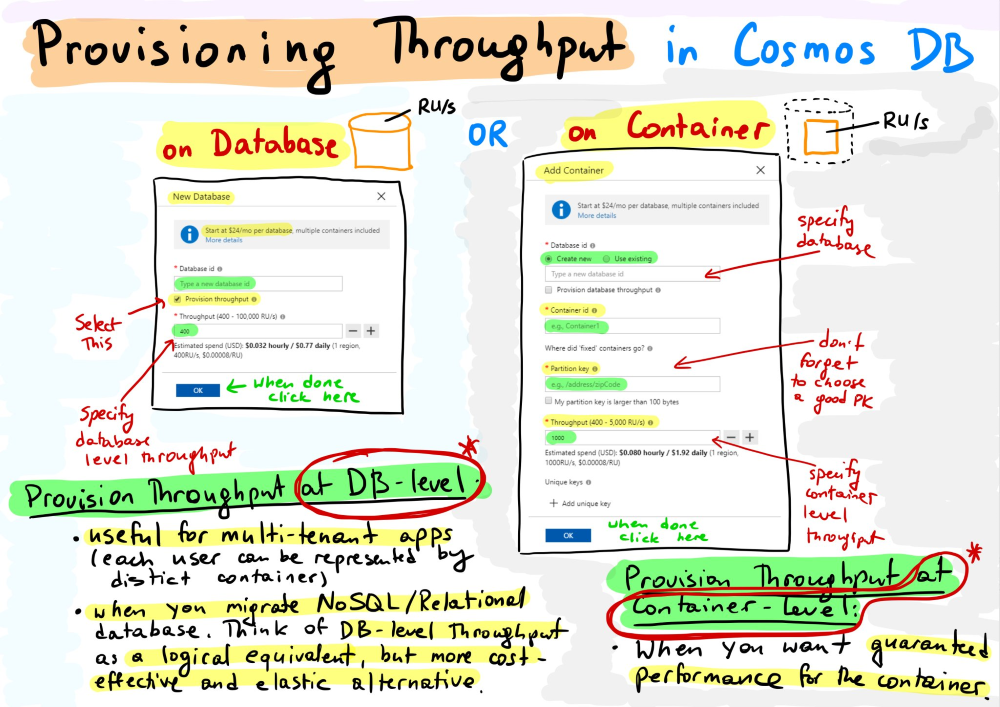
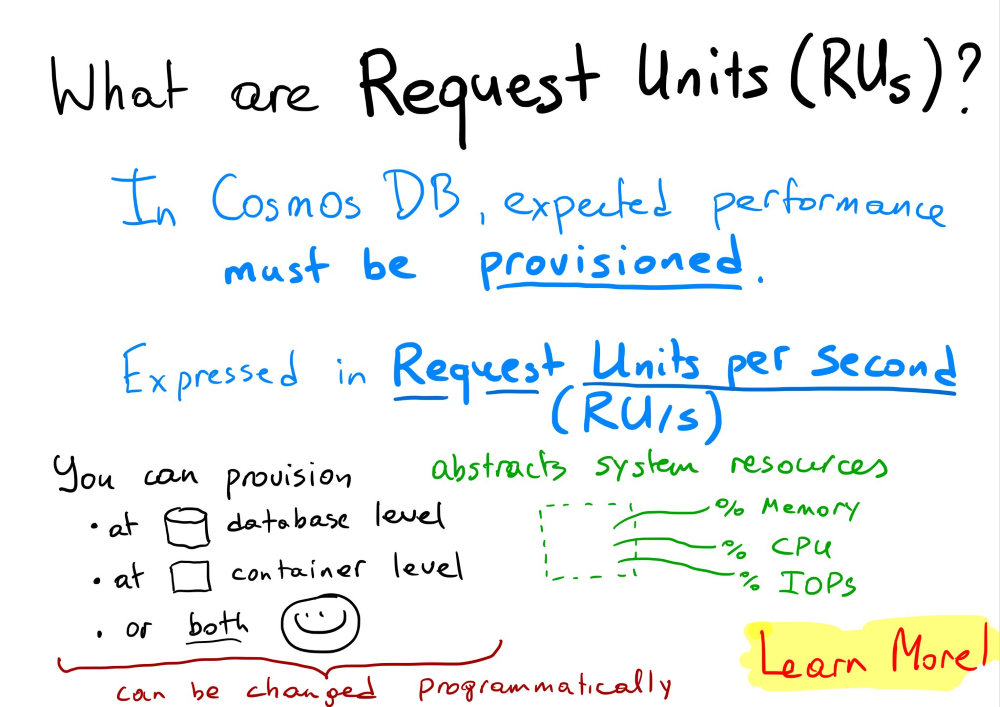
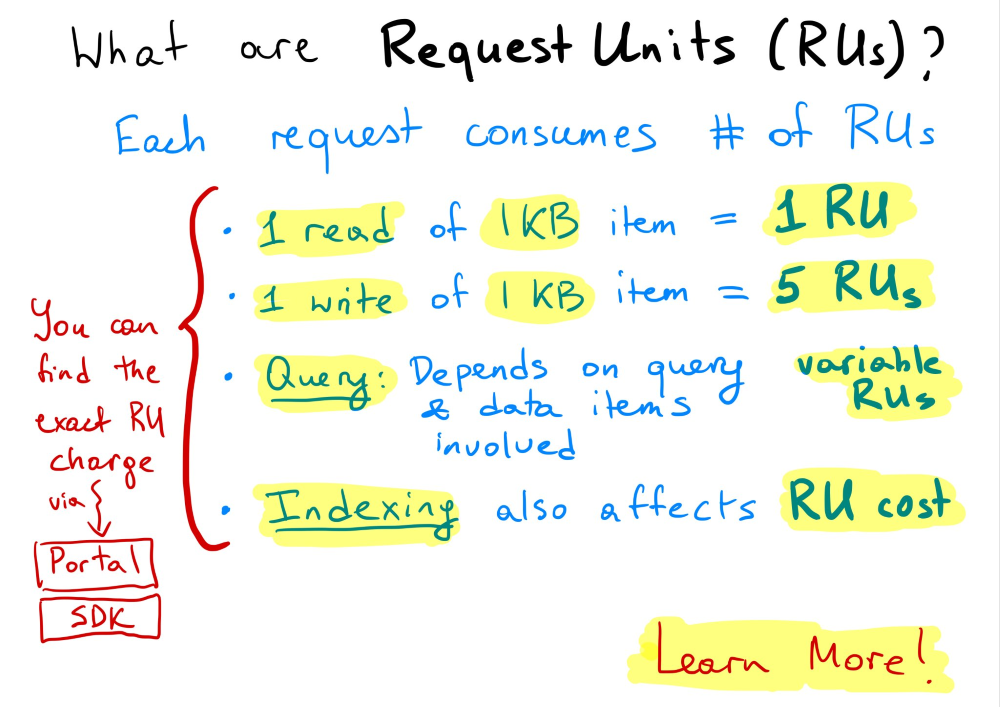
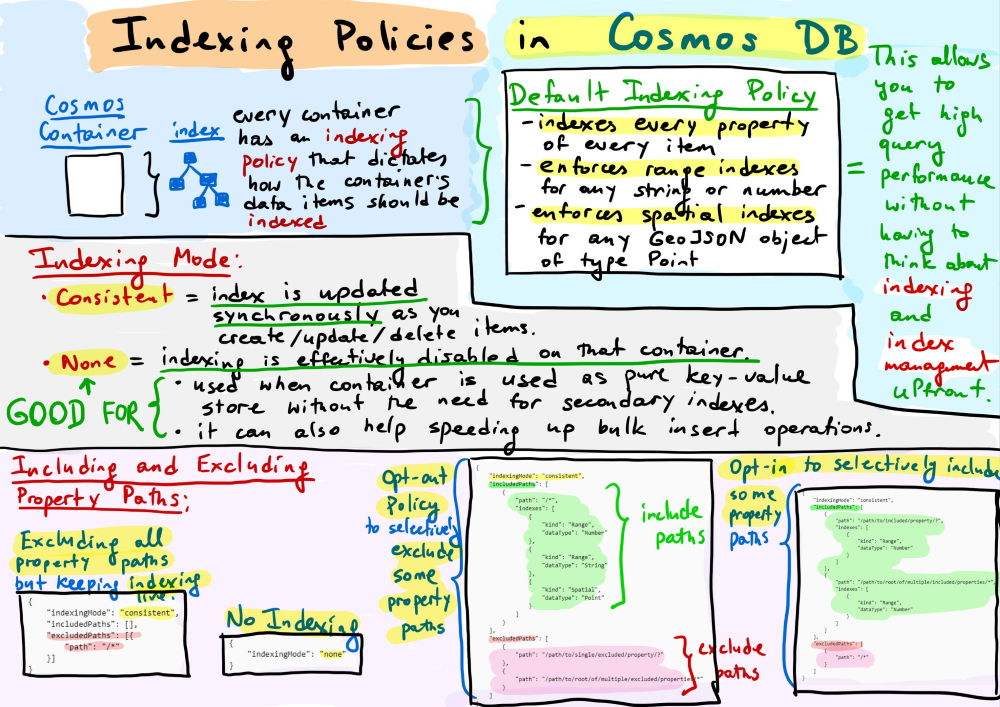
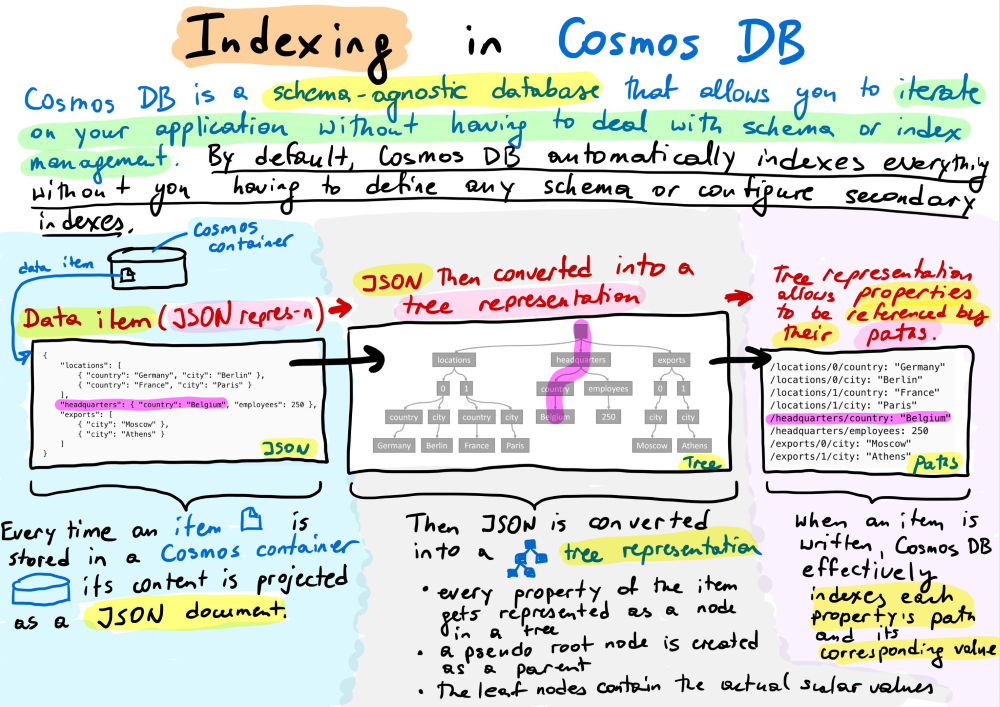
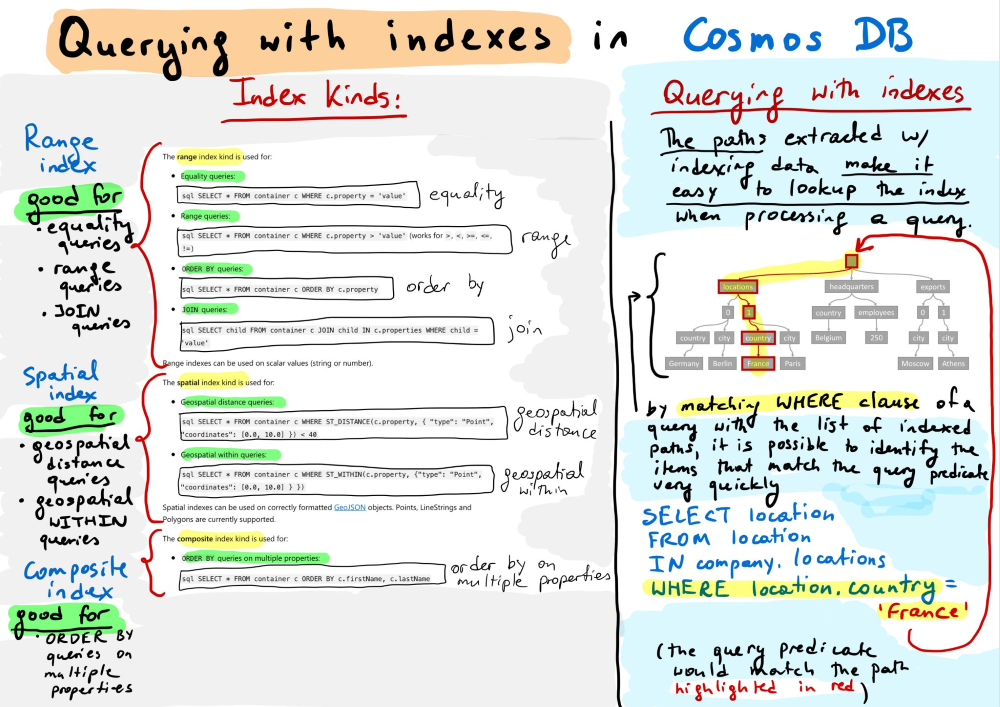
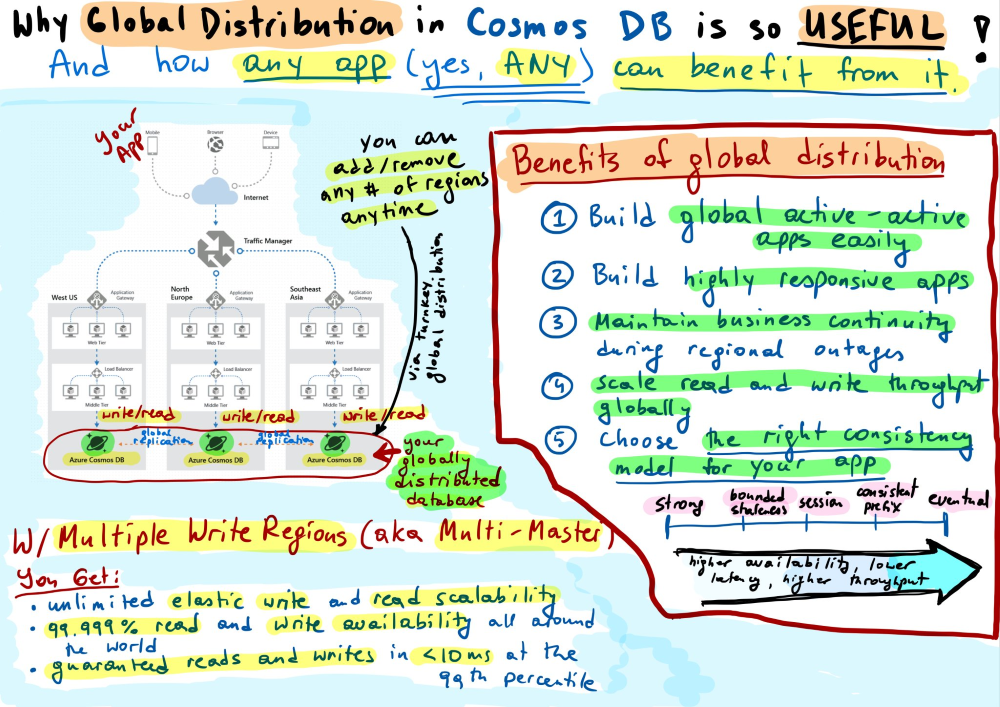
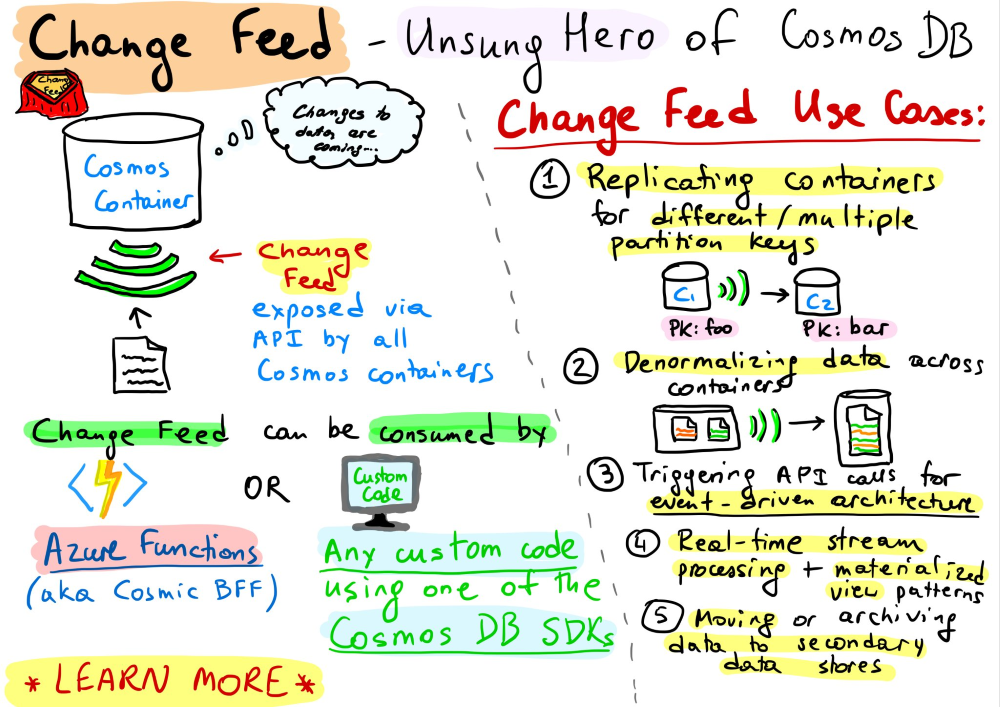
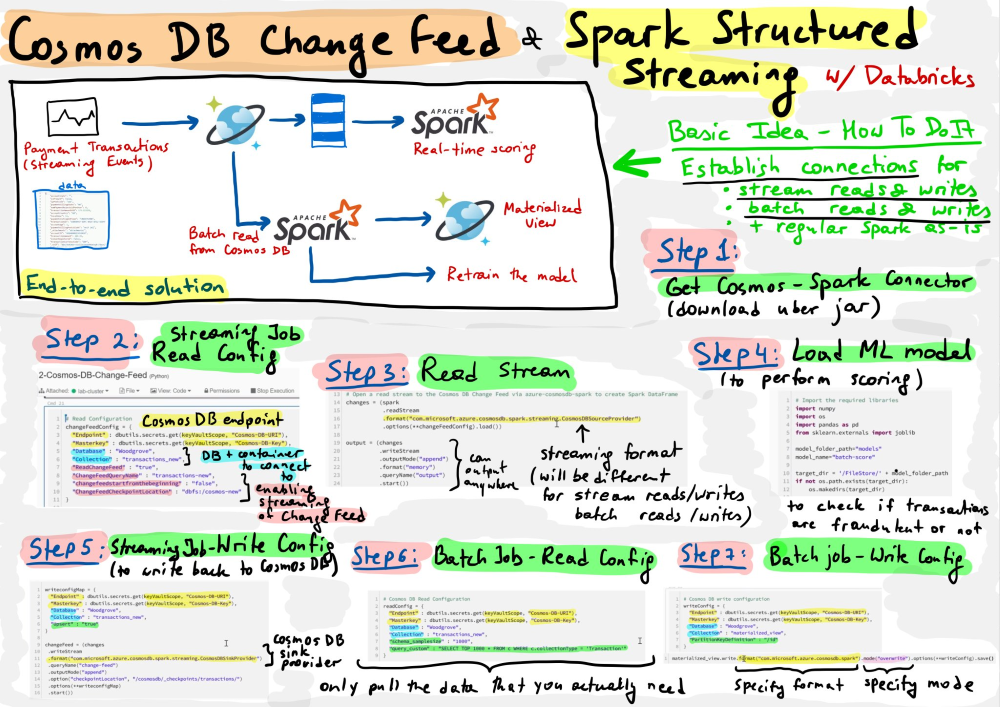
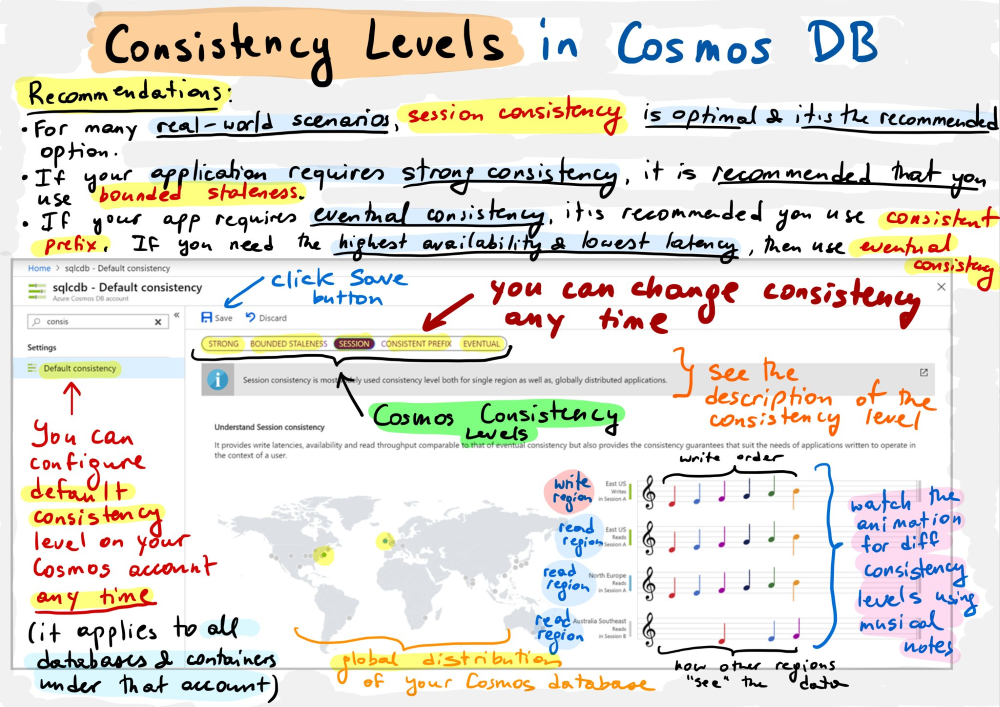
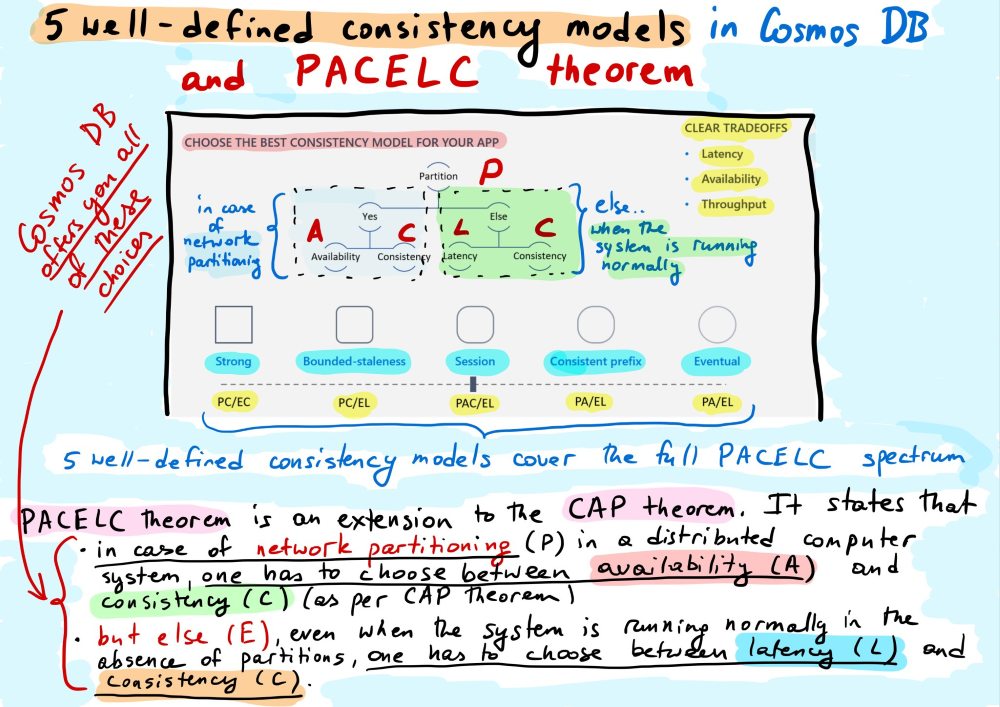
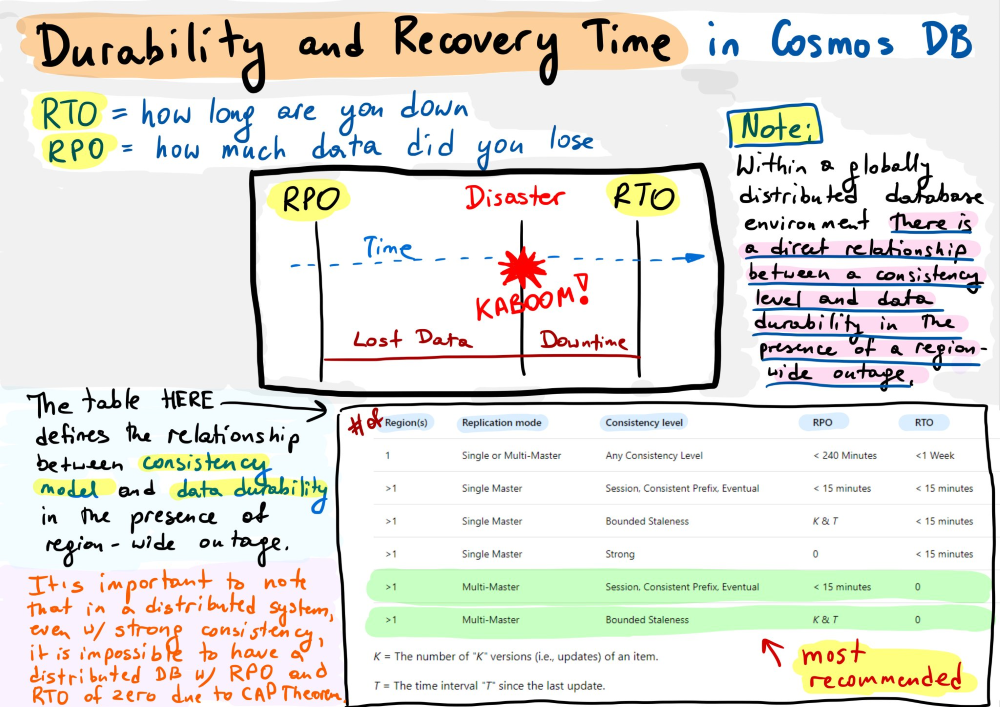
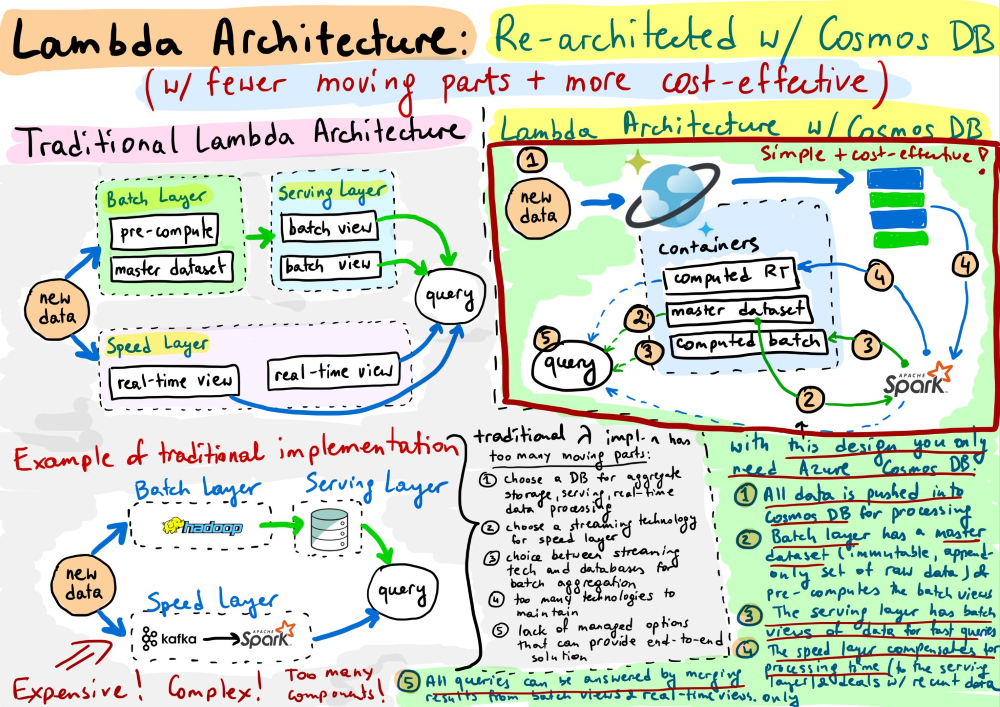
Learn CosmosDb in 27 pictures
The Azure CosmosDb team published a series of cartoons on their twitter account to explain alot of CosmosDb features. I collected them and thought it would be nice to reshare them with you. Happy learning!
The 7 new ones
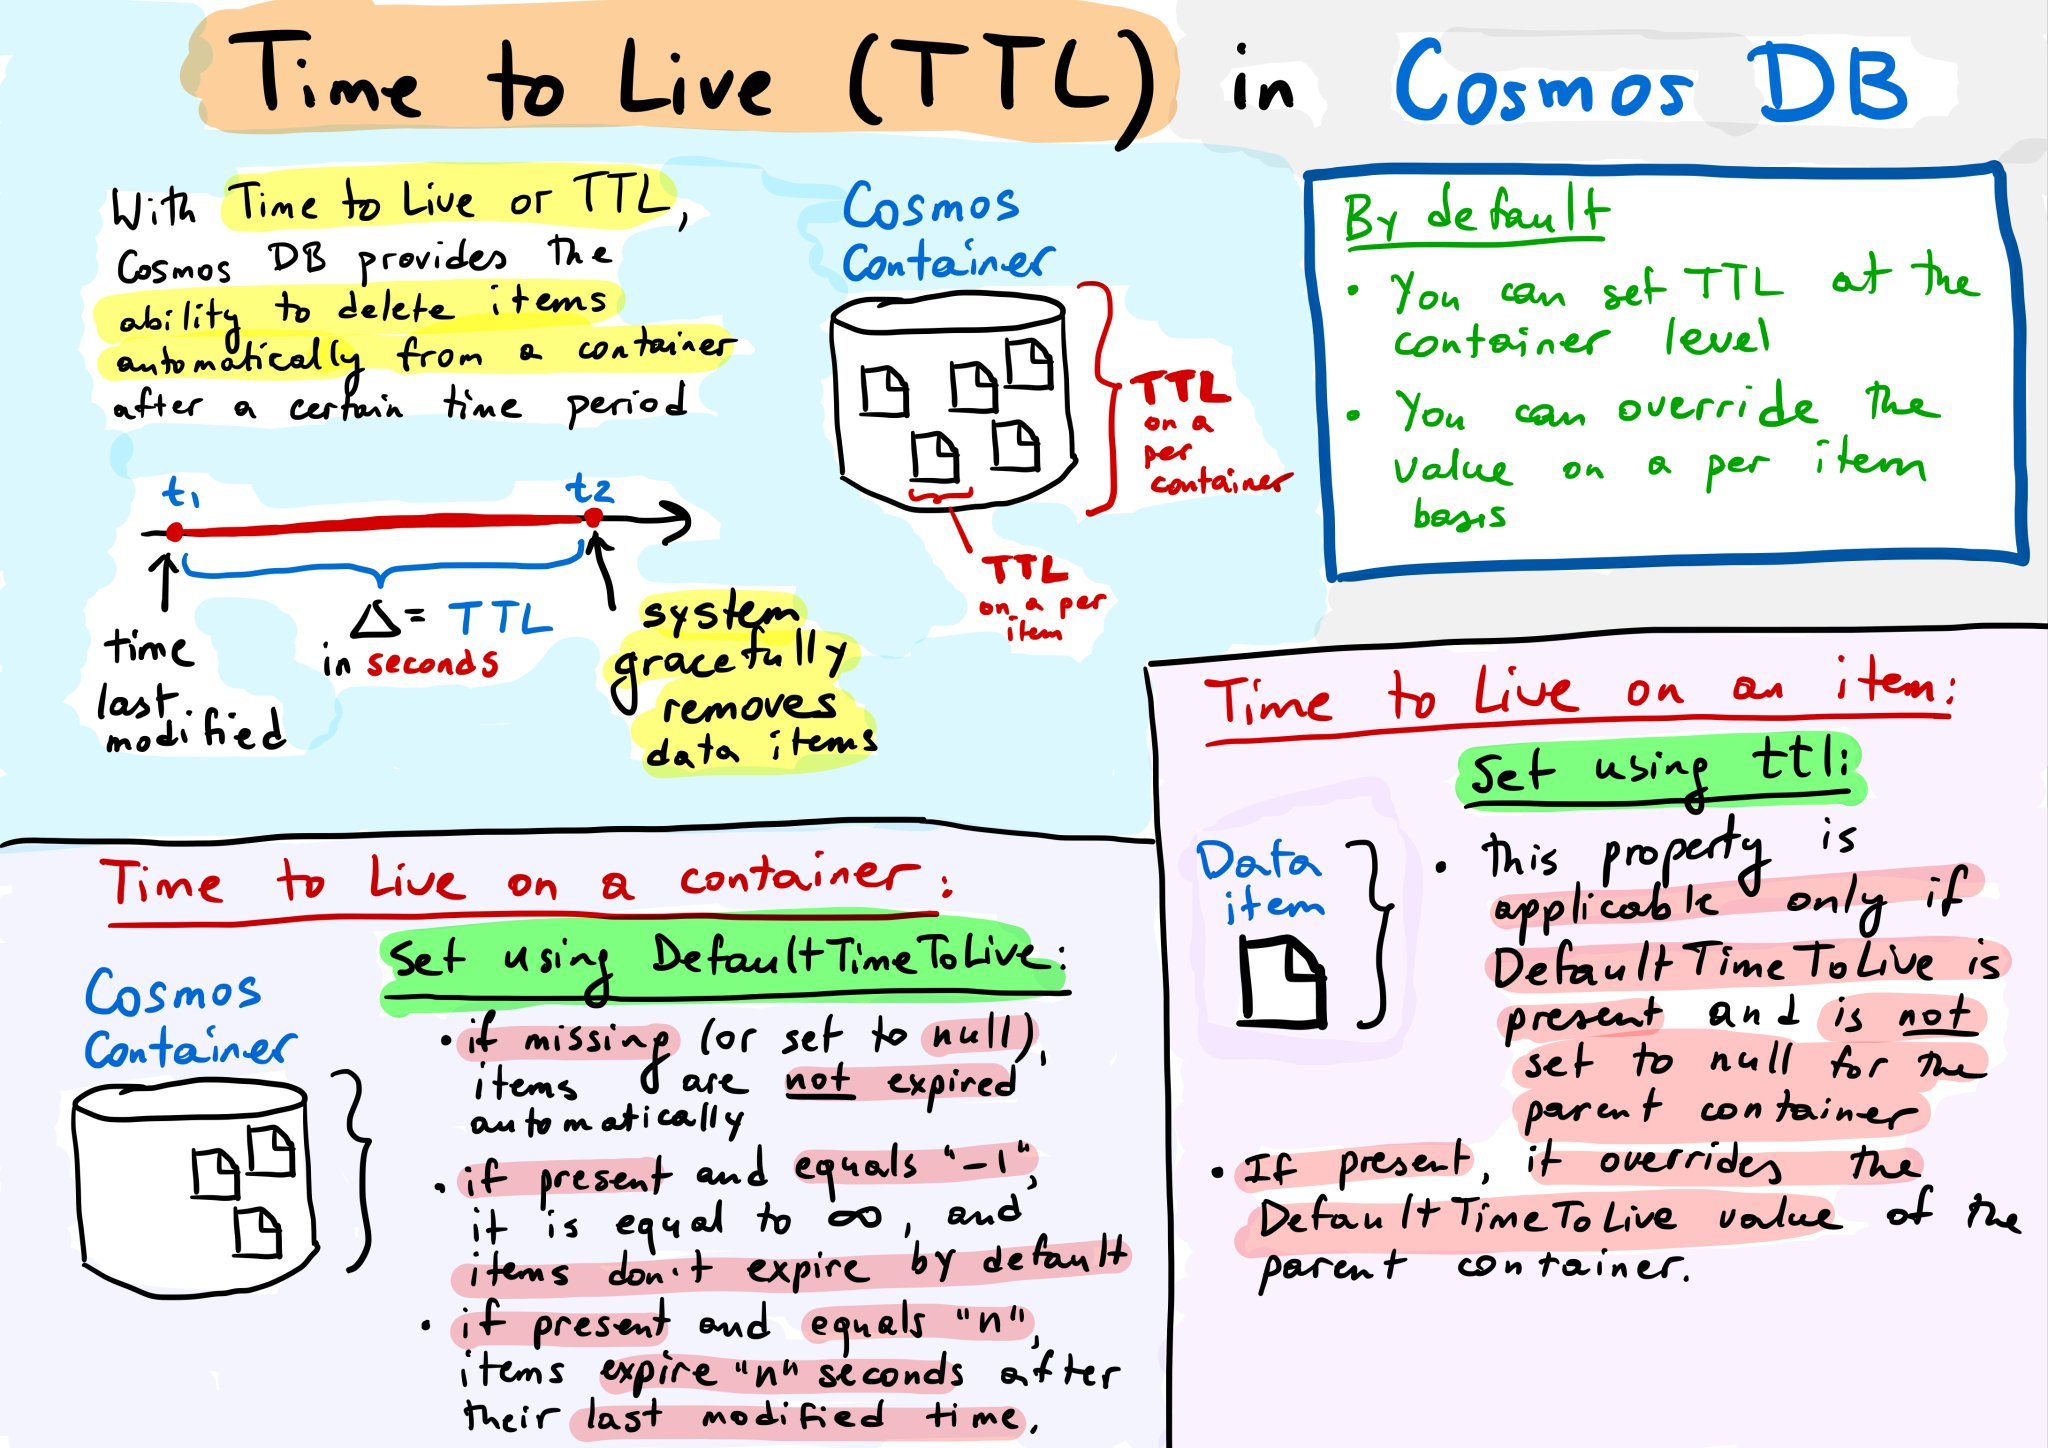
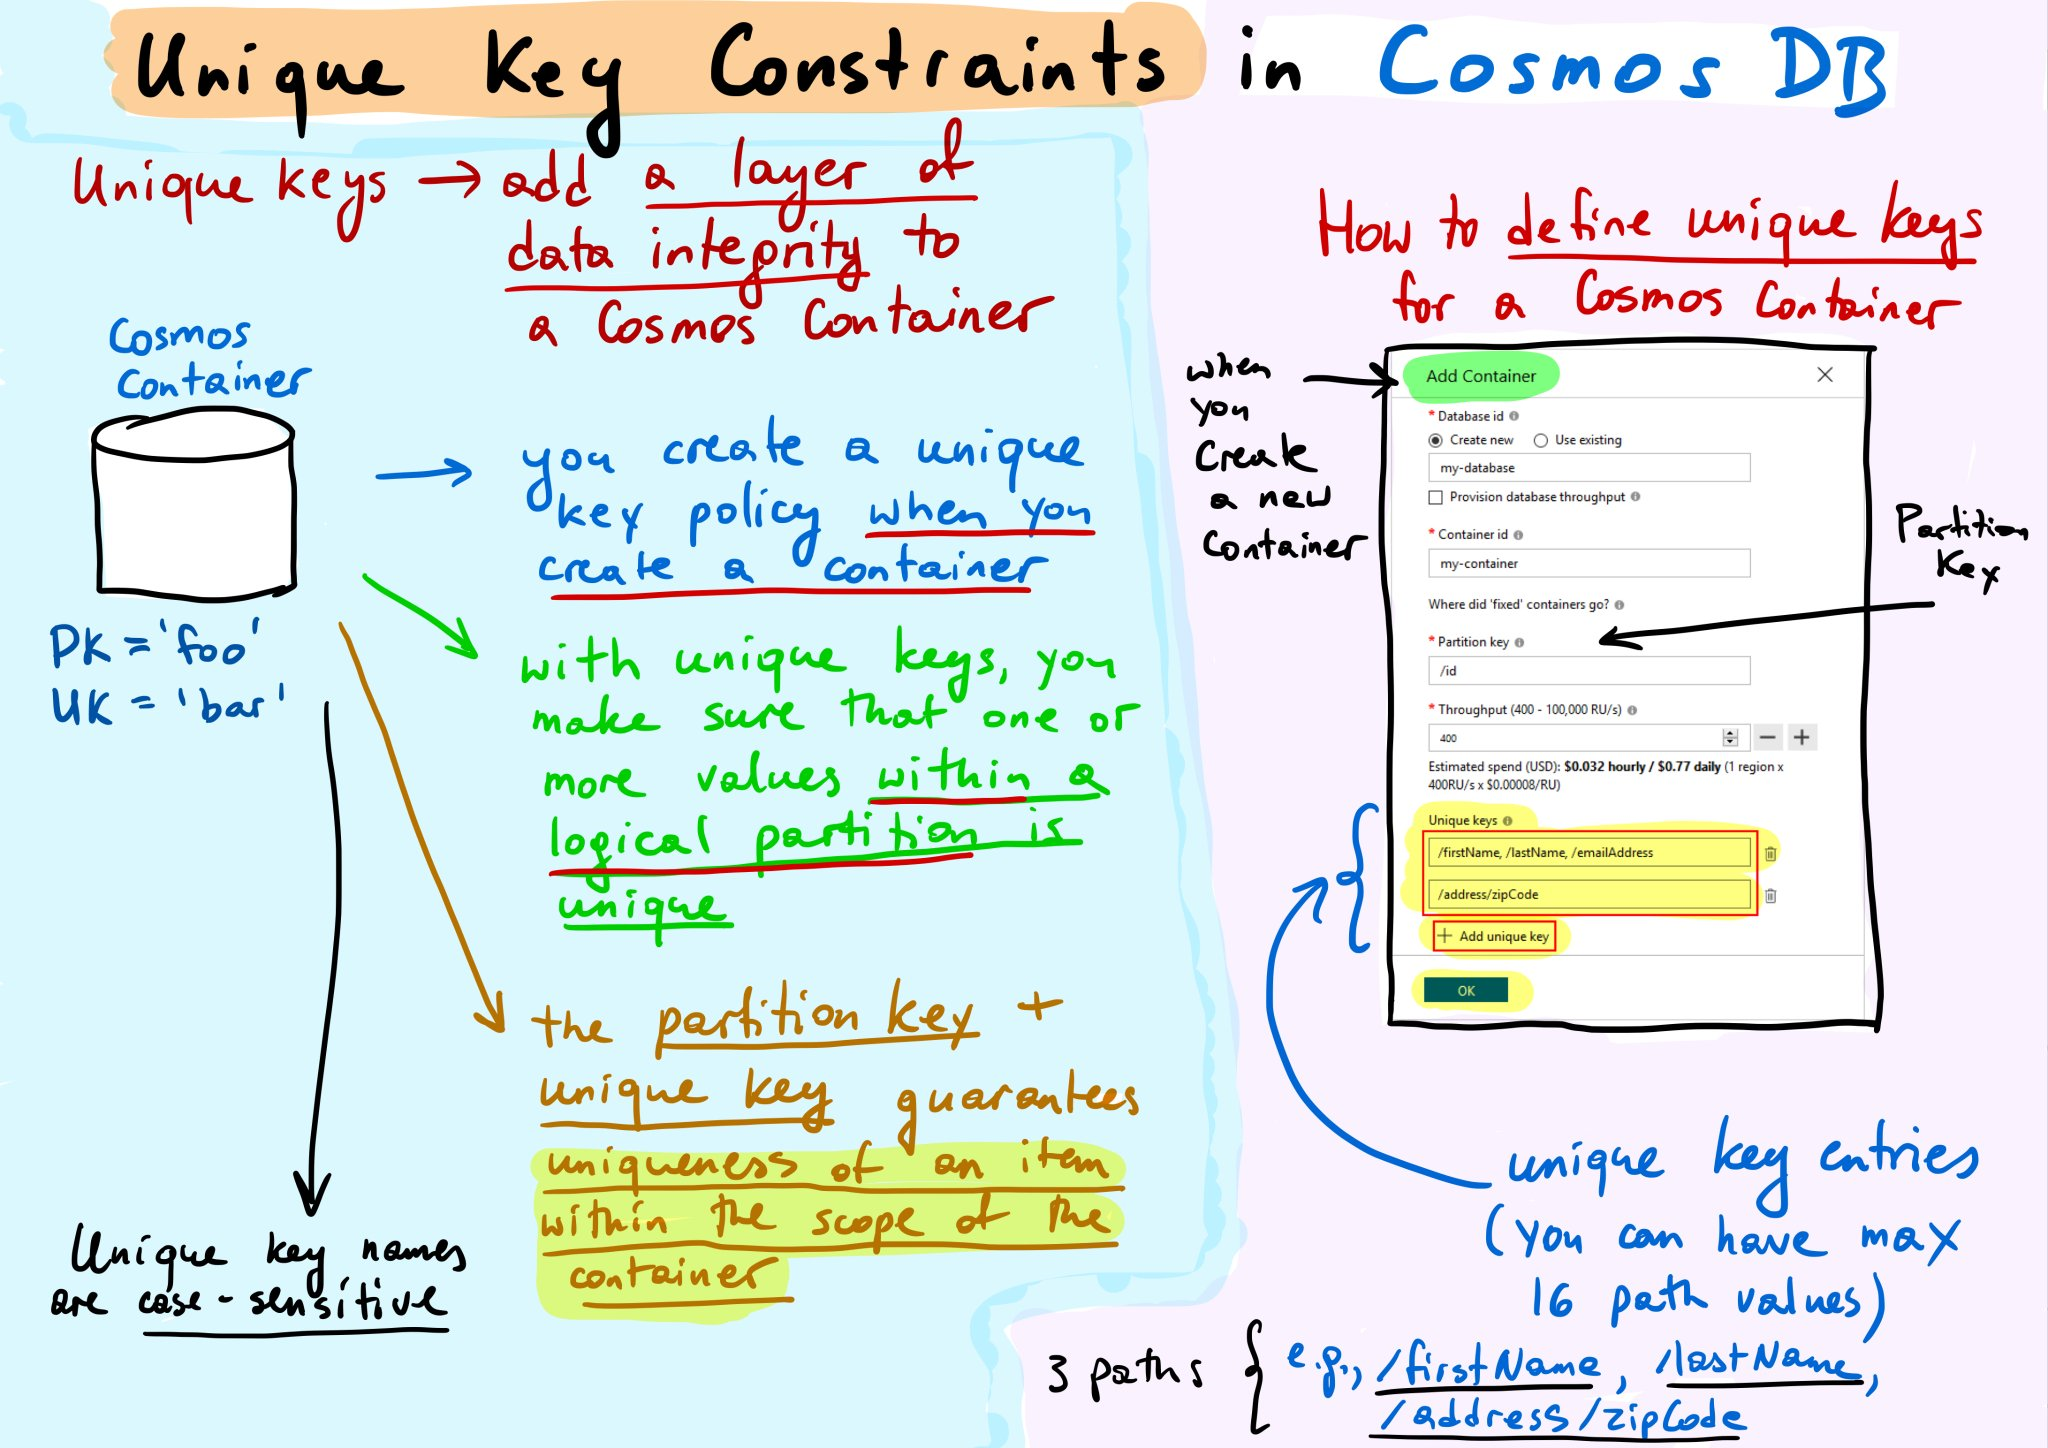
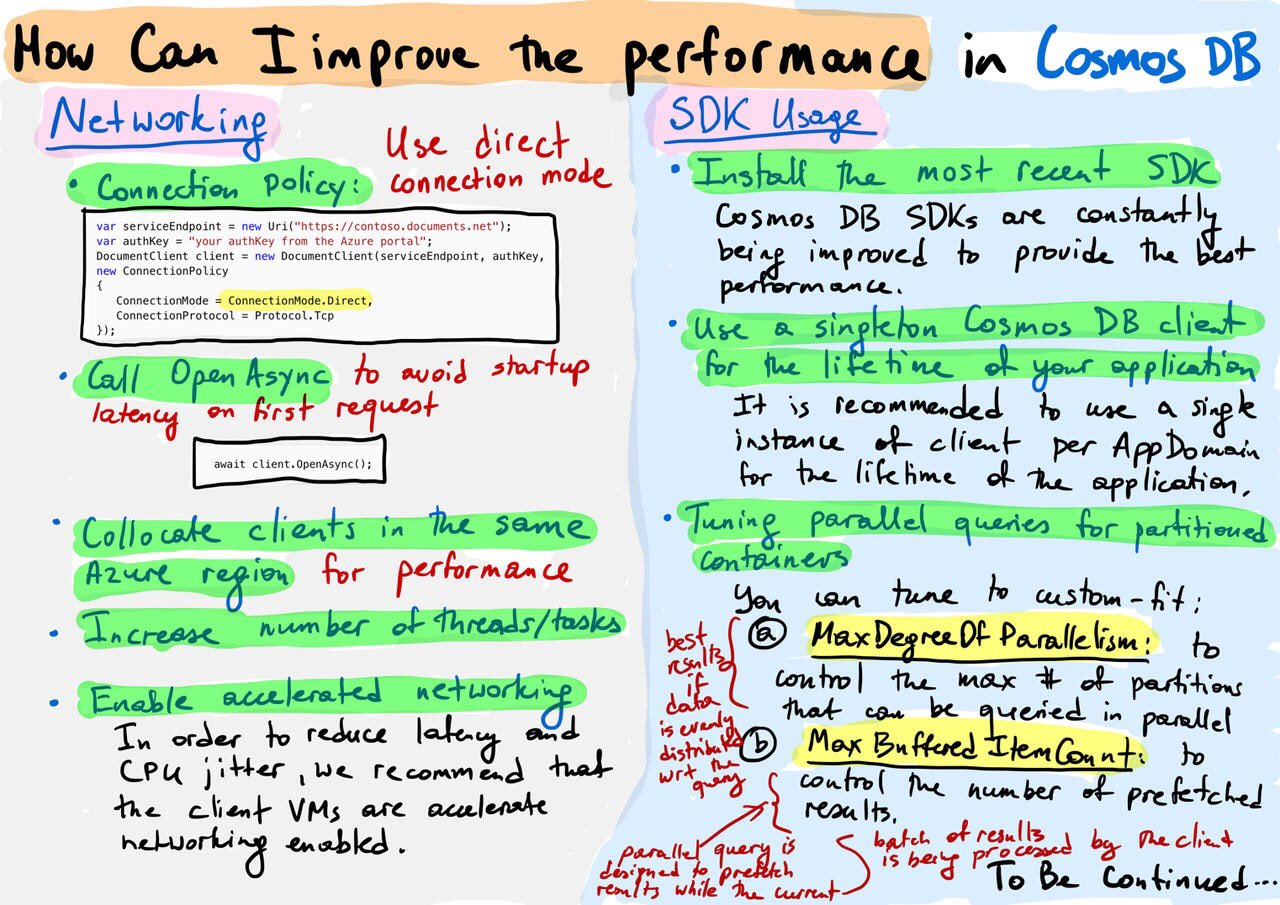
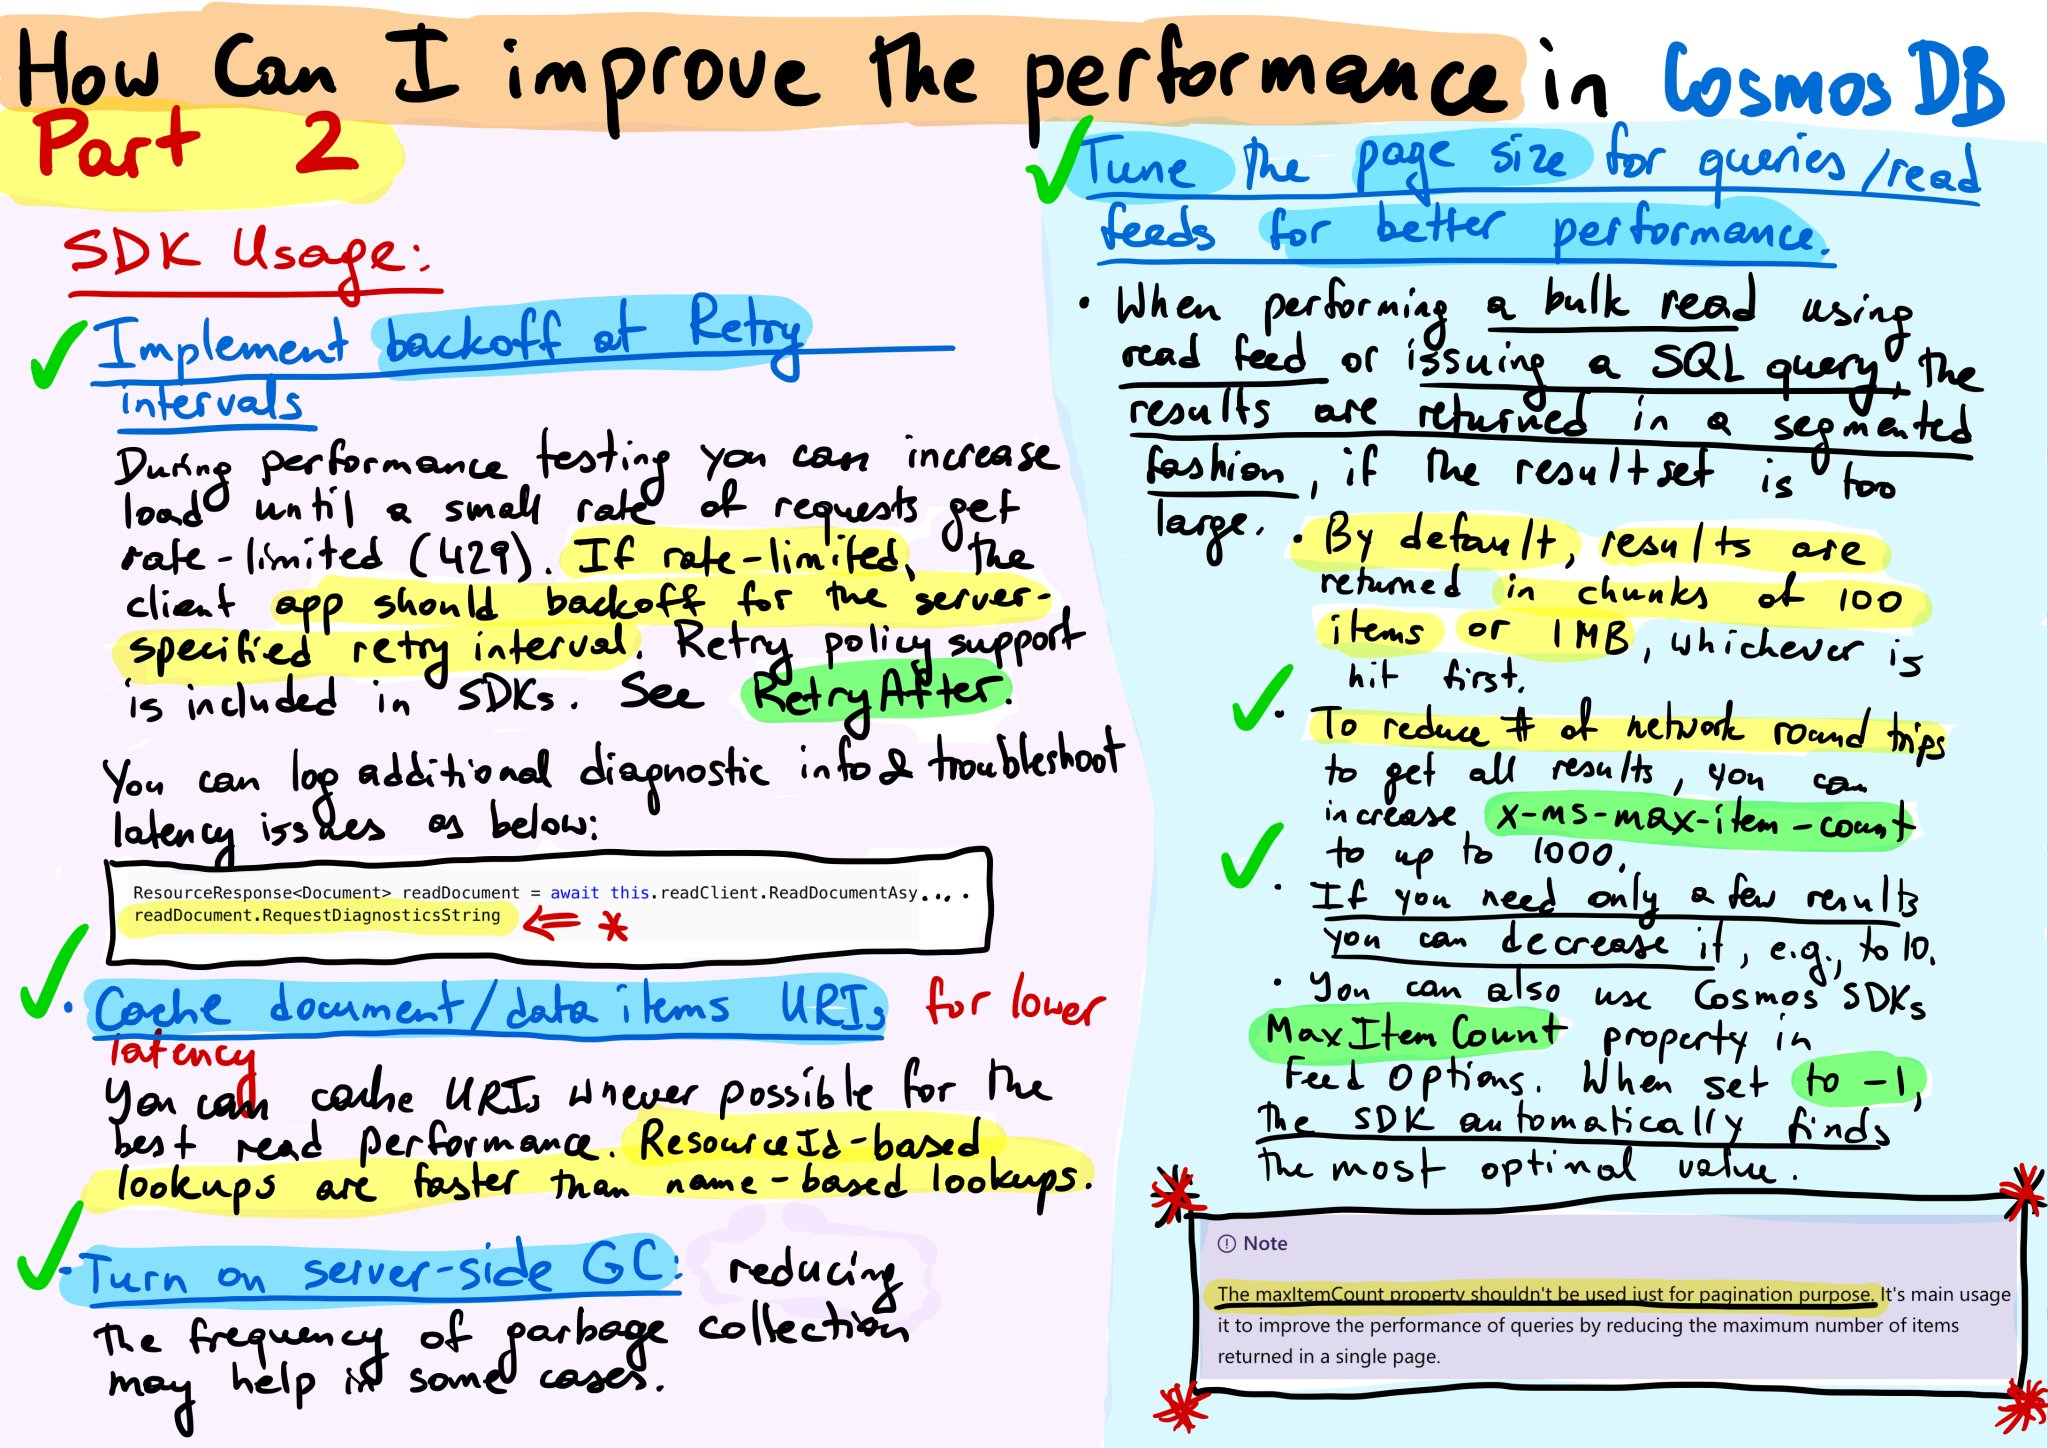
The 20 original ones
Locally testing Azure Functions
Azure Functions with for instance TimeTriggers or ServiceBusTriggers can be difficult to test. Especially when you’re trying not to interfere in a development or testing environment. What a lot of people don’t know is that the Azure Functions platform provides a feature to manually trigger Azure Functions, regardless of their actual trigger type.
The only thing you’ll have to do is to send a Http POST message to an admin enpoint. Keep it mind to add a payload with at least an empty input property, otherwise the function will not be triggered.
Take for instance this Functions with a TimeTrigger named TriggerOnTime.
1 | public static class Functions |
To manually fire this off, perform a Http POST message to the following endpoint: POST: http://localhost:7071/admin/functions/TriggerOnTime
Don’t forget to add an empty payload.
1 | { |
You can perform this request with a simple curl command.
1 | curl |
To mock a ServiceBusMessage simple provide the JSON serialized content of the message inside the input property.
Happy coding!
Versioning with Azure PaaS and Serverless
Working with multiple teams on a big microservices architecture can be a real struggle. What I often see is that teams are responsible for their set of microservices and struggle to isolate their services. Resulting in the following problems:
- Teams are not able to release independently.
- Teams are building release trains that have to be coordinated precisely.
- Hence, companies are hiring people as release coordinators.
- Reverting release trains is not possible, fix-over-fix scenario’s will occur.
- The applications are temporary in a state of flux while releasing a train.

What we ideally want is that teams stop building release trains and start releasing independently at any given time of the day. However, a lot has to be done before companies achieve that kind of development maturity. I came up with a set of principles that will guide an organization to become more maturity, and there by increasing flexibility, productivity and quality.
The golden principles.
- Services must be able to run independently.
- Services must be able to reconnect with other services. Any dependency can be deployed at any time. Design your service to fail.
- Services can never introduce breaking changes.
- This means services should adopt a versioning strategy.
- There can be no direct dependencies between services, that means no direct REST interfaces anymore.
- Teams are able to release their service at any given time.
- Teams are responsible and accountable for their own services.
Most of the principles are kind of straight forward, but keep in mind they are key for success. Sometimes simple principles are the hardest to implement, especially when you have legacy components in your microservices architecture, or maybe because it’s technically difficult to implement them. In this blog I’ll help you implementing some of the principles in Azure PaaS and Serverless services. Let’s start with a combination of versioning strategy and mitigating direct dependencies.
Service bus versioning
The most common way for microservices to communicate in an asynchronous matter on Azure is the use of Azure Service Bus. With Azure Service Bus, teams can define message channels to communicate between microservices. What a lot of development teams forget is to adopt a versioning strategy for their service bus messages.
One way of versioning service bus messages is to add a custom property to a message. I like this better then to add a version property to the actual JSON or XML message because, in my opinion, a version is not part of the data you actually want to send, it’s the metadata. It’s important for the consuming party to know.
So depending on the programming language you use you can add a custom message property to a service bus message. In C# it will look like something like this.
1 | // Data you want to send. |
I like to keep the version the same as the version of your microservice. In this way we are not bogged down into a versioning hell. The version of the message is equal to the version of the service that actually created the message. A simple but effective rule. In this way you can also track by what version of a microservice a message is actually created.
With Azure Service Bus explorer you can easily check messages, create additional subscriptions, etc. I highly recommend you to use it, you can see what kind of messages are send and also inspect the custom message properties. It’s a nice tool to debug your versioning strategy.
So if you send messages with a Version custom message property you can create for instance create 2 subscriptions for each version. With a service bus filter you can then make sure that messages with a specific version are only received by certain topics.
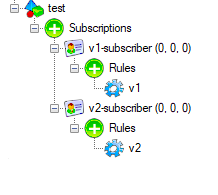
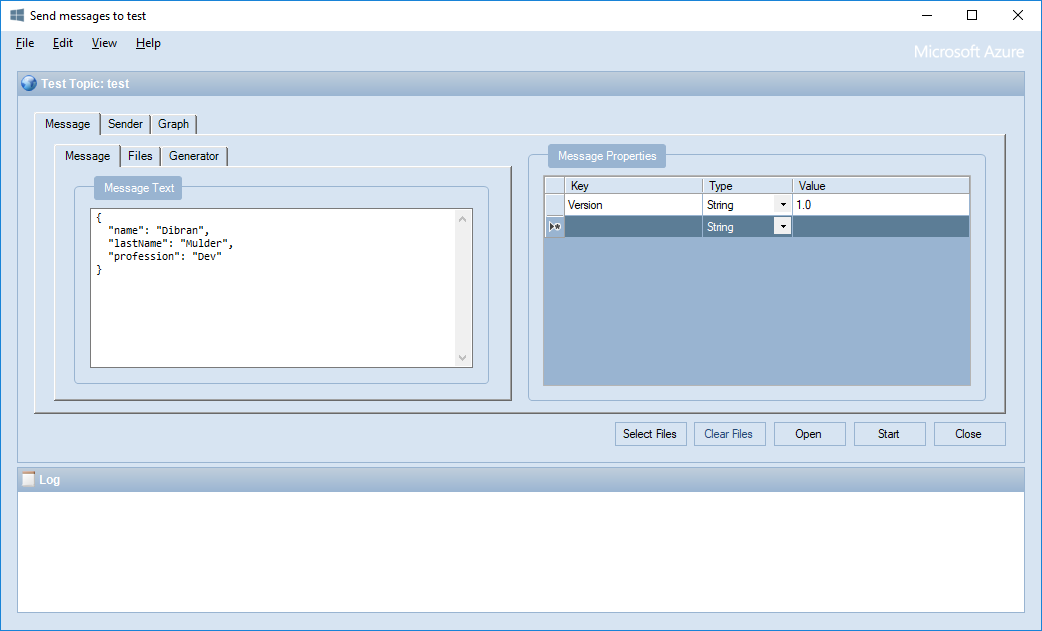
A simple service bus filter can be:
1 | Version='1.0' |
Don’t forget to remove the default rule: 1=1. If one of the rules match a message will be accepted by a subscription.
You can also choose to do the filtering and version handling in the consuming service. But I personally like it better to separate messages in subscriptions based on version numbers.
Lastly, I would like to add that service bus filters can easily be created by ARM scripts. In this way you won’t need to service bus explorer or code to manage your infrastructure.
1 | { |
Azure Functions versioning
With Azure functions it’s pretty easy to handle versioning. You can add a versioning scheme to the route of an Http Trigger like this.
1 | [] |
However, routing in Azure Functions is pretty badly implemented. ASP.net core handles it way better and its therefore highly recommended to use an API gateway in front of it. As I described in this blog post you can use for instance Azure API Management to handle that for you. You will then get a lot of additional options such as: routing, mocking, caching, authorization, etc.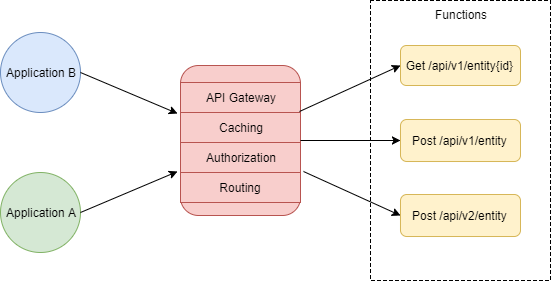
ASP.net core versioning
Lastly I would like to point out to a very nice Github repository for ASP.net core versioning. It has several examples to implement versioning correctly. Versioning is actually a 1st class citizen in ASP.net core, enabling you to adopt a solid strategy and never make breaking changes again.
Migrating Azure Table Storage to SQL with Azure Logic Apps
I’ve created an App that uses Azure Table Storage as a backing store. At first this looked like the right decision but after a while I figured that I should migrate to a relational database. But in the mean while the Table Storage database grew quite big. I’m not talking about millions of records but more like: 5 tables with about 100k of records in it. So how do you migrate that data to a SQL Server database? I figured I would use Azure Logic Apps.
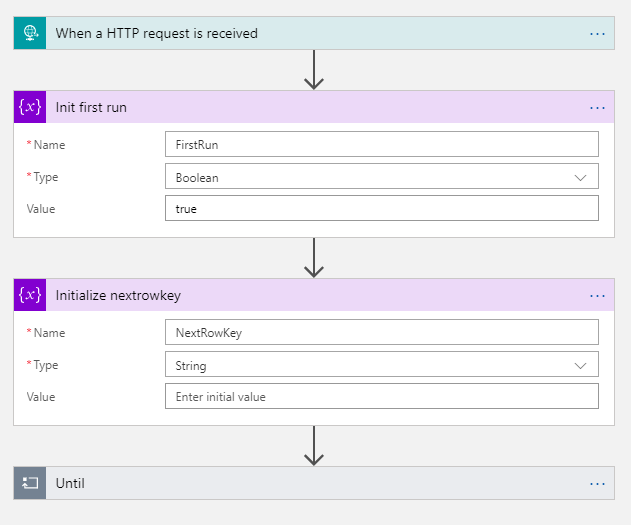
It all starts with a trigger, in Azure Logic Apps a manual trigger is often an Http Request. After that I initialize 2 variables, the FirstRun and NextRowKey variables. The FirstRun is used to call the Azure Table Storage tables without a NextRowKey query parameter. Once the first page is fetched this variable will be set to false and the subsequent pages will be requested with a NextRowKey query parameter. This is the first step to fetch your data with pages. Bear in mind Azure Table Storage can only return 1000 records per request!
The JSON for initializing the variables.
1 | { |
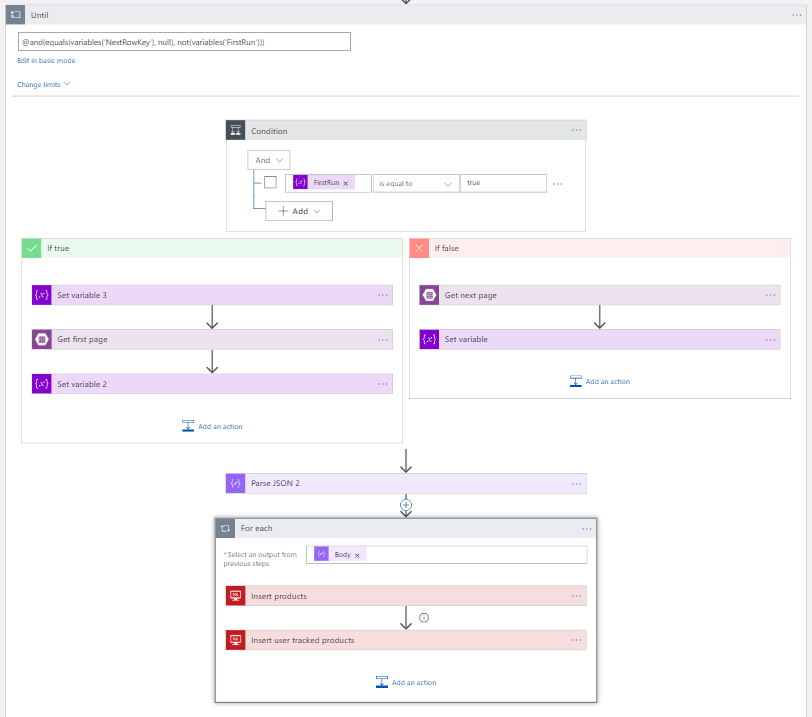 The next part is to repeat the fetch records part until there are no more records or when its the first run. I use this expression to check wether to continue or not: `@and(equals(variables('NextRowKey'), null), not(variables('FirstRun')))`
After that I use a condition Action to check whether its the first run or not. Remember I initialize a variable to determine if its the first run. If its the first run that obviously we’ve to set the FirstRun variable to false. After that its just quite simple, either we fetch a page with a NextRowKey query parameter or not. Either way we Parse the outcome of the fetch entities and loop over it to insert the records into the SQL database.
The trick is to retrieve the NextRowKey token from the Http Response header of the Get Entities action. I’ve searched in the documentation but its actually quite hard to come up with an expression to get it. But here it is: ```json
{
“Set_variable”: {
“inputs”: {
“name”: “NextRowKey”,
“value”: “@{actions(‘Get_next_page’)?[‘outputs’]?[‘headers’]?[‘x-ms-continuation-NextRowKey’]}”
},
“runAfter”: {
“Get_next_page”: [
“Succeeded”
]
},
“type”: “SetVariable”
}
}
1 |
|