Building a Web Scraper in Azure

Building a web scraper is pretty hard. Doing it in Azure is harder. Utilizing Serverless and PaaS services is challenging. I don’t want to pay for a VM and just deploy the scraper on it because I need the solution to be scalable. Secondly I only want to pay for actual usage and not for a VM thats idle.

The case

I want to scrape certain websites twice a day. At 10:00 UTC and at 18:00 UTC. This frequency might change in the future so I don’t want to have it build in hard coded. I’m scraping ecommerce sites and the pages that need to be scraped depend on a list of id’s comming from a database. So the input for the scraper is dynamic. Lastly the output of the scraper has to be stored in a database. Later on I will have to develop some UI which discloses the information for ecommerce traders.

The solution

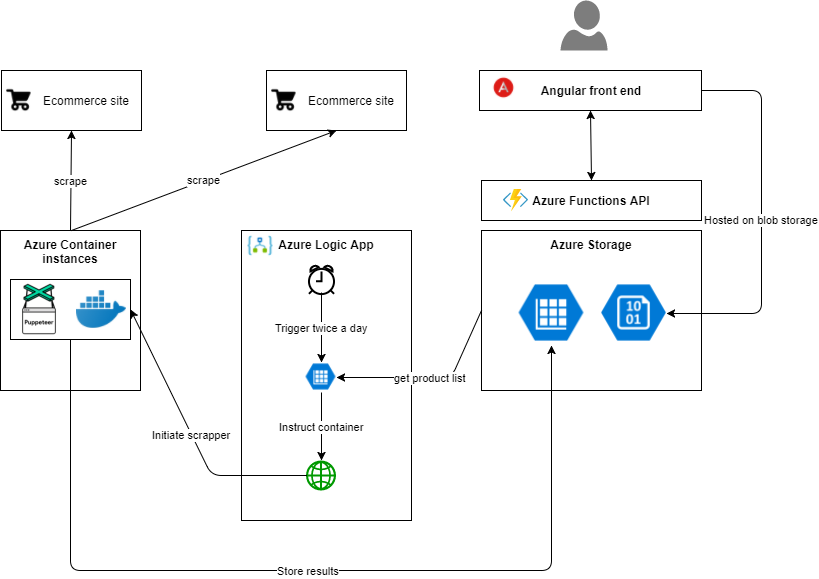
Web scraping comes in different shapes and sizes. Some packages just perform Http calls and evaluate the response. Others spin up and entire (headless) browser and perform actual DOM operations. Since I want to scrape different ecommerce sites spinning up an actual browser looked like the way to go. Also because lots of ecommerce sites rely on alot on JavaScript. Some are build as an SPA and that requires per definition a browser based approach. After some research I stumbled upon `puppeteer`. A headless Chrome API build by Google itself, very promising.

My initial idea was to run puppeteer inside an Azure Function, however after some research I came to the conclusion that running a headless browser on Azure PaaS or Serverless is not going to happen. So what are the alternatives? Well containers seems like a reasonable solution. I can spin up and tear down the container with some orchestration and thereby limit my costs. A good start point for running puppeteer containers in Azure is this blog post.

For orchestrating the scraper I was thinking about using Azure Functions again. But then on a bright day I figured I would use Azure Logic Apps instead. Logic Apps are great for defining and running workflows and look like a perfect fit. They are pay per usage and are easy to develop!

Puppeteer, TypeScript and NodeJs

I wanted to brush up my TypeScript and NodeJS skills since it has been a while that I seriously developed in TypeScript. The last time I did something significant I was still using Visual Studio instead of VS Code for TypeScript development. So here’s the story to get a puppeteer scraper working in NodeJs and TypeScript.

Depedencies

First of all get TypeScript tsconfig.json file there using the following command.

1
2
tsc --init
message TS6071: Successfully created a tsconfig.json file.

A sample of how your TypeScript configuration file might look like is this.
Once important thing is to enable source maps. This allows you to debug your TypeScript code instead of debugging the transpiled JavaScript (which is a mess).

1
2
3
4
5
6
7
8
9
10
11
12
{
"compilerOptions": {
"target": "es5",
"declaration": true,
"lib": [
"es2015", "dom"
]
},
"exclude": [
"node_modules"
]
}

Once you’ve setup the TypeScript configuration its time to setup a NPM project.

1
npm init

You are now ready to start developing your TypeScript application.
You probably need some packages to interface with Puppeteer, Azure storage or whatever. Install them using npm.

1
2
3
npm install puppeteer --save
npm install azure-storage --save
npm install azure-sb --save

A lot of packages got separate TypeScript definition packages. These are required to have type checking. We also require them for puppeteer. You should install them as a dev-dependency instead of a regular dependency.

1
2
npm install @types/puppeteer --save-dev
npm install @types/azure-sb --save-dev

Puppeteer

Once you’ve installed your dependencies you can start developing your scraper. It’s all up to you to interact with the page and retrieve the right information. A very basic example is this:

1
2
3
4
5
6
7
8
9
import * as puppeteer from 'puppeteer';

const browser = await puppeteer.launch();
const page = await browser.newPage();
await page.goto('https://somesite.com');

// Evaluate the page and interact with it.

await browser.close();

One thing you probably want to do is to debug your code. In VSCode you’ll have to add a debug configuration. This can be achieved by adding the following configuration in launch.json. Notice the “Launch program” configuration inside the debug panel of VS Code.

1
2
3
4
5
6
7
8
9
10
11
12
13
14
15
16
{
"version": "0.2.0",
"configurations": [
{
"type": "node",
"request": "launch",
"preLaunchTask": "tsc",
"name": "Launch Program ",
"sourceMaps": true,
"program": "${workspaceFolder}\\src\\index.js",
"outFiles": [
"${workspaceFolder}/**/*.js"
]
}
]
}

Docker and Azure

Well you’ve got your scraper working on Node using TypeScript. The next thing is to host it in the Cloud. We want to containerize the application inside a docker container. Building a docker container requires a dockerfile. Here’s one that works for the Puppeteer scraper. The Google Chrome teams has made a nice Docker file with some tricks applied, I basically copied that. Secondly is this a nice blogpost about running Docker containers on Azure Container Instances. Its worth a read.

1
2
3
4
5
6
7
8
9
10
11
12
13
14
15
16
17
18
19
20
21
22
23
24
25
26
27
28
29
30
31
32
33
34
35
36
37
38
FROM node:8-slim

RUN apt-get update && apt-get -yq upgrade && apt-get install \
&& apt-get autoremove && apt-get autoclean

RUN apt-get update && apt-get install -y wget --no-install-recommends \
&& wget -q -O - https://dl-ssl.google.com/linux/linux_signing_key.pub | apt-key add - \
&& sh -c 'echo "deb [arch=amd64] http://dl.google.com/linux/chrome/deb/ stable main" >> /etc/apt/sources.list.d/google.list' \
&& apt-get update \
&& apt-get install -y google-chrome-unstable fonts-ipafont-gothic fonts-wqy-zenhei fonts-thai-tlwg fonts-kacst ttf-freefont \
--no-install-recommends \
&& rm -rf /var/lib/apt/lists/* \
&& apt-get purge --auto-remove -y curl \
&& rm -rf /src/*.deb

ADD https://github.com/Yelp/dumb-init/releases/download/v1.2.1/dumb-init_1.2.1_amd64 /usr/local/bin/dumb-init
RUN chmod +x /usr/local/bin/dumb-init

# copy project files and install dependencies
COPY . /var/app
WORKDIR /var/app
RUN npm install

RUN npm i puppeteer
ENV AZURE_STORAGE_CONNECTION_STRING=secret
ENV AZURE_SERVICEBUS_CONNECTION_STRING=secret

# Add pptr user.
RUN groupadd -r pptruser && useradd -r -g pptruser -G audio,video pptruser \
&& mkdir -p /home/pptruser/Downloads \
&& chown -R pptruser:pptruser /home/pptruser \
&& chown -R pptruser:pptruser /var/app

# Run user as non privileged.
USER pptruser

ENTRYPOINT ["dumb-init", "--"]
CMD [ "node", "src/index.js" ]

Service bus

Now that we’ve got a very basis scraper running inside a Docker container on Azure Container Instances, its time to feed to scraper with commands.
I therefore created a queue of scrape commands. I prefer using Service Bus technology over Http REST interfaces because it has better fault handling. Secondly it might take a while for a scrape commands to finish and I dont want to run in any Http timeouts or whatsoever.

So we have to listen to a Service Bus inside your Node application. Microsoft has created a package that can be used to setup a connection, namely: azure-sb.
Here’s the code to listen to Service Bus messages on a queue.

1
2
3
4
5
6
7
8
9
10
11
12
13
14
15
16
17
18
19
20
21
22
23
24
25
26
27
28
29
30
31
32
33
34
35
36
37
38
39
40
41
42
43
44
45
46
47
48
49
50
51
52
53
54
55
56
57
58
59
import * as azure from "azure-sb";
import { Logger } from "./logger";

let logger = new Logger(instrumentationKey);

function checkForMessages(sbService: azure.ServiceBusService, queueName: string) {
const options: azure.Azure.ServiceBus.ReceiveSubscriptionMessageOptions = {
timeoutIntervalInS: 60,
isPeekLock: true
};
sbService.receiveQueueMessage(queueName, options, function (err: Error | null | string, lockedMessage: azure.Azure.ServiceBus.Message) {
if (err) {
if (err == 'No messages to receive') {
logger.log('No messages');
} else {
processMessage(sbService, err, null);
}
} else {
processMessage(sbService, null, lockedMessage);
}
});
}

function processMessage(sbService: azure.ServiceBusService, err: Error | null | string, lockedMsg: azure.Azure.ServiceBus.Message) {
if (err) {
logger.log('Error processing message: ' + err);
} else {
logger.log('Processing message - setting lock');
const model = JSON.parse(lockedMsg.body) as Model;

// Initiate your scrape here.

sbService.deleteMessage(lockedMsg, function (err2) {
if (err2) {
logger.log('Failed to delete message: ' + err2);
} else {
logger.log('Deleted message.');
}
});
}
}

var queueName = 'queuename';
logger.log('Connecting to queue ' + queueName);
var sbService = azure.createServiceBusService(AZURE_SERVICEBUS_CONNECTION_STRING);
sbService.createQueueIfNotExists(queueName, function (err) {
if (err) {
logger.log('Failed to create queue: ' + err);
} else {
setInterval(() => {
try {
checkForMessages(sbService, queueName);
} catch (error) {
logger.log('Error during check for messages.');
logger.error(error);
}
}, 5000);
}
});

Azure Logic Apps

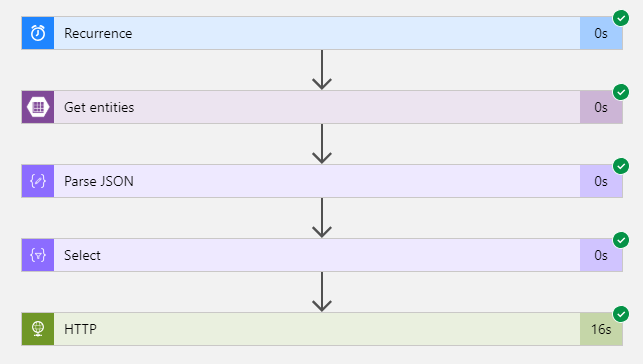
Now that we can initiate a scrape session with a Service Bus queue message. We should queue some scrape commands. I chose to use Logic Apps for that because its on pay per use base and secondly its just a basic workflow which probably doesn't change a lot. 
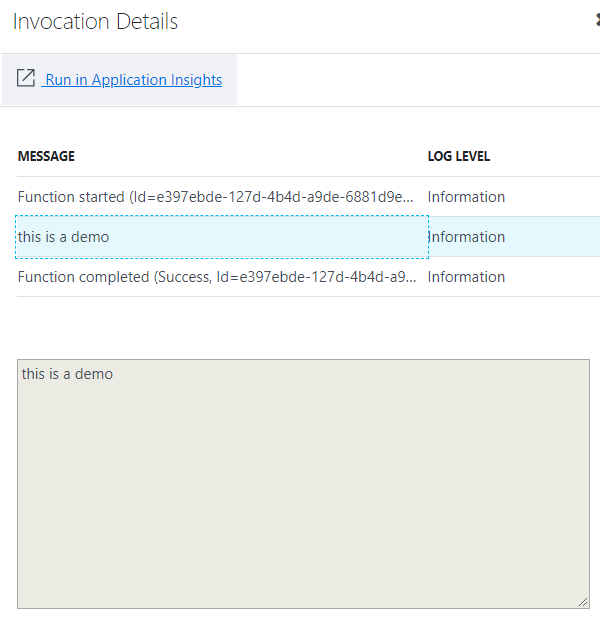
Another benefit of Azure Logic Apps is the ability to analyse your 'runs' and exactly see the data flow through your Logic App. The steps are pretty basic and straight forward.

Using Wordpress / Woocommerce in Serverless Azure

Sometimes Wordpress isn’t that bad. When for instance you’re building a SEO optimized landing page for a custom made tool and you don’t want to develop everything your self. Secondly, Wordpress has thousands of plugins that can be very useful. In my case we are using Woocomerce with a subscription payment module, so that we can manage payed subscriptions for our tool and secondly we want to manage the user accounts inside Wordpress. This saves me lots of development hours and next to that I don’t have to build any maintenance tooling since that is already inplace in Wordpress. So first line support can be done by not-so-much technical people, in other words they won’t call for every problem :)

Overview

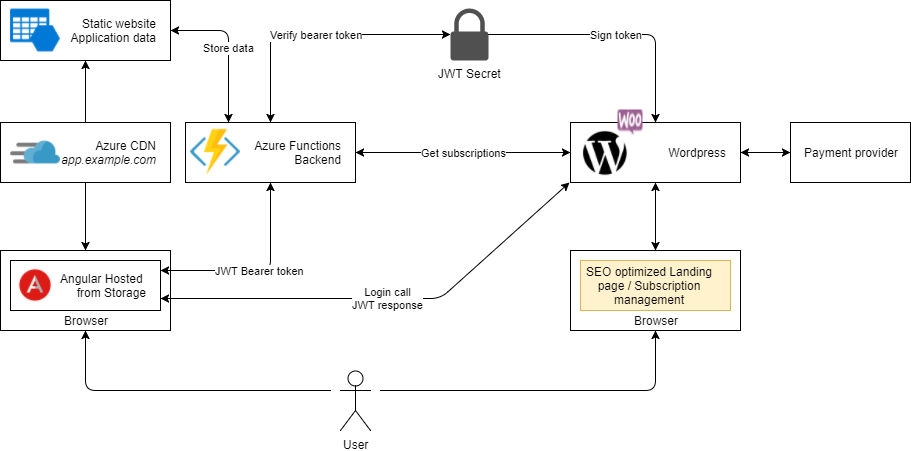
So in essence its very easy. We just have a user with a single set of credentials which he can use in both the SEO optimized page, lets say `example.com` and in the custom made tool lets say `app.example.com`. Using the [JWT Authentication for WP REST API](https://wordpress.org/plugins/jwt-authentication-for-wp-rest-api/) plugin of Wordpress we can login any user and get a JWT bearer token as response. The JWT Authentication plugin requires a JWT Auth Secret key which we can define and share with the `Azure Functions` backend. The functions backend then checks the validity of incoming Bearer token with the shared JWT Auth Secret key, making an additional call to Wordpress unnecessary. Its blazing fast.

But we are not there yet. We need some communication between the Functions backend and Wordpress on an application to application level. In my case I want to retrieve the available subscriptions and the active subscription for a user from Wordpress / Woocommerce. Subscriptions are the trial, starter, business and pro packs that users can buy and those “packs” enable the user some privileges inside my Angular tool. Since its app to app communication I can’t use a Bearer token, because thats user context bounded, and secondly the Woocommerce API requires an OAuth 1.0 authentication. It comes down to this. The Functions backend requires a Consumer key and a Consumer secret which need to be passed into a query string. Postman has excellent OAuth 1.0 support to test it out.

Keep in mind to not add the empty parameters to the signature. Woocommerce doesn’t support it.

So how does this look like in code. There are 2 parts that I want to share with you. Verifying a JWT Bearer token based on a JWT Auth Secret key and the OAuth 1 implementation with Woocommerce.

Verifying a JWT Bearer token

  • Perform a Http REST call from Angular.

    1
    2
    3
    4
    5
    6
    7
    8
    9
    public async authenticate(username: string, password: string) {
    const authResponse = await this.http.post(environment.wordpressBackend + this.jwtEndpoint, { username, password }).toPromise();
    localStorage.setItem('token', (authResponse as AuthResponse).token);
    }

    public async getSubscription() {
    const res = await this.http.get(environment.tradersmateBackend + 'api/subscriptions').toPromise();
    localStorage.setItem('subscription', res as string);
    }
  • Wordpress anwers with a JWT Bearer token and some meta information.

    1
    2
    3
    4
    5
    6
    {
    "token": "secrettokenwillbehere",
    "user_email": "dibran@example.com",
    "user_nicename": "dibranmulder",
    "user_display_name": "Dibran Mulder"
    }
  • Perform a protected Azure Function call, using an Angular interceptor to add the Bearer token.

    1
    2
    3
    4
    5
    6
    7
    8
    9
    10
    11
    12
    13
    14
    15
    16
    17
    18
    19
    20
    21
    22
    23
    24
    25
    26
    27
    28
    import { Injectable } from '@angular/core';
    import {
    HttpRequest,
    HttpHandler,
    HttpEvent,
    HttpInterceptor
    } from '@angular/common/http';
    import { AuthService } from './auth.service';
    import { Observable } from 'rxjs';

    @Injectable()
    export class TokenInterceptor implements HttpInterceptor {
    constructor(public auth: AuthService) {
    }

    intercept(request: HttpRequest<any>, next: HttpHandler): Observable<HttpEvent<any>> {
    const token = this.auth.getToken();
    if (token) {
    request = request.clone({
    setHeaders: {
    Authorization: `Bearer ${token}`
    }
    });
    }

    return next.handle(request);
    }
    }
  • A backend Azure Function checks the incoming Http Request and validates the Bearer token.

  • Don’t forget to respond with a 401 status code when the token is invalid.

1
2
3
4
5
6
7
8
9
10
11
12
13
14
15
16
17
18
19
20
21
22
23
24
25
26
27
28
29
[FunctionName("SomeGet")]
public static async Task<HttpResponseMessage> GetSome(
[HttpTrigger(AuthorizationLevel.Anonymous, "get", Route = "some")] HttpRequestMessage req,
[Inject] IValidateJwt validateJwt,
ILogger log)
{
try
{
log.LogInformation("Product add called");

// Throws an UnAuthorizedException exception when the Bearer token can't be validated.
int userId = validateJwt.ValidateToken(req);

// Do some business logic here.
var results = ...

return req.CreateResponse(HttpStatusCode.OK, results);
}
catch (UnAuthorizedException e)
{
log.LogError(e.Message, e);
return req.CreateResponse(HttpStatusCode.Unauthorized);
}
catch (Exception e)
{
log.LogError(e.Message, e);
return req.CreateErrorResponse(HttpStatusCode.BadRequest, e);
}
}
  • Verify the Bearer token inside your Azure Functions.
  • Inject the JWT Auth Secret Key into the constructor.
1
2
3
4
5
6
7
8
9
10
11
12
13
14
15
16
17
18
19
20
21
22
23
24
25
26
27
28
29
30
31
32
33
34
35
36
37
38
39
40
41
42
43
44
45
46
47
48
49
50
51
52
53
54
55
56
57
58
public class ValidateJwt : IValidateJwt
{
private const string dataClaimType = "data";
private readonly TokenValidationParameters tokenValidationParameters;

public ValidateJwt(string secretKey)
{
tokenValidationParameters = new TokenValidationParameters
{
IssuerSigningKey = new SymmetricSecurityKey(Encoding.ASCII.GetBytes(secretKey)),
ValidateIssuerSigningKey = true,
ValidateIssuer = false,
ValidateAudience = false
};
}

public int ValidateToken(HttpRequestMessage httpRequest)
{
try
{
// We need bearer authentication.
if (httpRequest.Headers.Authorization.Scheme != "Bearer")
{
throw new UnAuthorizedException();
}

// Get the token.
string authToken = httpRequest.Headers.Authorization.Parameter;
if (string.IsNullOrEmpty(authToken))
{
throw new UnAuthorizedException();
}

var tokenHandler = new JwtSecurityTokenHandler();
// Validate it.
ClaimsPrincipal principal = tokenHandler.ValidateToken(authToken, tokenValidationParameters, out SecurityToken validatedToken);
if (principal.Identity.IsAuthenticated)
{
// Check for a data claim.
if (principal.HasClaim(x => x.Type == dataClaimType))
{
Claim dataClaim = principal.Claims.FirstOrDefault(x => x.Type == dataClaimType);
var userObj = JsonConvert.DeserializeObject<DataClaim>(dataClaim.Value);
// With a user object.
if (userObj != null && userObj.User != null)
{
return userObj.User.Id;
}
}
}
}
catch
{
// Do nothing
}
throw new UnAuthorizedException();
}
}

Calling Woocommerce with OAuth 1.0

To interact with the Woocommerce API we need to implement the OAuth 1 flow. Its not used that much so you won’t find a lot of C# examples online. Here’s mine.

Inject a HttpClient, ConsumerKey and ConsumerSecret into the Constructor. Only set the OAuth properties that are actually used, remember the Postman option with including empty parameters. It was a pain in the ass to get in working but I tested this client with Wordpress 5.0.3 and Woocommerce 3.5.4.

1
2
3
4
5
6
7
8
9
10
11
12
13
14
15
16
17
18
19
20
21
22
23
24
25
26
27
28
29
30
31
32
33
34
35
36
37
38
39
40
41
42
43
44
45
46
47
48
49
50
51
52
53
54
55
56
57
58
59
60
61
62
63
64
65
66
67
68
69
70
71
72
73
74
75
76
77
78
79
80
81
82
83
84
85
86
87
88
89
90
91
92
93
94
95
96
97
98
99
100
101
102
103
104
105
106
107
108
109
110
111
112
113
114
115
116
117
118
119
120
121
122
123
124
125
126
127
128
129
130
131
132
133
134
135
136
137
138
139
140
141
142
143
144
145
146
147
148
149
150
151
public class WordpressHttpClient : BaseHttpClient
{
private readonly string consumerKey;
private readonly string consumerSecret;
private readonly Random rand;

public WordpressHttpClient(string consumerKey, string consumerSecret, HttpClient httpClient)
: base(httpClient)
{
rand = new Random();
this.consumerKey = consumerKey;
this.consumerSecret = consumerSecret;
}

public async Task<IEnumerable<Subscription>> GetSubscriptionsAsync()
{
var nonce = GetNonce();
var timeStamp = GetTimeStamp();

var queryCollection = HttpUtility.ParseQueryString(string.Empty);
queryCollection["oauth_consumer_key"] = consumerKey;
queryCollection["oauth_signature_method"] = "HMAC-SHA1";
queryCollection["oauth_timestamp"] = timeStamp;
queryCollection["oauth_nonce"] = nonce;
queryCollection["oauth_version"] = "1.0";
string baseQueryString = queryCollection.ToString();

var requestParameters = new List<string>();
foreach (string key in queryCollection)
{
requestParameters.Add($"{key}={queryCollection[key]}");
}
// We need to sign a base string.
string otherBase = GetSignatureBaseString(HttpMethod.Get.ToString(), "https://www.example.com/wp-json/wc/v1/subscriptions", requestParameters);
var otherSignature = GetSignature(otherBase, consumerSecret);

// Add that signature to the query parameters.
queryCollection["oauth_signature"] = otherSignature;
string finalQueryString = queryCollection.ToString();

// And actually perform the request.
var finalUri = new Uri("https://www.example.com/wp-json/wc/v1/subscriptions?" + finalQueryString, UriKind.Absolute);
HttpRequestMessage httpRequestMessage = new HttpRequestMessage(HttpMethod.Get, finalUri);
var response = await Client.SendAsync(httpRequestMessage);
response.EnsureSuccessStatusCode();
return await response.Content.ReadAsAsync<Subscription[]>();
}

private string GetNonce()
{
var nonce = rand.Next(1000000000);
return nonce.ToString();
}

private string GetTimeStamp()
{
var ts = DateTime.UtcNow - new DateTime(1970, 1, 1, 0, 0, 0, 0);
return Convert.ToInt64(ts.TotalSeconds).ToString();
}

private string GetSignature(string signatureBaseString, string consumerSecret, string tokenSecret = null)
{
var hmacsha1 = new HMACSHA1();

var key = Uri.EscapeDataString(consumerSecret) + "&" + (string.IsNullOrEmpty(tokenSecret)
? ""
: Uri.EscapeDataString(tokenSecret));
hmacsha1.Key = Encoding.ASCII.GetBytes(key);

var dataBuffer = Encoding.ASCII.GetBytes(signatureBaseString);
var hashBytes = hmacsha1.ComputeHash(dataBuffer);

return Convert.ToBase64String(hashBytes);
}

private string GetSignatureBaseString(string method, string url, List<string> requestParameters)
{
var sortedList = new List<string>(requestParameters);
sortedList.Sort();

var requestParametersSortedString = ConcatList(sortedList, "&");

// Url must be slightly reformatted because of:
url = ConstructRequestUrl(url);

return method.ToUpper() + "&" + Uri.EscapeDataString(url) + "&" +
Uri.EscapeDataString(requestParametersSortedString);
}

private string ConstructRequestUrl(string url)
{
var uri = new Uri(url, UriKind.Absolute);
var normUrl = string.Format("{0}://{1}", uri.Scheme, uri.Host);
if (!(uri.Scheme == "http" && uri.Port == 80 || uri.Scheme == "https" && uri.Port == 443))
{
normUrl += ":" + uri.Port;
}

normUrl += uri.AbsolutePath;

return normUrl;
}

private Dictionary<string, string> ExtractQueryParameters(string queryString)
{
if (queryString.StartsWith("?"))
queryString = queryString.Remove(0, 1);

var result = new Dictionary<string, string>();

if (string.IsNullOrEmpty(queryString))
return result;

foreach (var s in queryString.Split('&'))
{
if (!string.IsNullOrEmpty(s) && !s.StartsWith("oauth_"))
{

if (s.IndexOf('=') > -1)
{
var temp = s.Split('=');
result.Add(temp[0], temp[1]);
}
else
{
result.Add(s, string.Empty);
}
}
}

return result;
}

private static string ConcatList(IEnumerable<string> source, string separator)
{
var sb = new StringBuilder();
foreach (var s in source)
{
if (sb.Length == 0)
{
sb.Append(s);
}
else
{
sb.Append(separator);
sb.Append(s);
}
}
return sb.ToString();
}
}

Azure Functions Http Response caching

As you might know its a best practice to keep your Azure Functions stateless. That means that also in memory caching should not be done inside your functions. Especially when you’re using a consumption plan. Your cache will be recycled when the plan goes to sleep.
What a lot of fokes forget is that the Http protocol as of Http 1.1 contains caching. Setting the right caching headers on a HttpResponseMessage is actually quite easy.

In ASP.net core we even had packages for us to do that. Those obviously don’t work for functions since the attributes can’t be placed on top of Azure Functions with Http Triggers. So sadly we’ve to write code to se the right headers. However its so easy that you won’t be sad for long.

Here’s a simple Http triggered function. Notice the CreateCachedResponse instead of CreateResponse extension method.

1
2
3
4
5
6
7
8
9
10
11
12
13
14
15
16
17
18
19
[FunctionName("SomeFunction")]
public static async Task<HttpResponseMessage> SomeHttpTriggeredFunctions(
[HttpTrigger(AuthorizationLevel.Anonymous, "post", Route = "some/route")] HttpRequestMessage req,
ILogger log)
{
try
{
log.LogInformation("SomeFunction called");

// Do something

return req.CreateCachedResponse(HttpStatusCode.OK, response);
}
catch (Exception e)
{
log.LogError(e.Message, e);
return req.CreateErrorResponse(HttpStatusCode.BadRequest, e);
}
}

In the extension method we will simply add some headers to the response.

1
2
3
4
5
6
7
8
9
10
11
12
13
14
15
16
17
18
using System;
using System.Net;
using System.Net.Http;
using System.Net.Http.Headers;

public static class CacheResponseExtensions
{
public static HttpResponseMessage CreateCachedResponse<T>(this HttpRequestMessage request, HttpStatusCode statusCode, T value, TimeSpan? maxAge = null)
{
HttpResponseMessage responseMessage = request.CreateResponse<T>(statusCode, value);
responseMessage.Headers.CacheControl = new CacheControlHeaderValue()
{
Public = true,
MaxAge = maxAge ?? defaultTimeSpan
};
return responseMessage;
}
}

And voila we’ve got client side caching working.

https://docs.microsoft.com/en-us/aspnet/core/performance/caching/response?view=aspnetcore-2.2

Azure API Management ARM Cheat sheet

Deploying an API Management instance via ARM is complicated. I’ve created a cheat sheet to help you out.
Alot is copied from a complete template originating from Github.

ARM

ARM might be the way to deploy a pre-setup instance. For adding API’s to an existing API Management instance I prefer to use the API Management extensions from the Azure DevOps Marketplace.

Instance

Parameterize every option, in your ARM script. Resources sucha as policies, products, api’s and such go into the sub resources array.

1
2
3
4
5
6
7
8
9
10
11
12
13
14
15
16
{
"apiVersion": "2017-03-01",
"name": "[variables('apiManagementServiceName')]",
"type": "Microsoft.ApiManagement/service",
"location": "[parameters('location')]",
"tags": {},
"sku": {
"name": "[parameters('sku')]",
"capacity": "[parameters('skuCount')]"
},
"properties": {
"publisherEmail": "[parameters('publisherEmail')]",
"publisherName": "[parameters('publisherName')]"
},
"resources": []
}

Tenant policy

To create a tenant wide policy.

1
2
3
4
5
6
7
8
9
10
11
{
"apiVersion": "2017-03-01",
"type": "policies",
"name": "policy",
"dependsOn": [
"[concat('Microsoft.ApiManagement/service/', variables('apiManagementServiceName'))]"
],
"properties": {
"policyContent": "[parameters('tenantPolicy')]"
}
}

API’s

Adding API’s can be done via Open API definitions. If your Open API definition doesn’t contain a host property, like: "host":"somewebsite.azurewebsites.net". Then you should add the service url property inside your ARM.

1
2
3
4
5
6
7
8
9
10
11
12
13
{
"apiVersion": "2017-03-01",
"type": "apis",
"name": "PetStoreSwaggerImportExample",
"dependsOn": [
"[concat('Microsoft.ApiManagement/service/', variables('apiManagementServiceName'))]"
],
"properties": {
"contentFormat": "SwaggerLinkJson",
"contentValue": "http://petstore.swagger.io/v2/swagger.json",
"path": "examplepetstore"
}
}

You can also add operations manually, without using Open API definitions.

1
2
3
4
5
6
7
8
9
10
11
12
13
14
15
16
17
18
19
20
21
22
23
24
25
26
27
28
29
30
31
32
33
34
35
36
37
38
39
40
41
42
43
44
45
46
47
48
49
50
51
52
53
54
55
56
57
58
59
60
61
62
{
"apiVersion": "2017-03-01",
"type": "apis",
"name": "exampleApi",
"dependsOn": [
"[concat('Microsoft.ApiManagement/service/', variables('apiManagementServiceName'))]"
],
"properties": {
"displayName": "Example API Name",
"description": "Description for example API",
"serviceUrl": "https://example.net",
"path": "exampleapipath",
"protocols": [
"HTTPS"
]
},
"resources": [
{
"apiVersion": "2017-03-01",
"type": "operations",
"name": "exampleOperationsDELETE",
"dependsOn": [
"[concat('Microsoft.ApiManagement/service/', variables('apiManagementServiceName'), '/apis/exampleApi')]"
],
"properties": {
"displayName": "DELETE resource",
"method": "DELETE",
"urlTemplate": "/resource",
"description": "A demonstration of a DELETE call"
}
},
{
"apiVersion": "2017-03-01",
"type": "operations",
"name": "exampleOperationsGET",
"dependsOn": [
"[concat('Microsoft.ApiManagement/service/', variables('apiManagementServiceName'), '/apis/exampleApi')]"
],
"properties": {
"displayName": "GET resource",
"method": "GET",
"urlTemplate": "/resource",
"description": "A demonstration of a GET call"
},
"resources": [
{
"apiVersion": "2017-03-01",
"type": "policies",
"name": "policy",
"dependsOn": [
"[concat('Microsoft.ApiManagement/service/', variables('apiManagementServiceName'))]",
"[concat('Microsoft.ApiManagement/service/', variables('apiManagementServiceName'), '/apis/exampleApi')]",
"[concat('Microsoft.ApiManagement/service/', variables('apiManagementServiceName'), '/apis/exampleApi/operations/exampleOperationsGET')]"
],
"properties": {
"policyContent": "[parameters('operationPolicy')]"
}
}
]
}
]
}

There are also other ways, such as WSDL, and inserting Open API definitions as a value in your ARM.
See the documentation and check for contentFormat and contentValue.

Product

To create a product and add API’s directly to the product.

1
2
3
4
5
6
7
8
9
10
11
12
13
14
15
16
17
18
19
20
21
22
23
24
25
26
27
28
29
30
31
32
33
34
35
36
37
38
39
40
41
{
"apiVersion": "2017-03-01",
"type": "products",
"name": "exampleProduct",
"dependsOn": [
"[concat('Microsoft.ApiManagement/service/', variables('apiManagementServiceName'))]"
],
"properties": {
"displayName": "Example Product Name",
"description": "Description for example product",
"terms": "Terms for example product",
"subscriptionRequired": true,
"approvalRequired": false,
"subscriptionsLimit": 1,
"state": "published"
},
"resources": [
{
"apiVersion": "2017-03-01",
"type": "apis",
"name": "exampleApi",
"dependsOn": [
"[concat('Microsoft.ApiManagement/service/', variables('apiManagementServiceName'))]",
"[concat('Microsoft.ApiManagement/service/', variables('apiManagementServiceName'), '/apis/exampleApi')]",
"[concat('Microsoft.ApiManagement/service/', variables('apiManagementServiceName'), '/products/exampleProduct')]"
]
},
{
"apiVersion": "2017-03-01",
"type": "policies",
"name": "policy",
"dependsOn": [
"[concat('Microsoft.ApiManagement/service/', variables('apiManagementServiceName'))]",
"[concat('Microsoft.ApiManagement/service/', variables('apiManagementServiceName'), '/products/exampleProduct')]"
],
"properties": {
"policyContent": "[parameters('productPolicy')]"
}
}
]
}

User

To create a user. But think of using Azure AAD integration.

1
2
3
4
5
6
7
8
9
10
11
12
13
14
15
{
"apiVersion": "2017-03-01",
"type": "users",
"name": "exampleUser1",
"dependsOn": [
"[concat('Microsoft.ApiManagement/service/', variables('apiManagementServiceName'))]"
],
"properties": {
"firstName": "ExampleFirstName1",
"lastName": "ExampleLastName1",
"email": "ExampleFirst1@example.com",
"state": "active",
"note": "note for example user 1"
}
}

Group

To create a group of users.

1
2
3
4
5
6
7
8
9
10
11
12
13
14
15
16
17
18
19
20
21
22
23
{
"apiVersion": "2017-03-01",
"type": "groups",
"name": "exampleGroup",
"dependsOn": [
"[concat('Microsoft.ApiManagement/service/', variables('apiManagementServiceName'))]"
],
"properties": {
"displayName": "Example Group Name",
"description": "Example group description"
},
"resources": [
{
"apiVersion": "2017-03-01",
"type": "users",
"name": "exampleUser3",
"dependsOn": [
"[concat('Microsoft.ApiManagement/service/', variables('apiManagementServiceName'))]",
"[concat('Microsoft.ApiManagement/service/', variables('apiManagementServiceName'), '/groups/exampleGroup')]"
]
}
]
}

Subscription

To create a subscription for a user.

1
2
3
4
5
6
7
8
9
10
11
12
13
14
{
"apiVersion": "2017-03-01",
"type": "subscriptions",
"name": "examplesubscription1",
"dependsOn": [
"[concat('Microsoft.ApiManagement/service/', variables('apiManagementServiceName'))]",
"[concat('Microsoft.ApiManagement/service/', variables('apiManagementServiceName'), '/products/exampleProduct')]",
"[concat('Microsoft.ApiManagement/service/', variables('apiManagementServiceName'), '/users/exampleUser1')]"
],
"properties": {
"productId": "/subscriptions/{subscriptionId}/resourceGroups/{resourceGroupName}/providers/Microsoft.ApiManagement/service/exampleServiceName/products/exampleProduct",
"userId": "/subscriptions/{subscriptionId}/resourceGroups/{resourceGroupName}/providers/Microsoft.ApiManagement/service/exampleServiceName/users/exampleUser1"
}
}

Named values

Add named values, often used in policies as variables.

1
2
3
4
5
6
7
8
9
10
11
12
13
14
15
{
"apiVersion": "2017-03-01",
"type": "properties",
"name": "exampleproperties",
"dependsOn": [
"[concat('Microsoft.ApiManagement/service/', variables('apiManagementServiceName'))]"
],
"properties": {
"displayName": "propertyExampleName",
"value": "propertyExampleValue",
"tags": [
"exampleTag"
]
}
}

Certificate

To create a certificate.

1
2
3
4
5
6
7
8
9
10
11
12
{
"apiVersion": "2017-03-01",
"type": "certificates",
"name": "exampleCertificate",
"dependsOn": [
"[concat('Microsoft.ApiManagement/service/', variables('apiManagementServiceName'))]"
],
"properties": {
"data": "[parameters('mutualAuthenticationCertificate')]",
"password": "[parameters('certificatePassword')]"
}
}

OpenId Connect

For OpenId integration.

1
2
3
4
5
6
7
8
9
10
11
12
13
14
15
{
"apiVersion": "2017-03-01",
"type": "openidConnectProviders",
"name": "exampleOpenIdConnectProvider",
"dependsOn": [
"[concat('Microsoft.ApiManagement/service/', variables('apiManagementServiceName'))]"
],
"properties": {
"displayName": "exampleOpenIdConnectProviderName",
"description": "Description for example OpenId Connect provider",
"metadataEndpoint": "https://example-openIdConnect-url.net",
"clientId": "exampleClientId",
"clientSecret": "[parameters('openIdConnectClientSecret')]"
}
}

Identity providers

You can add multiple identity providers. The following providers are available.

1
2
3
4
5
6
["facebook",
"google",
"microsoft",
"twitter",
"aad",
"aadB2C"]
1
2
3
4
5
6
7
8
9
10
11
12
{
"apiVersion": "2017-03-01",
"type": "identityProviders",
"name": "google",
"dependsOn": [
"[concat('Microsoft.ApiManagement/service/', variables('apiManagementServiceName'))]"
],
"properties": {
"clientId": "googleClientId",
"clientSecret": "[parameters('googleClientSecret')]"
}
}

Logger

You can use either EventHub or Application Insights as a Logging framework.
The difference is in the credentials.

Eventhub

1
2
3
4
5
6
7
8
9
10
11
12
13
14
15
16
{
"apiVersion": "2017-03-01",
"type": "loggers",
"name": "exampleLogger",
"dependsOn": [
"[concat('Microsoft.ApiManagement/service/', variables('apiManagementServiceName'))]"
],
"properties": {
"loggerType": "azureEventHub",
"description": "Description for example logger",
"credentials": {
"name": "exampleEventHubName",
"connectionString": "[parameters('eventHubNamespaceConnectionString')]"
}
}
}

Application Insights

1
2
3
4
5
6
7
8
9
10
11
12
13
{
"apiVersion": "2017-03-01",
"type": "loggers",
"name": "exampleLogger",
"dependsOn": [
"[concat('Microsoft.ApiManagement/service/', variables('apiManagementServiceName'))]"
],
"properties": {
"loggerType": "applicationInsights",
"description": "Description for example logger",
"credentials": "3e2e9837-b17b-44b3-a652-ed296080c57d"
}
}

Reference

Microsoft ARM Docs

Azure API Management overview

Azure API Management is a jungle of configurations, options and possibilities. The documentation is not always that clear and sometimes its hard to see what your options are and which suit your solution best. In this blogpost I’m trying to shine some light into that darkness.

Terminology

Lest started with some very basics. API Management(from now on APIM, cauz im lazy) is a service sitting in the middle of a consuming client application and a backend service. Its there for reasons, such as: enforcing policies, caching, routing, security and so on. Its often used as a central hub within a company to manage outgoing and incomming traffic. Its main goal is to retrain control over your API’s.

  • The consuming client applications are called: Client or front-end application.
  • The incomming traffic from a client application is call inbound traffic.
  • Your API which you are disclosing via APIM is called the backend service or api.
  • The response from the backend service is called outbound traffic.

Products and groups

Next up APIM got some features and data structures which you need to be familiar with. It all starts with products and groups. A product essentially is a set of API’s. For a client application to be effective it might have to consult several backend api’s to get all data. Especially when you are using a microservice based architecture. A product then might be a combination of multiple backend api’s. Its important to keep in mind that a set of backend API’s should look like one product from a client application perspective. Once you’ve defined a set of API’s for a product you’ll have to grant groups of users to a product. APIM also contains a build in group called ‘Guests’ which once allowed access to a product opens up your API’s in your product for everyone.

Subscriptions

You can also choose to enable subscriptions for a product. Once enabled users have to request a subscription and they obtain a set of keys. Those keys should be added to every call to APIM so that APIM can validate if your subscription is still valid.

Policies

Lastly a product can also contain policies. Later you’ll see that you can also define policies on API or even on operation level. Policies applied on product level apply on every API inside the product. Its a hierachial system for defining policies.

Add API’s

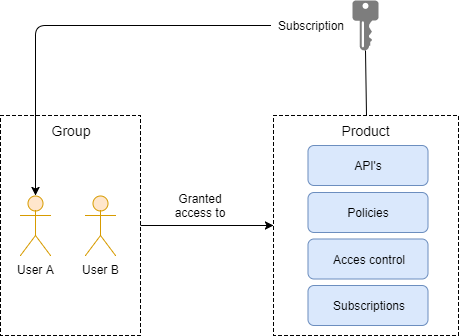
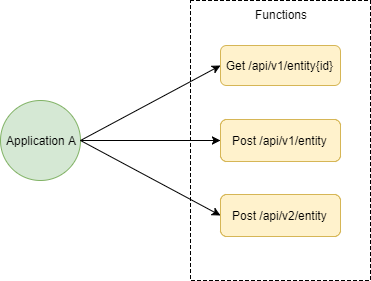
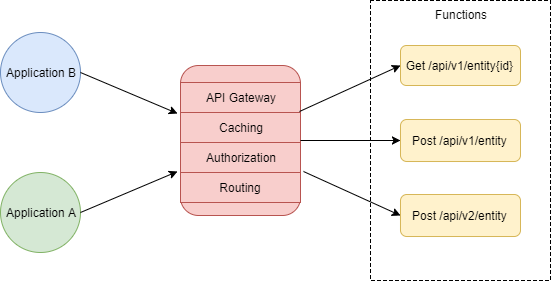
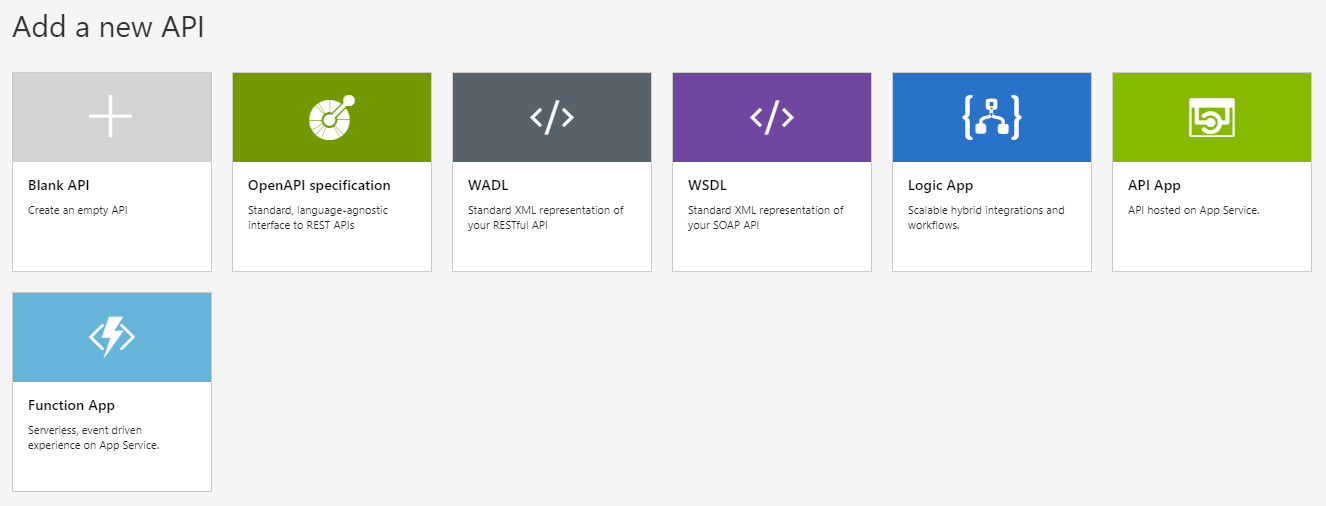
You can add API's in various ways. With a blank API's you'll have to define every thing youself. Its doesn't bootstrap any operations or whatsoever. Other options do bootstrap your API's inside APIM. OpenAPI spefications for instance delivery detailed operations and improve efficiency and usability. OpenAPI definitions were previously called Swagger definitions.

Its also possibile to integrate with a Function App in Api Management. As discussed in this post an API Gateway is recommended when you’re creating a Serverless API or when you’re using a Microservice based architecture. Be aware that OpenAPI definitons inside Azure Functions V2 are still in preview and therefore the bootstrapped operations lack some detail.

In the next blogpost I’ll address the CI/CD posibilities in combination with APIM. In my opinion its indispensable for a DevOps team, let alone a whole company using the same APIM instance.

Security

Client Authentication

OpenId
OAuth
Subscription Keys

Backend service

Function keys
Basic Auth
Client certificates

Policies

1
2
3
4
5
6
7
8
9
10
11
12
13
14
<policies>
<inbound>
<base />
</inbound>
<backend>
<base />
</backend>
<outbound>
<base />
</outbound>
<on-error>
<base />
</on-error>
</policies>

Categories

  • Restriction
  • Advanced
  • Authentication
  • Caching
  • Cross domain policies (CORS)
  • Transformation

https://docs.microsoft.com/en-us/azure/api-management/api-management-policies

Secrets in Azure DevOps the bad parts

Storing secrets inside your build and release pipeline variables is a bad practise and Microsoft advises not to use it, but use KeyVault instead. However fact is, is that its also very convenient and easy to use, so people are going to use it alot. But what are the risks of using this? Are your secrets save?

Decrypting secrets

May 17th of 2018 FoxIt published a tool to decrypt secrets from the TFS/VSTS and now AzureDevops variable stores. This tool on itself is a huge risk from a compliance and security perspective.

Imagine you store connection strings or passwords inside the variables store and they provide access to your production databases. Malicious developers are now able to retrieve those secrets and do their harm. Without any trace. Since you are not able to get a trace log from Azure DevOps. A better way the prevent variables to be decrypted is the read them from KeyVault.

Secrets in ARM scripts

Another risk with using secrets inside ARM scripts is the risk of exposing variables without knowing it. ARM parameters are often strings, for example: usernames, password, connection strings, etc. Those strings might come from trusted sources maybe even a KeyVault. One mistake thats often made is that those parameters are of type string. See the example below, these are the parameters for a basic WebApp ARM Script. In this WebApp we want to access a database and we want to have the connection string to that database as a parameter.

1
2
3
4
5
6
7
8
9
10
11
12
13
14
15
16
17
18
19
20
21
22
23
24
25
26
27
28
29
30
31
32
{
"parameters": {
"webAppName": {
"type": "string",
"metadata": {
"description": "Base name of the resource such as web app name and app service plan "
},
"minLength": 2
},
"sku":{
"type": "string",
"defaultValue" : "S1",
"metadata": {
"description": "The SKU of App Service Plan, by defaut is standard S1"
}
},
"location": {
"type": "string",
"defaultValue": "[resourceGroup().location]",
"metadata": {
"description": "Location for all resources."
}
},
"databaseConnectionString": {
"type": "string",
"defaultValue": "",
"metadata": {
"description": "The connection string to the database."
}
}
}
}

What a lot of people don’t know is that you can look into the deployments of a Resource Group. Simply go to Resource groups > Deployments and select one. If a parameter is not marked as type: securestring then it will be shown in plain text. The bad part of this experience is that you require very few rights to look into the deployments of a resource group. Read rights are enough. You are for instance prohibited to look into the app settings or connection strings of a WebApp but you are often allowed to look into this deployments.

The correct parameter type should be the following:

1
2
3
4
5
6
7
8
9
10
11
{
"parameters": {
"databaseConnectionString": {
"type": "securestring",
"defaultValue": "",
"metadata": {
"description": "The connection string to the database."
}
}
}
}

Building Serverless API's in Azure

Serverless is a hot topic in Cloud Development. Serverless cloud computing is all about scalability, performance, minimizing cost and maximizing business value by eliminating complexity. Its a true game changer but is it always the best approach for your software? In this blogpost I’ll address the pros and cons regarding Serverless API’s.

REST API’s

We’ve been building API’s for decades, with techniques like RCP, SOAP, Enterprise Service Buses, etc. The majority of the people nowadays build their API’s based on a REST or RESTful architecture. How does this trend match the new serverless hype that’s taking place? In this blogpost we are trying to find that out.

I’ll assume that you know what REST is but in case you don’t. It’s based on the following principles:

performance, scalability, simplicity, modifiability, visibility, portability, and reliability

In order for an architecture to achieve those goals, REST has the following constraints:

Client-Server Architecture, Statelessness, Cachability, Layered system, Code on demand and Uniform Interface.

More information about the constraints and principles can be found here

So, at first sight, it doesn’t really look that Serverless computing and REST are in conflict. Moreover, Serverless computing might be complementary to REST. Let’s have a closer look.

Serverless

According to Martin Fowler’s blog this is the definition of Serverless:

Serverless can also mean applications where server-side logic is still written by the application developer, but, unlike traditional architectures, it’s run in stateless compute containers that are event-triggered, ephemeral (may only last for one invocation), and fully managed by a third party. One way to think of this is “Functions as a Service” or “FaaS”.

Source from Martin Fowler

So the key takeaways are: event triggered, ephemeral and fully managed by a third party. So those Functions are serverside logic, triggered by events. In a REST based scenario that trigger might be an Http call, representing a REST operation. So far so good.

So, we might end up building Azure Functions for every REST operation. The client application then has to orchestrate the REST calls to the right functions. This might be done via naming conventions, a pattern which is common in REST based architectures. If you are questioning if this is really a good idea, hold that thought! I’ll come back to it.

Calling Azure Functions directly from your Client feels like a bad idea. Azure Functions should be those little snippets of code just executing at crazy scale and they should perform really well. On the other hand, we want to have an API with all kinds of additional features, we need those features to have an effective and future proof communication with our clients. I’m talking about:

  • SSL termination
  • Authentication
  • IP whitelisting
  • Client rate limiting (throttling)
  • Logging and monitoring
  • Response caching
  • Web application firewall
  • GZIP compression
  • Servicing static content
  • Restfull routing
  • Versioning
  • Health checking
  • Documentation

These features and Functions don’t fit really well. If we end up adding all those features to our Azure Functions we should just have picked ASP.net core and we could have built that API way faster than we would have in Azure Functions. So how do we bring those features in play while keeping our Azure Functions lean and mean. Well we need some sort of Application Gateway. A service sitting in the middle of the client and our Azure Functions which takes care of most of the features above. This Application Gateway should scale very good and shouldn’t introduce a new bottle neck. Think of it as an Load Balancer.

Azure API Gateway

Azure offers a set of services which have the possibility to route traffic, cache and so on. However most of them are not a good fit to act as an API Gateway.

The following services are just for routing traffic on different levels but don’t implement documentation, logging, analytics, caching and so on:

  • Azure Traffic manager
    DNS based (global) load balancer and fail-over solution
  • Azure Application Gateway
    HTTP/HTTPS based redirect + SSL offload + Web Application Firewall (OWASP) solution
  • Azure Load Balancer
    Generic (port based) load balancer -> often used for IaaS VM’s

Azure API Management

The only service which is an actual API Gateway implementation is Azure API management. It includes caching, routing, security, documentation, logging and so on. It’s a comprehensive suite of features, and I’m planning to write a bunch of blog posts about it. So, stay tuned.

One thing to consider is the pricing of Azure API management. It’s quite expensive with a start rate of about 670 dollars. If you want to do Global API management or VNET integration you will have to pick the Premium tier, which comes at 2700 dollar a month. So the key take away is that if you want to build a REST API on Functions you might have to give in some features or pay a little extra.

A best practice is to share the API management instance across a company. In this way you can manage all outbound API’s from one service. Also you are managing all clients inside one service, offboarding clients is way easier this way.

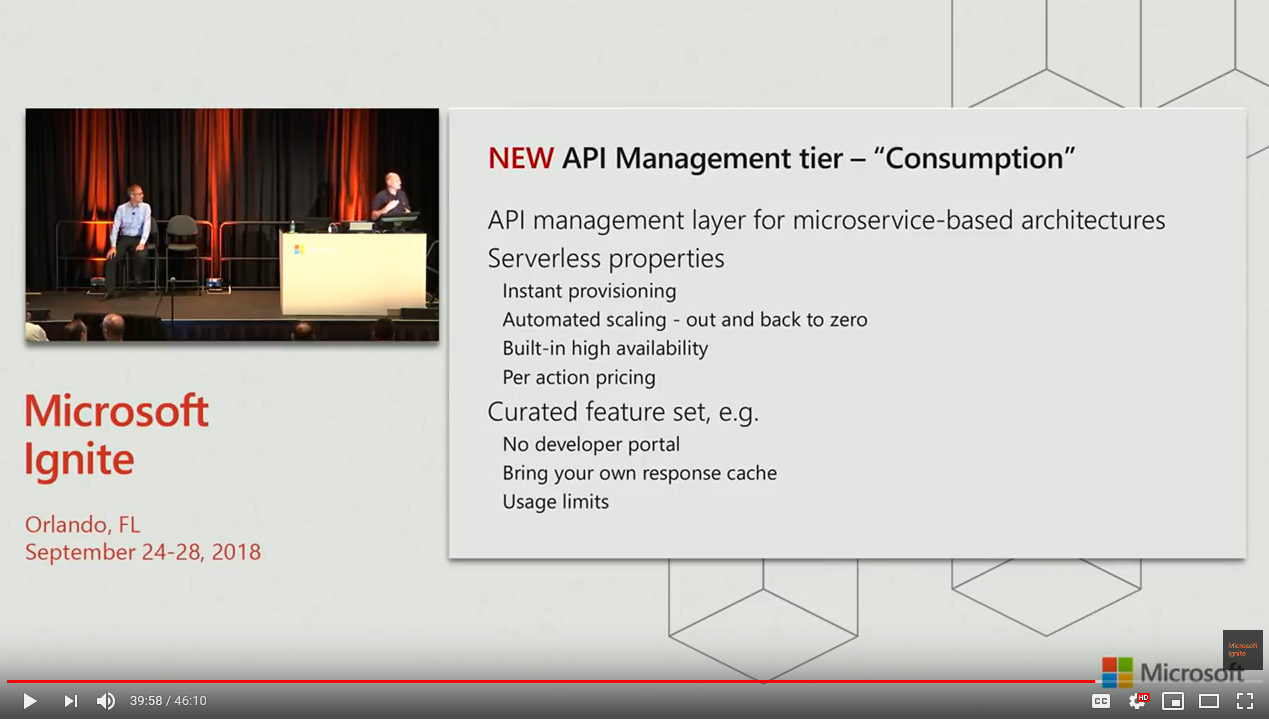
[Link to the Video](https://www.youtube.com/watch?v=BoZimCedfq8&t=39m58s)

On Ignite 2018, Microsoft announced an API Management Consumption based tier. This tier should be optimized to handle Serverless scenarios. So basically Microsoft confirms the need for API Gateway when building Serverless architectures.

This consumption tier is now in private preview, hopefully it will be in public preview and later GA very soon. In the near future I will write some blog posts on:

  • How to configure an API management instance via ARM and Azure DevOps
  • How to add Azure Functions to API management via Azure DevOps.
  • Building REST API’s on Azure Functions. Including features like:
    • Dependency injection
    • Response caching
    • Authentication

Stay tuned and happy coding.

Azure AD Managed Service Identity

What is Azure AD Managed Service Identity (MSI)

Azure AD MSI is an Azure feature, which allows Identity managed access to Azure resources. This improves security, by reducing the need for applications, to have credentials in code, configurations. It creates an identity, which is linked to an Azure resource. The identity can then be granted access to Azure resources. This allows for access management on identity level, and one of the advantages, that the Identity management itself is done by Azure.

​”A common challenge when building cloud applications is how to manage the credentials that need to be in your code for authenticating to cloud services. Keeping these credentials secure is an important task. Ideally, they never appear on developer workstations or get checked into source control. Azure Key Vault provides a way to securely store credentials and other keys and secrets, but your code needs to authenticate to Key Vault to retrieve them. Managed Service Identity (MSI) makes solving this problem simpler by giving Azure services an automatically managed identity in Azure Active Directory (Azure AD). You can use this identity to authenticate to any service that supports Azure AD authentication, including Key Vault, without having any credentials in your code.

​Managed Service Identity comes with Azure Active Directory free, which is the default for Azure subscriptions. There is no additional cost for Managed Service Identity.”

(from: Azure AD Intro)

Azure AD MSI Setup options

There are several options to setup MSI, this article will give an impression how to setup AD MSI using the Azure Portal.

Azure Portal

The most easiest method is to use the Azure Portal. This provides an intuitive way, and shows which features are supported. The suggested approach, is to setup features in the Azure portal to have a good idea on the desired setup, and then use the Azure resource explorer to define the arm script.

​ARM

Setting up the AD MSI with ARM is possible, at the moment there are some PowerShell scripts required to set up an VSTS pipeline. One thing to keep in mind, is that a new Azure Identity will be created, so the difficult part of the ARM template, is linking an existing users and grant them permissions.

PowerShell / Azure CLI

As with all Azure features, it’s possible to use PowerShell and the Azure CLI to setup the MSI. One important aspect of this feature, is that it’s managed in Azure, which means local debugging becomes complex. To resolve this, it’s possible to use the Azure CLI to is the easiest way to perform local debugging (see this article).​

Walkthrough - enable Azure AD MSI for existing functions

Objective

In this walkthrough, we enable Azure AD MSI for an existing Azure Function The function retrieves a secret from Azure KeyVault. In the initial implementation

the function had to retrieve the KeyVault Id & secret in the configuration file.

CONFIG FILE

1
2
3
4
5
6
<!-- ClientId and ClientSecret refer to the web application registration with Azure Active Directory -->
<add key="ClientId" value="clientid" />
<add key="ClientSecret" value="clientsecret" />

<!-- SecretUri is the URI for the secret in Azure Key Vault -->
<add key="SecretUri" value="secreturi" />

CODE TO ACCESS TOKEN

1
2
3
4
5
6
7
8
9
10
11
//the method that will be provided to the KeyVaultClient

public static async Task<string> GetToken(string authority, string resource, string scope)
{
var authContext = new AuthenticationContext(authority);
ClientCredential clientCred = new ClientCredential(GetSetting("ClientId"), (GetSetting("ClientSecret"));
AuthenticationResult result = await authContext.AcquireTokenAsync(resource, clientCred);
if (result == null)
throw new InvalidOperationException("Failed to obtain the JWT token");
return result.AccessToken;
}}​

CODE TO RETRIEVE THE SECRET

1
2
3
var kv = new KeyVaultClient(new KeyVaultClient.AuthenticationCallback(Utils.GetToken));

var sec = await kv.GetSecretAsync(WebConfigurationManager.AppSettings["SecretUri"]);

The problem with the code shown above is;

  1. Any change in the KeyVault security resulted in downtime in the function
  2. It was not clear who was able to access the KeyVault

Why AD MSI?

With the new approach, we will make sure that only the function is able to access the KeyVault. By enabling Azure AD MSI, one the advantages, is that we do this using an Identity linked to the Azure function. In the new workflow, the Azure function has no need for any configuration, thus the function is more secure, and all the management of access, is done in the KeyVault.

Azure Function - Enable AD MSI

Within our Azure function, we navigate to platform features, and click on ‘​​Managed Service Identity’ (note that this is also supported in several other Azure services such as WebApps).

We can enable the feature, which will create an Azure Identity

This has created an Identity, recognizable by the name of the function we created.

We now have completed the first step, 2 things needs to be done:

  1. Manage access for the identity
  2. Update the Code in the function

Key Vault Access

The CCC provides a Blueprint and service to create a KeyVault, in summary, it allows for storage of secrets/certificates (with renewal procedures), and is highly recommended to store confidential data in (see: Architecture Blueprint Azure Key Vault.docx). We will assume a KeyVault is already available, and will configure the identity;

  1. We click on Access Control (IAM)
  2. Click Add
    a. Choose the role ‘Reader’
    b. Select ‘Function App’, in the dropdown ‘Assign Rights’ (note that we have several types available)

c. Choose the appropiate subscription
d. Choose the appropiate resource group
e. Select the Identity
f. Click save

What have we done? We now have granted the function to access the Key Vault, with the specified Identity. Any decision to revoke access, change permissions, can now be defined in the Key Vault resource itself.

Our sample secret within the Key Vault;

Azure Function - Code Change

We have now ensured that the function can retrieve data ​from the KeyVault without requiring a configuration. We now need to make the following changes

  1. Remove the configuration for SecretKey-Value, so that we only have the URI configured;

CONFIG FILE

<!-- SecretUri is the URI for the secret in Azure Key Vault -->
<add key="SecretUri" value="secreturi" />​

CODE TO ACCESS TOKEN

Obsolete!

CODE TO RETRIEVE THE SECRET

1
2
3
4
5
var azureServiceTokenProvider = new AzureServiceTokenProvider();​
var kvClient = new KeyVaultClient(new KeyVaultClient.AuthenticationCallback(azureServiceTokenProvider.KeyVaultTokenCallback));
var result = await kvClient.GetSecretAsync(GetSetting("SecretUri"));
log.Info(result.Value);

Output from the function

Summary

As shown in this simple example, it’s quite easy to enable Azure AD MSI for your application. Using Azure AD MSI, results in a lot of benefits. Besides manually configuring this, it’s also possible to set this up using ARM scripts, VSTS, with the following article​​

Resources

Intro

https://azure.microsoft.com/nl-nl/blog/keep-credentials-out-of-code-introducing-azure-ad-managed-service-identity/

Supported Azure services

https://docs.microsoft.com/nl-nl/azure/active-directory/managed-service-identity/overview

Web Application accessing a KeyVault using Azure AD MSI

https://docs.microsoft.com/nl-nl/azure/key-vault/key-vault-use-from-web-application

VSTS and MSI

https://blogs.msdn.microsoft.com/azuredev/2017/10/15/devops-using-azure-msi-with-vsts-step-by-step/

Debugging a function locally with Azure AD MSI

https://rahulpnath.com/blog/authenticating-with-azure-key-vault-using-managed-service-identity/

Azure functions V2 with EF Core

Last week I was trying to build an API on top of Azure Functions with a backing SQL database. This sounds like a pretty easy task however that was not the case, here’s my story.

Normally when I use a SQL database in a WebApp, and therefore this also applies to Functions, I use an ORM mapper. I’m pretty familiar with Entity Framework so that’s what I tried. You might think why don’t you use Triggers and Bindings to connect with your SQL database? Well SQL bindings and triggers aren’t supported yet.

If you want to use Entity Framework inside Azure Functions V2 then you would have to use Entity Framework Core (EF Core) since EF core runs on .NET Core which supports .NET Standard 2.0, and .NET Standard 2.0 is the target for Azure Functions v2 projects.

Installation

Well having that said I chose to have a separate class library for my EF Core database context to live in because I have multiple function apps inside my solution, which all have to use that same database context.

EF core requires some Nuget packages, at the time of writing I use the 2.1.2 versions of the understanding packages. The Design package is required when you want to work with migrations, if your not planning to do that then forget about that package. The SqlServer package has actually a pretty cool story. It is possible to use other underlying databases such as CosmosDb, MySql or what have you. So only use that SqlServer package when you have a backing Sql Server database.

1
2
3
Microsoft.EntityFrameworkCore
Microsoft.EntityFrameworkCore.Design
Microsoft.EntityFrameworkCore.SqlServer

Do not install the following packages.

1
2
Microsoft.EntityFrameworkCore.Tools
Microsoft.EntityFrameworkCore.Tools.DotNet

Those packages got deprecated after .Net core 2.1.3. Before you continue, make sure you have downloaded the latest .NET Core SDK. To check your local version execute:

1
2
> dotnet --version
2.1.400

Setting up the context

Just like with the traditional EF you have to setup a DbContext class with all the DbSets/tables and models and stuff. Generally EF core is simular to EF but there are some differences. A good site with alot of documentation is: https://www.learnentityframeworkcore.com/. Your context might look like this:

1
2
3
4
5
6
7
8
9
10
11
12
13
14
15
16
public class MyContext : DbContext
{
public MyContext(DbContextOptions<MyContext> dbContextOptions) : base(dbContextOptions)
{
}

protected override void OnModelCreating(ModelBuilder modelBuilder)
{
}

public DbSet<Order> Orders { get; set; }

public DbSet<Client> Clients { get; set; }

...
}

Azure Functions V2 Dependency injection

After setting up your DbContext you probably want to use it in your Azure Functions. In order for you to effectively do that you have to setup proper dependency injection. Sadly this is not yet supported out of the box in Azure Functions V1 or V2 so you’ll have to build it your own. Don’t be sad I have found a pretty good implementation on Github. Once you have a project with that code you can just reference that project from within your Azure Functions project or just create a Nuget package.

All you then have to do is setup a ServiceProvider and add your dependencies simular to what you would have done in ASP.net core for instance. Note that the package Microsoft.EntityFrameworkCore contains a AddDbContext method that is build for injecting EF Core DbContexts.

1
2
3
4
5
6
7
8
9
10
11
12
13
14
15
16
17
18
19
20
21
public class ServiceProviderBuilder : IServiceProviderBuilder
{
public IServiceProvider BuildServiceProvider()
{
IConfigurationRoot config = new ConfigurationBuilder()
.SetBasePath(Environment.CurrentDirectory)
.AddJsonFile("local.settings.json", optional: true, reloadOnChange: true)
.AddEnvironmentVariables()
.Build();

var connectionString = config.GetConnectionString("SqlConnectionString");

var services = new ServiceCollection();

services.AddSingleton<IDemoService, DemoService>();

services.AddDbContext<MyContext>(options => options.UseSqlServer(connectionString));

return services.BuildServiceProvider(true);
}
}

Once you’ve setup the registration then it’s very easy to inject it into your Azure Functions, take a look at this sample:

1
2
3
4
5
6
7
8
9
10
11
12
13
14
15
16
17
public static class DemoFunction
{
[FunctionName(nameof(DemoFunction))]
public static async Task<IActionResult> Run(
[HttpTrigger(
AuthorizationLevel.Anonymous,
"get",
Route = "demo/route/{id}")]HttpRequestMessage req,
[Inject] MyContext myContext,
string id,
ILogger log)
{
var order = myContext.Orders.FirstOrDefault(x => x.Id == id);
order.Paid = true;
await mspContext.SaveChangesAsync();
}
}

Migrations

So we’ve got a DbContext setup and injected it into our Azure Functions, the next thing what you probably want to do is to use Migrations. EF core comes with great command line tooling, remember when we were using the Package Manager console to execute some Powershell? Finally those days are over. With the new dotnet ef tooling you can just do it from the command line.

There is no such thing as Enable-Migrations anymore, you just add a Migration and you’ve enabled it. The command to add a migrations is: dotnet ef migrations add <name>.

Remember that I created a Shared Class Library which targets .NET Standard? Well If you get the following error you’ve done the same as I did:

1
2
3
> dotnet ef migrations add InitialCreate

Startup project 'MyProject.Shared.csproj' targets framework '.NETStandard'. There is no runtime associated with this framework, and projects targeting it cannot be executed directly. To use the Entity Framework Core .NET Command-line Tools with this project, add an executable project targeting .NET Core or .NET Framework that references this project, and set it as the startup project using --startup-project; or, update this project to cross-target .NET Core or .NET Framework.

An easy work around is to enable multiple TargetFrameworks, note that its plural, add an ‘s’ after TargetFramework. If you add a netcoreapp target framework then your Class Library can execute on its own, even without a static void main() or something like that.

1
2
3
4
5
6
7
8
9
<Project Sdk="Microsoft.NET.Sdk">

<PropertyGroup>
<TargetFrameworks>netcoreapp2.0.7;netstandard2.0</TargetFrameworks>
</PropertyGroup>

...

</Project>

If you execute the dotnet ef migrations add <name> again then you will probably get the following error.

1
2
3
> dotnet ef migrations add InitialCreate

Unable to create an object of type 'MyContext'. Add an implementation of 'IDesignTimeDbContextFactory<MyContext>' to the project, or see https://go.microsoft.com/fwlink/?linkid=851728 for additional patterns supported at design time.

This error states that you do not have setup a DbContextOptions object for your DbContext class. In other words during command line execution it doesn’t know where to execute or check the migrations on. In order for you to workaround this you’ll have to implement a IDesignTimeDbContextFactory<MyContext>. You’ll not have to reference it anywhere, the tooling will just check for the existence and initiate the class. I chose to create an appsettings.json file and inject a connectionString inside that file.

1
2
3
4
5
6
7
8
9
10
11
12
13
14
15
public class DesignTimeDbContextFactory : IDesignTimeDbContextFactory<MyContext>
{
public MyContext CreateDbContext(string[] args)
{
IConfigurationRoot configuration = new ConfigurationBuilder()
.SetBasePath(Directory.GetCurrentDirectory())
.AddJsonFile("appsettings.json")
.Build();

var builder = new DbContextOptionsBuilder<MyContext>();
var connectionString = configuration.GetConnectionString("SqlConnectionString");
builder.UseSqlServer(connectionString);
return new MyContext(builder.Options);
}
}
1
2
3
4
5
{
"ConnectionStrings": {
"SqlConnectionString": "Server=tcp:whatever.database.windows.net,1433;Initial Catalog=whatever;Persist Security Info=False;User ID=whateveradmin;Password=secret;MultipleActiveResultSets=False;Encrypt=True;TrustServerCertificate=False;Connection Timeout=30;"
}
}

If you try the command again, it should work.

1
2
> dotnet ef migrations add InitialCreate
Done. To undo this action, use 'ef migrations remove'

CI / CD

Last but not least you probably want to generate migrations and execute them from your CI/CD environment. This way you’ll get a fully managed way of migrating/managing your database for all different environments.

VSTS

In VSTS you just setup a build with the following steps: * dotnet restore * dotnet build * dotnet publish - 
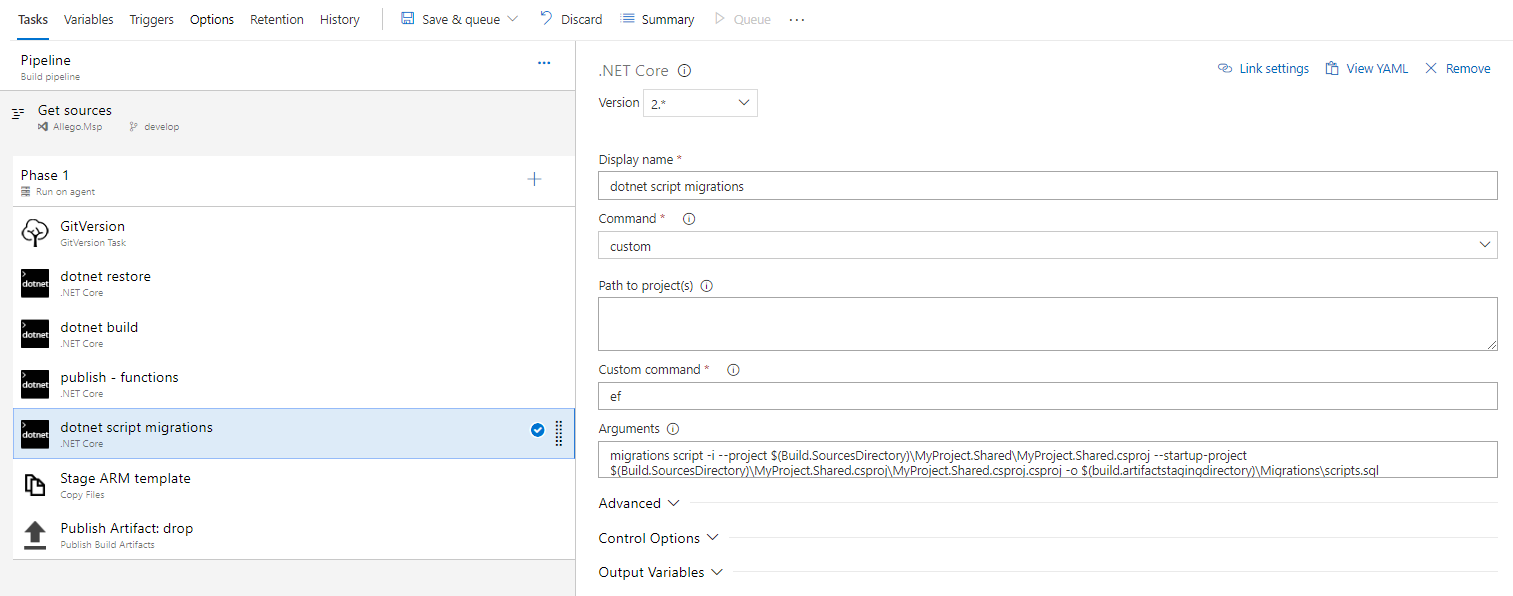
Name the projects of your function apps. * dotnet custom - Add `ef` as custom command - Add the arguments below. Set the project and the startup-project to your Class Library. * Stage the ARM template * Publish the artifacts
1
migrations script -i --project $(Build.SourcesDirectory)\MyProject.Shared\MyProject.Shared.csproj --startup-project $(Build.SourcesDirectory)\MyProject.Shared.csproj\MyProject.Shared.csproj.csproj -o $(build.artifactstagingdirectory)\Migrations\scripts.sql
Its important that you add the `-i` argument. This argument will generate the migrations script in such a way that it checks if the migration is already executed on the database. This prevents the pipeline from applying the same migrations twice. Notice that the migrations script is outputed to the artifacts directory which is published at the last step of the build. 
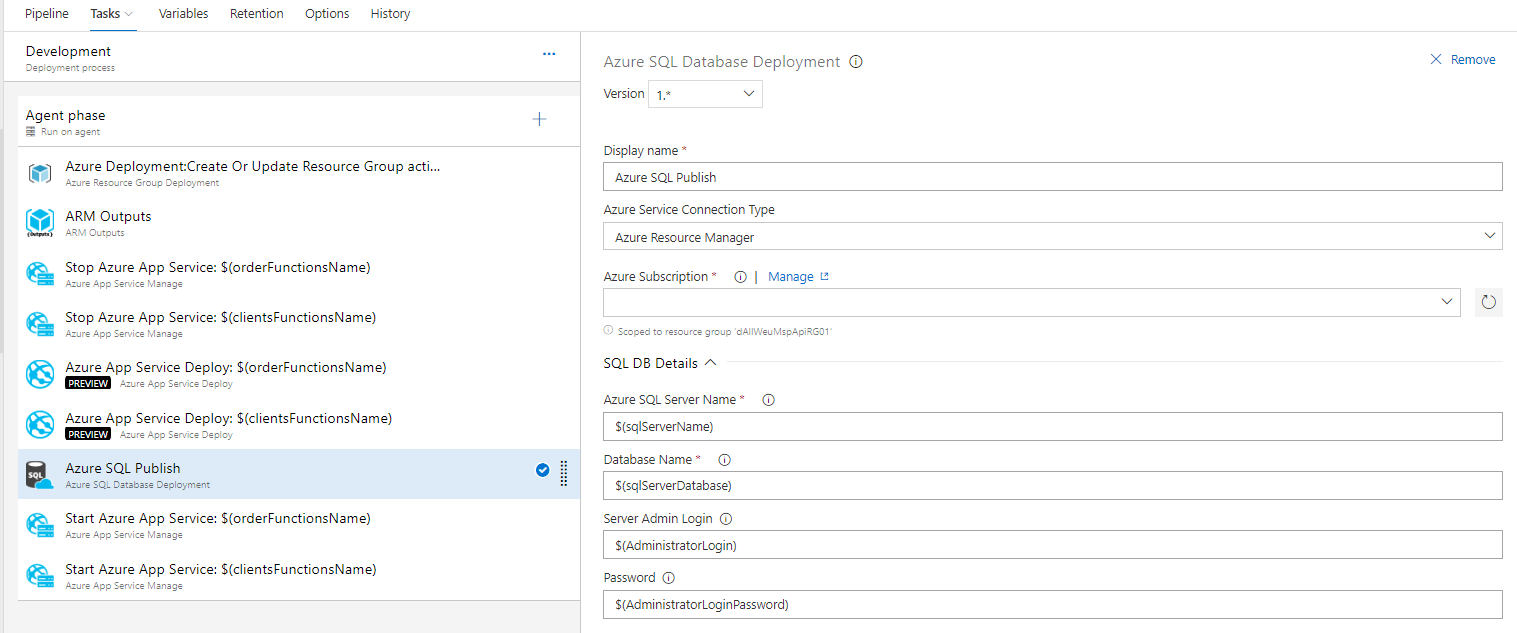
In the release part of the CI/CD pipeline you'll just have to the following: * Execute the ARM script * I use ARM script outputs to get the SQL Server name and Database name. * Stop your Azure Functions * Redeploy them * Execute the migrations script against the database * Restart the Azure Functions.

Well that’s it, you’ve got Azure Functions V2 running Entity Framework Core in Azure! Thanks for reading and happy coding.

Some tips and tricks

Just some tips and tricks.

Don’t worry about this warning. Since EF Core tools are build into the .NET Core tooling you might have mismatches with your EF Core packages.

1
The EF Core tools version '2.1.0-rtm-30799' is older than that of the runtime '2.1.1-rtm-30846'. Update the tools for the latest features and bug fixes.

It can also occur that you only get this warning in VSTS. That might be the result of different .NET Core SDK’s on your client pc and VSTS. Check this page out to see what version of dotnet is running in VSTS.

Adding the -i argument prevents migrations from being executed twice.

1
> dotnet ef migrations script -i

It adds the following check to the generated SQL:

1
2
3
4
IF NOT EXISTS(SELECT * FROM [__EFMigrationsHistory] WHERE [MigrationId] = N'20180823120412_InitialCreate')
BEGIN
-- Generated migrations code here
END

To remove all migrations and start over just simply execute this.
It can be handy at the initial development.

1
2
> dotnet ef database update 0
> dotnet ef migrations remove

Azure Service Health

The Azure cloud provides data redundancy, global data centers, disaster recovery, SLA’s, so you would easily forget that incidents can happen. It might not be likely, with all the automatic healing, and services within Azure, but in case something is down, it is crucial to be able to have insights in what is happening, and even better, to be in control. This article describes the several options available for global Azure monitoring, and highlights the features in Azure Service Health (Azure Status)

Azure monitoring

Azure contains a massive amount of services, and provides an extensive set of monitoring services. Monitoring can be done roughly on these levels (this is an short overview, more services are available):

  1. Application level - for this Application Insights is ideal, it provides analytics on all events monitored (out of the box, custom events, and even events from Azure services), and has some powerfull features, such as anomaly detection, which is able to distinguish normal vs extrodinary events.

  2. Service level - for this Log Analytics or Operations Management Suite (OMS) can be used, which enables you to log all activity within Azure resources, and specify metric based alerts (such as spikes in data in / requests etc)

  3. Cloud level – Azure Service Health monitoring is a valuable service, which helps in case of any interruption, events within all of the Azure datacenters, and services, which might have impact for you as a customer.

In this article we’ll describe the following Azure Service Health features:

  • Portal feature
    • Health Map - which can be used in the Azure portal and show the actual status
  • Monitoring features
    • Health Alert - which is an type of alert fired when an issues is detected within Azure, impacting resources
    • Action group - which is used to send out alert information, and which can help to trigger workflows

Portal feature

Health Map

Within the Azure portal it’s easy to setup an Azure Service Health map, it takes only a few clicks.

  1. We login to the Azure portal
  2. Click all services, filter on “Service health” (suggestion: mark it as favorite)
  1. Within the service health blade it’s possible to setup the map, but also view:
    a. Service issues (any issues within Azure)
    b. Planned Maintenance (planned activities by Microsoft)
    c. Health Advisories (adivise based on service issues by Microsoft)
    d. Health History
    e. Resource Health (current status)
    f. Health Alerts (configured alerts)

  2. From the tab ‘Service Issues’, perform the following actions:
    a. Select the subscription(s), for which Health alerts needs to be monitored
    b. Select the regions which are relevant
    c. Select the services used to monitor
    d. Click on ‘Pin filtered world map to dashboard’

Navigate to the Azure Dashboard (close all blades/tabs), and a similar maps as shown below is now added, any issues with the selected region/applicable services are displayed in the map

Monitoring features

In case an issue is detected by the Azure Service health, an alert is fired. In order to do something with this alert, an action group needs to be linked to this alert.

The action group is configured, and based on the action type, information is pushed to a service. This flow has to following steps, in this section each step is explained

Azure Health monitoring

This is the service which enables the health monitoring. Click on ‘Health Service’, this can be done through the menu item ‘Health Service’, or within the ‘Monitor’, in the section: ‘Service Health’

Now click on ‘Health Alerts’ in order to set up a new rule.

Azure Health alerts

We can now define alerts and specify which subscription, service, region is monitored;

  1. Define the conditions
  2. Select the Event types, the following event types can be selected:
    • Service Issue - outage/issues within Azure
    • Planned maintenance - Azure service affected by scheduled maintenance (notitications are sent upfront)
    • Health advisories - suggestions by Microsoft to mitigate problems base on a Service issue (e.g. routing data etc)
  3. Enter the alert details
  4. In case there is no action group, ‘Create a new Action group’ *

Action group

The action group is a definition, what actions are taken, in case an alert occurs. The action group is basically a container which can be linked to an Alert, in which Action types can be defined.

  1. Choose the subscription / resource group
  2. Select one or more action types
    a. Configure the action type

Considerations:

  1. An email-sms-voice seems to be the most obvious types of alerts to use, as it’s a risk to let a function/logic* app handle outage, without being sure that the outage is affecting these types of services.
  2. A WebHook, could be very interesting, as it allows you to notify an external hosted service.
  3. To mitigate problems, the Azure Automation Runbook enables you to run a workflow, such are shutting down services ** changes routes, so that the impact is limited.
  4. The ITSM connector,*** which can create service tickets in your preferred service management tool.

* Functions/Logic apps needs to be defined in the subscription in which the Alert is defined
** The Automation RunBook, is either a standard one, or the one saved in the User library.
*** The ITSM is a connector, which supports the following service management tools: ServiceNow, System Center Service Manager, Provance and Cherwell

Automation

ARM template

Based on our configured alert, it’s now possible to create additional alerts, and use the existing configuration as an template. With the Azure resource explorer, we can navigate to our subscription, select the Operation privder ‘Microsoft.Insights’ and view our template and re-use this. It’s also possible to use the Azure Template feature, and deploy directly from within Azure, an example of such a template can be found here: Service Health Template.

** This blog is written by: **