What is Azure AD Managed Service Identity (MSI)
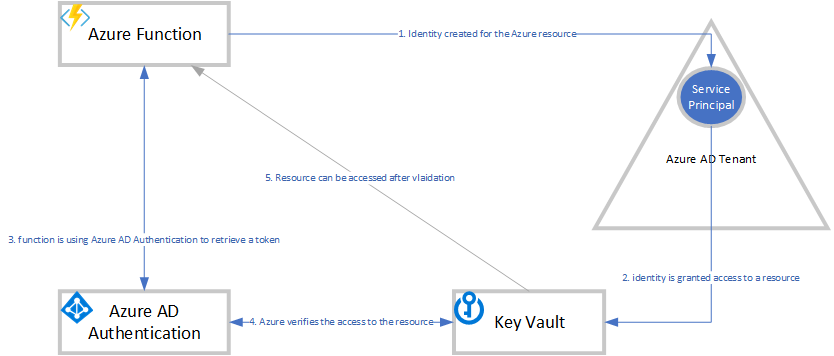
Azure AD MSI is an Azure feature, which allows Identity managed access to Azure resources. This improves security, by reducing the need for applications, to have credentials in code, configurations. It creates an identity, which is linked to an Azure resource. The identity can then be granted access to Azure resources. This allows for access management on identity level, and one of the advantages, that the Identity management itself is done by Azure.
”A common challenge when building cloud applications is how to manage the credentials that need to be in your code for authenticating to cloud services. Keeping these credentials secure is an important task. Ideally, they never appear on developer workstations or get checked into source control. Azure Key Vault provides a way to securely store credentials and other keys and secrets, but your code needs to authenticate to Key Vault to retrieve them. Managed Service Identity (MSI) makes solving this problem simpler by giving Azure services an automatically managed identity in Azure Active Directory (Azure AD). You can use this identity to authenticate to any service that supports Azure AD authentication, including Key Vault, without having any credentials in your code.
Managed Service Identity comes with Azure Active Directory free, which is the default for Azure subscriptions. There is no additional cost for Managed Service Identity.”
(from: Azure AD Intro)
Azure AD MSI Setup options
There are several options to setup MSI, this article will give an impression how to setup AD MSI using the Azure Portal.
Azure Portal
The most easiest method is to use the Azure Portal. This provides an intuitive way, and shows which features are supported. The suggested approach, is to setup features in the Azure portal to have a good idea on the desired setup, and then use the Azure resource explorer to define the arm script.
ARM
Setting up the AD MSI with ARM is possible, at the moment there are some PowerShell scripts required to set up an VSTS pipeline. One thing to keep in mind, is that a new Azure Identity will be created, so the difficult part of the ARM template, is linking an existing users and grant them permissions.
PowerShell / Azure CLI
As with all Azure features, it’s possible to use PowerShell and the Azure CLI to setup the MSI. One important aspect of this feature, is that it’s managed in Azure, which means local debugging becomes complex. To resolve this, it’s possible to use the Azure CLI to is the easiest way to perform local debugging (see this article).
Walkthrough - enable Azure AD MSI for existing functions
Objective
In this walkthrough, we enable Azure AD MSI for an existing Azure Function The function retrieves a secret from Azure KeyVault. In the initial implementation
the function had to retrieve the KeyVault Id & secret in the configuration file.
CONFIG FILE
1 | <!-- ClientId and ClientSecret refer to the web application registration with Azure Active Directory --> |
CODE TO ACCESS TOKEN
1 | //the method that will be provided to the KeyVaultClient |
CODE TO RETRIEVE THE SECRET
1 | var kv = new KeyVaultClient(new KeyVaultClient.AuthenticationCallback(Utils.GetToken)); |
The problem with the code shown above is;
- Any change in the KeyVault security resulted in downtime in the function
- It was not clear who was able to access the KeyVault
Why AD MSI?
With the new approach, we will make sure that only the function is able to access the KeyVault. By enabling Azure AD MSI, one the advantages, is that we do this using an Identity linked to the Azure function. In the new workflow, the Azure function has no need for any configuration, thus the function is more secure, and all the management of access, is done in the KeyVault.
Azure Function - Enable AD MSI
Within our Azure function, we navigate to platform features, and click on ‘Managed Service Identity’ (note that this is also supported in several other Azure services such as WebApps).

We can enable the feature, which will create an Azure Identity
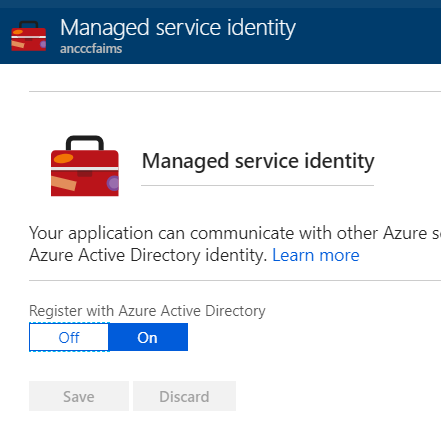
This has created an Identity, recognizable by the name of the function we created.
We now have completed the first step, 2 things needs to be done:
- Manage access for the identity
- Update the Code in the function
Key Vault Access
The CCC provides a Blueprint and service to create a KeyVault, in summary, it allows for storage of secrets/certificates (with renewal procedures), and is highly recommended to store confidential data in (see: Architecture Blueprint Azure Key Vault.docx). We will assume a KeyVault is already available, and will configure the identity;
- We click on Access Control (IAM)
- Click Add
a. Choose the role ‘Reader’
b. Select ‘Function App’, in the dropdown ‘Assign Rights’ (note that we have several types available)
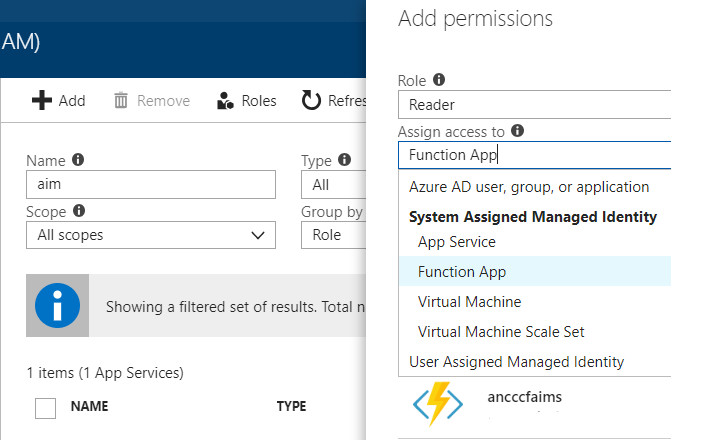
c. Choose the appropiate subscription
d. Choose the appropiate resource group
e. Select the Identity
f. Click save
What have we done? We now have granted the function to access the Key Vault, with the specified Identity. Any decision to revoke access, change permissions, can now be defined in the Key Vault resource itself.
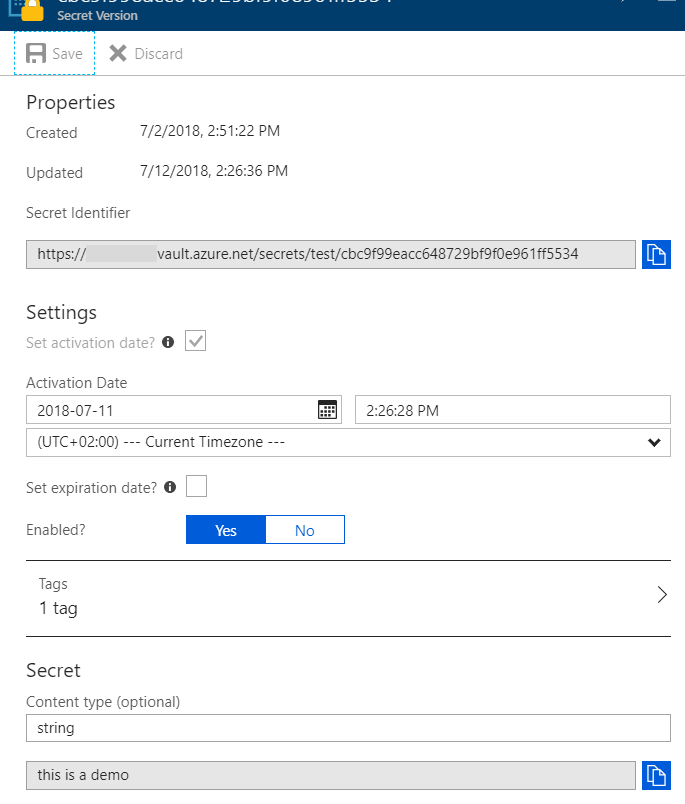
Our sample secret within the Key Vault;
Azure Function - Code Change
We have now ensured that the function can retrieve data from the KeyVault without requiring a configuration. We now need to make the following changes
- Remove the configuration for SecretKey-Value, so that we only have the URI configured;
CONFIG FILE
<!-- SecretUri is the URI for the secret in Azure Key Vault -->
<add key="SecretUri" value="secreturi" />CODE TO ACCESS TOKEN
Obsolete!
CODE TO RETRIEVE THE SECRET
1 | var azureServiceTokenProvider = new AzureServiceTokenProvider(); |
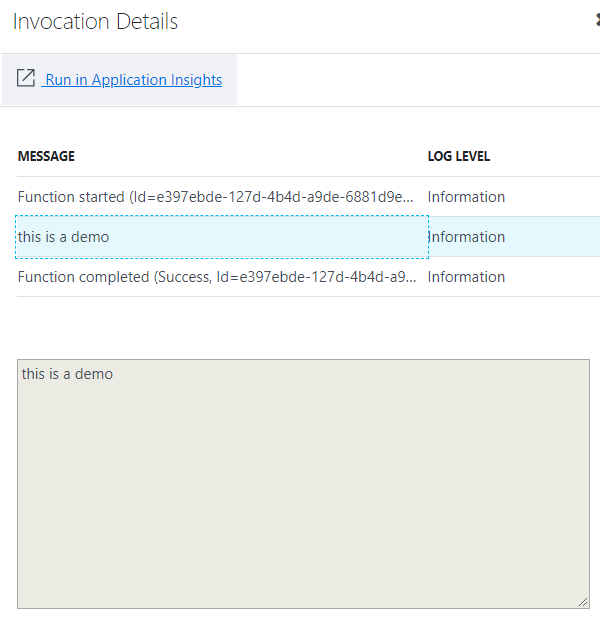
Output from the function
Summary
As shown in this simple example, it’s quite easy to enable Azure AD MSI for your application. Using Azure AD MSI, results in a lot of benefits. Besides manually configuring this, it’s also possible to set this up using ARM scripts, VSTS, with the following article
Resources
Intro
Supported Azure services
https://docs.microsoft.com/nl-nl/azure/active-directory/managed-service-identity/overview
Web Application accessing a KeyVault using Azure AD MSI
https://docs.microsoft.com/nl-nl/azure/key-vault/key-vault-use-from-web-application
VSTS and MSI
https://blogs.msdn.microsoft.com/azuredev/2017/10/15/devops-using-azure-msi-with-vsts-step-by-step/
Debugging a function locally with Azure AD MSI
https://rahulpnath.com/blog/authenticating-with-azure-key-vault-using-managed-service-identity/